Check these out too...

Thursday, March 31, 2016

Lingerie tales -- outwitting the product police


The product police have several branches; besides the guys who keep track of products you love and take them out of production, there are some who keep track of products you love and introduce design flaws.  I'm sorry to say that the second bunch have long been active with the bras that I have worn for a long time.  (Male readers with delicate sensibilities might want to take a pass on the rest of this post.)

The bra straps on this model are made by folding some tricot knit around a base and fusing the edges together on the back side.  Unfortunately, long before the bra is ready to be discarded, the fusing starts to come undone and the two halves ooze outward, exposing a line of scratchy used glue that does not feel nice against your shoulder.

I should point out that I am the descendant of the Princess known for her relationship with the Pea.  I hate little external irregularities that impinge upon my perfect, sensitive body.  I always cut out the labels from my clothing (irritating on the back of my neck), can't wear shoes with thread ends on the inside, can't sleep if there's a wrinkle in the mattress pad.  So a line of scratchy stuff over my shoulder will drive me crazy.  Over the years I have used various techniques to repair these straps by pulling the tricot edges back together, some involving hand sewing, others involving careful pinning and machine stitching.

A past repair

This week I took another culprit to my studio, resigned to spending a half hour fixing it.  But inspiration struck.  Why repair the strap when I could just turn it upside down?  I cut the stitching that held the bra strap to the back of the bra, unthreaded the other end of the strap from its metal ring, turned the strap upside down, rethreaded it, and stitched it back to the bra the other way up. Total time, maybe five minutes, of which one was figuring out whether it would really work and one was rethreading the machine with the right color.

Before: beautiful side up; scratchy side against my shoulder

After:  scratchy side up; beautiful side against my shoulder

Take that, product police!!

Monday, March 28, 2016

Breaking all the rules


I've been writing a lot about drawing recently, but that doesn't mean I haven't been putting in my hours at the sewing machine.  Still making acres and acres of distressed white quilting for flag-type quilts, and I want to tell you how liberating this process is!

For some time I have been feeling more and more constrained by and impatient with the traditional quilt format with its perfect piecing, flat batting, beautiful quilting and neatly finished edges.  Too bad, in a way, because I have long ago mastered the skills necessary to execute that format flawlessly.  But I have lately been feeling that the perfect quilt-police-approved technique is like painting yourself into a corner of the museum -- quilts over there in the corner, "real art" out here in the middle of the room.  And also, as I get older and more decrepit, it's physically harder to do the perfect technique on work as huge as I like to make it.

So this spring I'm in rebellion, and feeling quite frisky about it.  Instead of making a huge top and sandwiching and quilting it, I'm making modules: small units, each one sandwiched and quilted. I start with a rectangular piece of miscellaneous fabric as a backing and lay it upside down on my worktable.  Some of my backs are old fabric recycled after decades as home furnishings; some are bits of piecing that never made it as far as a quilt; some are small pieces of fabric left over from other projects or rescued from the grab bag.

these used to be a pillow

somebody's discarded block, sashed with somebody else's leftover fabric

Then I go to my box of leftover batting -- all those strips and bits cut off from larger quilts that I can't bear to throw away.  I lay them out to cover the backing, pretty much.  If there are gaps between pieces of batting I might plug them with an even tinier bit of batting, or I might just let the gap be.

I do the same thing with the top layer, finding miscellaneous fabric to fill the rectangle.  I pin the sandwich together so it won't fall apart on the way to the sewing machine, then stitch as needed to hold all the pieces together.  I might toss down some random threads or fabric bits for added texture, and eventually I progress toward stitching a regular grid over the top of everything.

After the modules are complete I'm joining them at the edges.  You might have used this technique as taught by the quilt police, where you place the two modules face to face, stitch along the appointed seamline, then flip the larger piece over and make a neat binding to cover up the back of the seam.  I have done it this way too in the past, but no longer.

Instead, I butt the two modules together and stitch back and forth over the edges until the two pieces are melded together.  Sometimes one of the modules has an overhanging piece of fabric that I can overlap, or sometimes I lay down a narrow strip to bridge the gap before I start stitching back and forth.  Or not.  The joins might disappear into the overall texture of the quilt, or they might stand out because of the dense stitching -- I don't care.

can you spot the horizontal join? of course you can

This is giving me a quilt with a big chip on its shoulder, which suits me just fine.  It's the antithesis of nice.  It's thumbing its nose at the conventions of the quilt police, opting for impact rather than technical perfection.  And I can't tell you how happy I am making it.


Friday, March 25, 2016

Drawing -- Book 2


I apologize if I'm going on too much about my drawing, this being allegedly a blog predominantly about fiber art, but since I took on a daily drawing at the start of the year, and since I enrolled in a drawing class, I have found that it's in the front of my consciousness.  It seems that every day I discover something new -- a new technique, a new insight, a new facility with some tool.

The other night as we drove home from an evening gathering the full moon was ahead of us, wreathed in clouds.  I found myself wondering how I would go about drawing it, noticing where the value change was abrupt and where it was gradual.  Three months ago I would have enjoyed the moon, but would never have observed it so carefully.

I noticed the same effect six years ago when I decided to do a photograph as my daily art project.  After a couple of months of carrying my camera everywhere and thinking always of what I could shoot, from what angle and from how close, I started to look at the things I saw with a newly critical eye.  My photos got better, and my sensibility changed forever; even if I don't have my camera with me I'm seeing things with a different eye than I had before.

In December when I decided on a daily drawing project I set my rules that I would buy various sketchbooks and fill each one in turn.  My first book was 80 pages of 3.5 x 4.75 inch white paper, and it didn't take me too long before I started thinking that it would be nice when I finished that book and could move up to something a little larger.  I did my last drawing in that book on March 21 and proceeded to my second book, which I had purchased in December in anticipation of the project.

I bought this book because it was really cheap -- $2 for 45 pages of 4 x 5.75 inch brown paper.  In contrast to my first book, this paper has wrinkles, I guess you would call them, as well as flecks of other materials.  I saw a fine turquoise thread, some larger blobs of what might be plant material, some lighter bits that are kind of shiny.  Because of the color, I'm probably not going to be able to work in the graphite pencils that I have been favoring in the previous sketchbook.  I'll try out all the different tools in my box, but have started with ultra fine point Sharpie which does give a nice black line that shows up well against the brown.

Drawing in ink is quite a different story than drawing in pencil.  Most important, you can't erase it, so be prepared for multiple lines (my drawing book calls them "restatements").  You can't shade in large expanses with the side of your pencil, so shadows have to be done in crosshatching.  And you can't blend the pigment to gradually change value.  As a result, I expect my second book of drawings will have a much different character than the first, and I hope to see improvement as I learn to work in this new environment.

I can hardly wait to see how this works out!  

Wednesday, March 23, 2016

Drawing with Professor YouTube


I don't know why this came as such a surprise to me, but I was amazed to discover, in the course of a research project for my drawing class, that there exists a large cottage industry of making YouTube videos on how to draw things.  I have never been an aficionada of YouTube, partly because I don't usually plug in the speakers on my computer (hate it when you get beeps and dings and plupfs for random keyboard activities).  But when we were assigned to find and look at several videos on drawing the same thing, then report back on the best one, I dutifully went on an exploration.

I thought I'd try to find "how to draw a sphere" because that seemed so pure -- so untainted by the hand of the artist, so uncompromising as to what is the right way and what is the wrong way.  And besides, I had just been struggling with shading round objects.  I was surprised to find that a few of the half-dozen videos I watched did not do a very good job, but I found one that was OK and did a couple of daily drawings from it.


Everybody in the class had to report back on the videos they had found, and I watched them all.  As a result, I learned to draw an eye and a face.


Later I followed along to draw a cat, a box, a fist, a nose and a dog.


Some of the videos I have watched have been pretty good; others have been pretty bad.  Remember, there are no editors to keep junk from being posted on the internet; caveat artifex.  But even the bad videos are often fun to watch, thanks to the speeded-up sections where the pencil zips around the drawing, laying down lines and shading faster than you can imagine.

Some of you readers have left comments indicating that you might be tempted to try a bit of drawing too, and if you are, you might check out some videos and see if that's an approach that you enjoy.  If you find an artist you like, who's a good teacher and has a good presentation style, make a point of watching some others by the same person; usually a good teacher will have posted many different lessons.  I like to check the length of a video before I commit to drawing along; it's going to take a bit longer than the duration of the clip.  So if you want to spend only 15 minutes on your drawing, don't choose a 26-minute video!  But there are plenty of 5-minute videos out there that you can watch for an easy way to dip your toe into the frightening waters of drawing.


Monday, March 21, 2016

Other artists think about flags


With my longstanding fixation on the flag, I have been alert to its use in other people's art as well as my own.

I found lots of flags among the Impressionist painters; their bright flutter must have been magnetic to artists trying to capture the momentary light of a scene.

Edouard Manet, Rue Mosnier Decked with Flags, 1878

Claude Monet, Garden at Sainte-Adresse, 1867


Childe Hassam, Flags on the Waldorf, 1916

More contemporary artists have used the flag too, but often in a political or ironic sense rather than simply as pictorial objects.

Faith Ringgold, Flag Is Bleeding


Larry Rivers, The Last Civil War Veteran, 1959


James Rosenquist, A Free for All, 1976

And the godfather of all flag art, Jasper Johns has used the flag as a recurring theme, making more than 40 paintings in different sizes and color palettes.


Jasper Johns, Flag on Orange Field, 1957

Jasper Johns, Green and Orange Flag, 1969

This one is painted in complements; if you stare at the white dot in the middle for a while and then look at a white wall, you'll see the RWB flag.

Johns' flags raised all kinds of consternation among art critics and theoreticians: were they actually flags, or were they pictures of flags?  It's hard for anybody other than art critic/theoreticians to see what the difference is, or why it matters, but thousands of trees were sacrificed for the discussion.  I don't particularly care about the answer, but I really love the flags (and everything else Johns has ever made).


Friday, March 18, 2016

Thinking about flags


I mentioned in my last post that I've had flags on the brain for quite some time, and promised to tell you about why that's such a powerful image for me.  I've always loved the flag.  Back in the 70s there was a time when Vietnam hawks and social conservatives (often the same people) appropriated the flag as a symbol of conservative hawkery; waving the flag or wearing a flag pin showed your disdain for filthy hippies, peaceniks and liberals of all sorts.  It took years before we filthy hippies were able to reclaim the flag as ours too.  Since then I have made a point to celebrate the flag whenever I can.

I rarely walk past a flag without taking a picture.  In my years of daily and weekly photographs posted on the blog, I've shown many many pictures of flags, like this one:


from Photo Suite 27, 7/1/2012


In 2008, I made a quilt consisting of 4,084 tiny flags, one for each of the U.S. military war dead in Iraq.

Postage 3: Memorial Day, detail

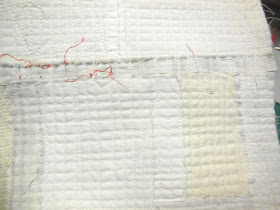
And I'm in the midst of making a new flag quilt right now.  It's going to be one of my Quilt National entries so I have to play coy and not show you more than a peek, but here's what the red stripes look like:

and here's what the white stripes look like:

If you think this flag has seen better days, you're exactly on my wavelength.  Contemplate your own metaphor.

Wednesday, March 16, 2016

Flag art by Brad Devlin


I went to the opening of an art show this week that really resonated with me, because the artist's subject is one that I've been fascinated by for years.  Brad Devlin is a local artist whose work for many years has been to recycle found objects and junk, and this show consisted entirely of flags.

Brad Devlin, Feel The Bern
Brad Devlin, Take Five
 Brad Devlin, Manifest Destiny
Brad Devlin, Melting Pot #3 (detail below)

(yes, they're tiny carpet samples)

Brad Devlin, D Boon Kilt A Bar

I find it intriguing how the basic format of the American flag -- starry union in the corner, stripes of alternating color -- is so ingrained in our minds that you can vary it considerably and still say "flag."  Even if you saw only one of these works, without a title and in any context, you would know it's a flag.

Hold that thought -- I'll be writing more on the subject of flags in my own art in subsequent posts.


Tuesday, March 15, 2016

Monday, March 14, 2016

On retreat 2


I wrote last week about my days at the retreat center, and how I started off frustrated.  Fortunately that changed.

The third day of the retreat, my drawing teacher (who is also a member of my fiber arts group) showed up and seemed amenable to being distracted from her own work.  I was able to get a lovely afternoon of one-on-one tutoring.  I spent that day working on still life drawing and finished two large pages in the sketchbook, which gave me a boost. The last day I worked on a much more elaborate still life and finished it just before we had to clean up and go home.

When you try to set up a drawing exercise in a strange place, you have to scrounge around for props and equipment that would be easy to find at home.  I rummaged through all the kitchen cabinets to find the right pottery (I wanted ones with no patterns to distract and complicate the drawing).  Then I had to find a pedestal to put them on.

I would wager this is one of the first times in history that these two useful tools have been made to work together.

I found a clean pillowcase in the linen closet to drape my pedestal, and set it up in front of a white flannel design wall.  And I used the wood rack where all the plastic rulers live to hold one ruler, tipped vertically, to help me gauge how the different parts of the still life composition related to one another.


I loved this apparatus, so much that I think I'll try to rig up a similar rack at home.  It was so helpful to be able to get a plumb line through the middle of the composition without the traditional hold-the-pencil-out-and-measure-with-your-thumb approach that I have not yet properly learned.

Here's what the still life looked like, posing for me:

And here's what the drawing looked like:

I've made such progress in the two months I've been working seriously at drawing and I was really proud of this piece.

Friday, March 11, 2016

On retreat 1


I spent the beginning of this week at my twice-annual retreat, just 30 minutes up the road but it might as well be hundreds of miles away.  Something about your work table being 2 minutes away from your bed, and a lack of distractions makes those days quite productive, or at least that's the plan.

This year I repeated my usual approach of bringing paperwork: still working on my longtime series of book review haikus.  I look through old New York Times arts sections, find review of art exhibits, and find haikus in the copy by identifying five- and seven-syllable phrases that put together, not only make nice poetry but faithfully reflect the opinion of the reviewer.  Then I paste the haikus, plus a small picture from the review, into my two little notebooks.

I'm reaching the end of this project, I realized on the first day of the retreat.  Not only are the notebooks getting full, I'm running out of steam.  No wonder, because I've been working on this series for several years, but suddenly this year I detected less enthusiasm than in the past.

I forgot to pack my tweezers, which are indispensable for picking up tiny bits of gluey paper and positioning them for pasting down.  So after fumbling through a half-dozen poems pasting by hand, I decided to simply "write" the poems (the time-consuming part) and wait till I got home to paste them into the book.

I got many finished, but it wasn't a particularly satisfying experience.  I found myself easily distracted by anything else going on in the room, and when you have to force yourself to do art it's a good sign that you should stop making art.  Or at least go make some other art that will make you happier.

I'll tell you about the rest of the retreat in my next post.


Wednesday, March 9, 2016

Channeling Morandi -- I wish


Last week's drawing exercises had to do with light and shadow, and on a beautiful warm morning I took my sketchbook outside to enjoy the bright sun.  I found a white bottle and an oversize white cup and posed them on the deck railing, then drew them from three different angles to capture different shadow patterns.


I'm learning a lot from this class, and a lot of it is not what I expected to learn.  In these drawings, for instance, I learned that while Giorgio Morandi can make wonderful still lifes by putting his pottery against a white wall, I don't think I can.  I still need to figure out how to give some kind of background effect, if only to let the shadows fall on something and to better delineate the edge of the white bottle.  Or maybe I just need to draw that edge with a heavier line.

I think the two most important things I'm getting out of it are a knowledge of the different tools available, and a confidence with holding them.  The specific lessons about where the ears go and how to measure distances with your outstretched pencil are harder to assimilate and perhaps in the long run less crucial.

I don't expect my drawing career to be stellar; what I do want is to become more confident with a pencil or pen in my hand.  I want to make marks (probably not realistic sketches, given my past history) that look authentic and have character and ideally, are MINE.  My drawings are improving with practice -- no surprise there -- but I'm particularly happy that it no longer seems terrifying to pick up the pencil and make lines in the sketchbook.  I'm even feeling better about having a sketchbook at all!