Check these out too...

Tuesday, May 31, 2011

Multiple choice -- the answer

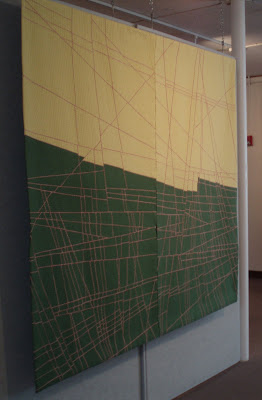
If you chose the version with the yellow on top, you're on the same wavelength as I was.  That's the "right way" -- the way it's in the catalog, and the way it's hanging now.


The quilt started with light over dark in my head before I even bought the fabric, and I don't think I ever questioned its orientation in the months it took to construct and quilt it.  But a few of us spent an amusing couple of minutes the other night turning the QN catalog around, and decided it looked good in all four directions. 

The one thing that seemed jarring to me about the green-on-top orientation, when I realized what I was looking at, was the angles of the corners.  (Here's a head-on view of both orientations so you can see what I'm talking about.)


Because the quilt isn't perfectly rectangular, when it's hung green side up it slants down to the left, whereas the yellow side up slants in a touch from each of its top corners.  When I saw it in person green side up I thought it was a bit out of balance.  Now that I look at it on the screen it doesn't bother me at all.

Since I obviously have sleeves on both top and bottom of the quilt, maybe I'll change it up in future display situations.

(Note to Anonymous -- I put a bottom sleeve on my quilts to help them hang flat. The stick also gives it a bit more weight so the quilt doesn't flutter in the breeze or ripple at the bottom.  Notice how straight it hangs in the photo at the top.  The top sleeve does have my name and the name of the quilt on it, right side up, which should provide a hint to those hanging it, but either sleeve will work functionally.)


Monday, May 30, 2011

Multiple choice

So which version of my Quilt National quilt do you like best?


At the opening reception on Friday night it was upside down, but got rehung overnight. I am embarrassed to report that I was in the room for an hour and a half, including standing in front of my quilt and picking a couple of stray threads off it, before I noticed the problem.

Tune in tomorrow to see whether you agree with me, or more accurately, whether you agree with the version I submitted to the show.  Several people told me they were perfectly happy with the upside-down version, and I guess I must have been too, since I didn't immediately realize there was anything wrong.

In a surprising coincidence, the same thing happened to my friend Marti Plager, who has been in the same small critique/support group with me for more than a dozen years.  The same, both in that her quilt was hung upside down, and that she didn't even notice it for at least an hour.  We certainly are attentive, aren't we?  But I neglected to document both versions of her piece.

Sunday, May 29, 2011

Collaboration project 4

My art theme for the year is collaboration, and today kicks off my fourth such project.  This time my partner in art is Linda McLaughlin, whom I have never met in person although, as you may know from reading my blog, we are twins separated at birth.

Both Linda and I have been posting daily photographs on our blogs for many months.  In the first year of our respective projects, we used photos that had been taken that very day, which made for a powerful incentive to get out there with the camera and take a walk, whether we felt like it or not.

Both of us, having completed a year of daily deadline pressure, decided to continue to post a photo every day, but changed the rules to make it slightly easier.  Now our photos can be taken that day, or found in our archives.  For me at least the new rules have led to new possibilities, as I have gone through old vacation photos to find interesting shots of faraway places.

But after all these months, I think both Linda and I are ready for a new twist on the formula.  So we've agreed to have occasional theme weeks, in which we'll both be posting on the same subject.  Linda chose the subject for this week, architectural details.  So please check out her blog as well as mine, and see how two artists on opposite sides of the country respond to the same "assignment."

Saturday, May 28, 2011

Friday, May 27, 2011

Quilt National opening day

Quilt National '11, the biennial juried show, opened this evening at the Dairy Barn in Athens OH.  Best in show went to Bonnie Bucknam for her quilt "Crater."  It's not only a beautiful composition from across the room, it's gorgeous up close where you can see her beautiful dense quilting.


I've had the privilege of being in several workshops and master class retreats with her at Nancy Crow's barn, and watched her cut and piece many quilts in this same "Geology" series.  Even when I sat next to her for two weeks and watched the fabric going up on the design wall, I was never sure how she was going to make it all fit together, or make those complex curved seams lie flat.  But she always made it work.

In my opinion, it's a well-deserved award for Bonnie.

Thursday, May 26, 2011

Master class

I wrote yesterday about taking a master class with Dorothy Caldwell, and Sandy posted some questions:
"Not having done that sort of master class, can you tell me what part the tutor plays in the process each student is involved with? Are you having tutorial times with Dorothy? Is there time where there are teacher/class plenary sessions? or is it all about having the space?"

Sandy, thanks for asking these questions.  I think master classes vary by teacher -- Dorothy and Nancy Crow are the only two people I have studied with in this format -- but I'll tell you what my experience has been.

At this level you're expected to have a preexisting body of work, which you will introduce to the teacher and the class. Then you announce an objective for the week.  As you begin working on it, the teacher will spend time with you as needed.  Sometimes you'll want help in making decisions, right away or as they come up.  Sometimes you'll want to have a heart-to-heart about your future plans rather than about the work you're doing this week.

There are usually group sessions to discuss subjects of general interest.  This week we talked about studio work routines, where you get inspiration, and websites/blogs/Facebook as means of self-promotion and communication.  Dorothy told us about her latest project, and gave a demonstration of the discharge techniques she uses.

I probably glossed too quickly in my earlier blog post over the role of the teacher.  She is the fulcrum around which the class revolves, and Dorothy is doing a wonderful job.  In my private discussions with her, I've been able to clarify many things about what direction I should take in the future, both artistically and in terms of  "career objectives."

I felt a bit guilty about bringing old work to this class, but have been very pleased with the results.  Dorothy helped me evaluate which pieces were worth finishing, which weren't, which were good enough that I should pursue the series.  She helped me judge which elements in my recent work were worth expanding on, which ones needed improvement, and which ones were successful.

Here I am with part of my huge work wall, color coordinated with my ironing surface -- photo by Dorothy Caldwell

Yes, the space was wonderful and I have accomplished a great deal that would have been difficult at home with my limited design walls.  That plus Dorothy have made a successful week for me.

Wednesday, May 25, 2011

Back at the Barn

It’s been more than two years since I went to a workshop at Nancy Crow’s barn, but here I am again -- my sixteenth week at this glorious facility over the last eight years.  I’ve taken classes and workshops in many venues but none so well suited to sewing large quilts. What makes the barn super in my view is not just the nice tables, deluxe ergonomic chairs or lovely rural solitude, but the huge design walls.

Even when the room is crowded (the largest class I’ve ever been in was 22 students) each participant gets her own 8 x 8 foot design wall. But when the class is small -- this week there are only eight of us -- we can pin work up anywhere in the room.

This workshop is a “master class,” with Dorothy Caldwell, the great fiber and embroidery artist. That means you bring whatever work you want to work on. So what to bring? I have no new work in progress, having just finished a big project. And I didn’t want to start a new piece at a workshop; my work process is so tedious that I could sew 12 hours a day all week and barely make a dent in a big quilt.  It's just that tedious preliminary stitching that I can do so much better in my cramped studio at home, watching trash TV; why waste a week at the barn doing that?

But I had a brilliant idea. I would take advantage of the great wall space by bringing some large quilts from the past that were already partially complete, and see if I could finish them. And even better, I would find those large quilts in my boxes of workshop projects from previous visits to the barn.

So many times I had come home with a project that was not great enough to finish, or simply too big to wrestle with in my design-wall-challenged studio. Or I had come home with an urgent idea for a new project, which took me careening down the road with no appetite for going back and finishing the workshop quilts. Whatever the reason, I had boxes full of workshop UFOs, neatly folded and packed in plastic bags, often with their extra fabric stowed right there.

So on Monday morning I started by pinning up four works in progress. Tuesday morning I expanded to the vacant back of the room and pinned up four more. Such luxury! Some of these pieces I hadn’t laid eyes on for years, since they were packed up at the barn. Looking at all of them anew, I was able to triage and work on those with merit, and pack the losers right back in their plastic bags for subsequent life as baby quilts or placemats.

As of this morning, here’s my scorecard:

- One definite A-list keeper, which I resolved and sewed together on Monday; two hours of cleanup at home and it will be ready to quilt.

- One B-list quilt, not good enough for prime time but good enough to enter in a regional show; I sewed on it all day yesterday and it’s one hour from completion. I’ll take that one home and quilt it up.

- A second A-list keeper, which I plan to finish today, then take home and quilt.

- A second B-list quilt, which I intend to finish by Thursday afternoon; again, I plan to quilt it when I get home.

- A huge piece that I completed at my first Nancy Crow workshop but never got quilted. I hadn’t even looked at it since summer of 2003. It still looks gorgeous, but the consensus is that it’s too much a workshop exercise, clearly identifiable as the strip piecing class project. I will look for somebody to quilt it for me, and it would be stunning in somebody’s living room, but will never be in a show.

I still have several pieces that haven’t come out of their plastic bags yet for evaluation. But I’m feeling quite exhilarated at having made big progress on unfinished business.  And for a change, instead of going home from the barn with half-finished projects, I'll be going home all ready to quilt.

Tuesday, May 24, 2011

Monday, May 23, 2011

Photo du jour

My sweetie with one of the thousands of beverages we've shared in 41 years of marriage -- Happy Anniversary!

Sunday, May 22, 2011

Another quilt finally has its day

I wrote last week about a quilt that I made three years ago that had never been in a show, until now.  In the same show, another quilt, almost the same age, will also have its debut in public, at the Claypool-Young Gallery in Morehead KY, June 4 - July 29.

This one is made with my "postage stamp" technique of little rectangles of fabric held together in the air with lines of stitching.  As with its partner in delayed glory, this one sprang from an unexpected moment when I came into the studio and saw work in progress casually piled on the worktable. But unlike its partner, this one's inspiration came from seeing another quilt in a pile.

I was working on a postage stamp quilt that contained more than 4,000 tiny American flags, and had been sewing and sewing and sewing and sewing for weeks, finally getting toward the end of the project.  The construction technique I use for these quilts leaves them in a huge heap as I work; the heap moves from one end of the worktable to the other as I sew, but never is neatly arrayed until it's finished and folded up into a bag.

The quilt in progress was meant to hang in a grid in space, and as I worked I would generally imagine it that way.  But this particular morning I noticed how delicious the little bits of fabric looked in their tangled heap, and resolved that my next postage stamp quilt would include a heap.  I made this quilt about a foot longer than it needed to be, and asked that it be hung so the bottom part would pile onto the floor.  Except for the day we photographed the quilt, I've never seen it installed and am looking forward to it.

For some reason I wanted to make a red quilt, and as I sewed I wondered what I would call it.  Even though I generally reference disasters and unpleasant occurrences in my quilts, I didn't want to do so with this one.  I'd just put in a highly emotional month sewing the American flags, which commemorate the U.S. military dead in Iraq, and was ready for something cheerful.

Postage 4: Spaghetti Sauce  (detail at the top of the page, in the right-hand column)


I decided that this quilt, with its lush reds cascading into a pool on the floor, is about spaghetti sauce, which happens to be my favorite thing to cook. Here's the artist statement:

I should have been Italian, because I could happily cook and eat pasta at least six nights a week.  As I made this piece, with its red sauce pouring down onto the floor (um, plate), I thought about spaghetti sauce as a metaphor for life.  Every night you have to fix dinner.  Maybe you went to the store and bought ingredients according to a plan; maybe you root around in the fridge to find leftovers or hit the cupboard for a can or two.  The sauce rarely ends up exactly like it did in the past, and some nights are better than others, but it’s usually better than 99% of the world’s supper.

Saturday, May 21, 2011

Multiple sewing machines

Jodi commented yesterday on the little bio that runs in the right-hand column of the blog.  "I see you have seven sewing machines   -- any of the them a featherweight, by any chance? Just wondering as I dopily passed up a good deal recently and am still kicking myself!"

No Jodi, there isn't a featherweight.  Even though featherweights may live in the hearts of sewists everywhere, like Santa Claus, none of them lives in my house.

I did learn to sew on a featherweight, but my mom traded it in on a fancier Singer when I was about ten, and that's the machine I used to upgrade from doll clothes to people clothes.  We were so proud of that Singer because it had an accessory that allowed you to do faux zigzag stitching for buttonholes.  The needle didn't move sideways, but this little accessory grabbed onto the fabric and moved it sideways, as well as forward and back, to make the buttonhole.  (Kind of like free-motion quilting, except you have to be the accessory.)

Trading it in -- that's the key word in my reminiscence.  In those days of course we traded in an old machine upon buying a new one.  Why on earth would you need two?  Why on earth would you want to keep that old outdated featherweight?  Sure enough, after I inherited mom's aforementioned Singer with the faux zigzag, I eventually traded it in on one with a real zigzag, and then traded that one in on my first Bernina.

But when it came time to upgrade to a new Bernina, the lady at the fabric store gave me the best advice I've ever received in terms of equipment.  When I inquired about a trade-in, she said don't do it!  You won't get that much money for it, and it's always better to have a spare machine on hand.  And boy, was she right! 

When the machine has to go into the shop, you're not left unplugged for a week or two or three.  When you go to a workshop, just grab your other machine and go -- you don't have to undo your entire sewing setup (which in my case involves crawling under the table to untwist twist ties galore and unthread the cords from their serpentine paths).  When a friend comes over for a play day, she doesn't have to bring her own machine.  When your granddaughter learns to sew, set her up permanently with her very own machine so you can quilt side-by-side.

Zoe with HER machine


Here's my current roster of machines:
  • my main machine, a Bernina 440, which is securely affixed to my sewing table with a lot of twist ties
  • my backup machine, a Bernina 1630, which I would have never abandoned except for its nasty habit of irregular tension so that the back of the quilting wasn't up to show standards, but its straight stitch is just fine and it likes to go to workshops with me
  • Zoe's machine, a Bernina 1020, which I never would have abandoned except it had no knee lift or automatic needle-down feature, and how can you be a serious quilter without those doodads?
  • my Babylock serger, not used so much now that I have given up garment sewing, but every now and then it comes out of hiding to do a good deed
  • my late mother-in-law's sewing machine, an old clunky Singer portable, which I have never taken out of its case, but after she died and we cleaned out her apartment, I knew the machine needed to go to a loving retirement home, not to the dump
  • an old Bernina 800 that I bought from somebody at a Nancy Crow workshop several years ago and almost immediately gave me buyer's remorse because it had lost its work tray and isn't very usable in its current condition, but someday I may find a tray on eBay or something, or sell it to somebody else
  • a Juki 600, my newest machine, graciously presented to me by the Juki Company after I taught workshops in Japan last year where the participants used these models, and I fell in love with the huge work tray; this is the one I'm going to use on my next huge quilting project.
However, nothing from my mom.  Nothing from my grandmother, the greatest sewing wizard of our family (she had a treadle Singer, which my grandfather later electrified for her).  And no featherweight. 

Friday, May 20, 2011

Finally!!

Every now and then you make a piece that you like a lot, but that somehow fails to impress the jurors who see it.  I've had three or four by that description lying around for a couple of years, dating from a period of immense productivity but relatively few show opportunities  These particular pieces weren't quite as good as their brothers of the same age, and whenever I'd send out three entries, the other ones would get in.

I understand why shows put age rules on their entries -- they want to make sure that viewers' first impressions aren't "my god, that old thing, I saw that at least once before."  And even if a piece hasn't been shown in public, there's a danger that older work isn't up to the best the artist can produce, or simply looks dated because newer work has taken on a subtly different character.  Nevertheless, there comes a time when a mother worries, like the mothers in Jane Austen, that her baby's expiration date has passed with nary a nibble from an eligible suitor.

So imagine my pleasure when not one but two aging virgins, both made in 2008, got to wiggle out from the bottom of the pile of quilts on the bed and go out in public!

The show is sponsored by the Surface Design Association in Kentucky, and will open June 4 at Claypool-Young Gallery at Morehead State University in Morehead KY.

One of the quilts in the show is pieced, in the skinny-line technique I've been using for several years now.  I was experimenting with the use of low-contrast colors for the "bricks" of my bricks-and-mortar patterning, and chose a blue, a green and a brown that seemed about the same value.  Maybe it was poor lighting, or maybe I was preoccupied, but I had pieced together a large expanse of fabric before I realized I was using woodland camouflage colors.  Rats.  I hadn't meant to use military references.  But I'd clearly gone too far to throw it out, or to introduce new colors.  I thought an expanse of plain black-and-beige would add some contrast and cut the military overtones.

My first thought was to place the black expanse underneath the camo expanse, but I came into the studio one evening and saw how the two pieces of fabric had been piled on top of one another   -- look, it's a flag!!!

Crazed 5: Camouflag 

I'll tell you about the second quilt in a later post.

Thursday, May 19, 2011

Inquiring minds want to know...

... more about the Holstein cow with gray haloes around her black spots.  Here are some of her compatriots.

Hey, if you want to know something, just ask.  I'll do my best to oblige!


Wednesday, May 18, 2011

Tuesday, May 17, 2011

Planning vs. plunging -- part 3


More today to follow up on my post about planning and plunging.  From the comments to that post, apparently there are many of us who plunge -- we work (write, sew, whatever) in order to find out what we want to say. We’re the bad girls, the noncompliant students, those who won’t do what we’re told.

By contrast, the good girls are planners. They write their outlines first, then their term papers. They keep sketchbooks and journals, plan out their quilts, arrange their compositions on the design wall before they start to sew. They are teachers’ pets.

Because so many people seemed intrigued and heartened by this line of thought, I want to stick with it for a bit. First, a response to Janet’s comment: “Okay, what's the difference between carrying a sketchbook around and carrying a camera around? Just because you're not putting pencil to paper doesn't mean you're not looking, seeing, thinking about art, which I presume is the point of using a sketchbook.”

Well, there is a difference, in execution if not in purpose. Some people don’t think well with a pencil in their hand; I am one of them. I have long ago realized that although I am working as a visual artist, I do not generally produce images in my head that need to be documented. Instead I produce ideas, expressed in words, that need to be transformed into images. I might jot down my words, but not my images, because they don’t exist yet.

Perhaps this strange brain wiring is why I have come to love my camera so much. When I see images in nature, I do scrutinize them and look for the picture inside the scene. I often take several photos of the same interesting thing, experimenting with cropping, camera angle, zooming in or out either with my controls or by walking closer or farther away. But I don’t know the picture I want to take until I’ve taken a lot, looked at them on the big screen back home, and selected my best. Again, I work in order to find out what I want to say.

Janet is absolutely right about “looking, seeing, thinking about art” -- that is the whole point. But some people do it with a sketchbook, others with a camera, others with neither of the above. Just as we discover the medium and the style that suits us best (fiber? paint? marble?) (representational? abstract? geometric? cartoony?) as artists, we need to figure out the working method that suits.

I realize that my propensity to plunge is one reason I stick with fiber art rather than moving into painting, which in many ways I envy.  I can sew up a wonderful area of red and yellow fabric, pin it up on the design wall, and let the rest of the quilt evolve around it. I don’t know yet -- and don’t have to know yet -- whether it’s going to end up in the center of the quilt or at the lower left-hand corner.

But if you’re doing a painting, you have to decide immediately where to put your brush full of red. If you put it in the lower left-hand corner, it’s going to be there forever. Sure, you can paint over it and try to reproduce it in the center of the picture, but unless you slice up your canvas and paste the red and yellow bit somewhere on a new canvas, you can’t change your mind.

Another commenter said that she plunges in her writing: “I appreciate being able to just start writing somewhere in the middle and add pieces here and there.” That could just as well describe my feelings toward fiber art. Make that red and yellow, and then see where it ends up.

Monday, May 16, 2011

Sunday, May 15, 2011

Planning vs. plunging -- part 2

Last week I wrote about the difference (according to a writing teacher) between planners and plungers -- and how that distinction in working style is equally valid when it comes to art. Several people left comments that make me think I’ve hit a chord. I want to respond to some of their points, and will do so in a couple of subsequent posts.

You may know that last week Blogger had a technological crisis, was off the air for a while and had to scramble to retrieve many old posts and comments from the bazillions of blogs it supports. I know that at least one comment about planning/plunging has apparently disappeared in the Bermuda Triangle of cyberspace, along with my reply. So I'll reply again.

Someone asked what specific tips my writing teacher had for those who plunge.

His main advice was that you should not revise or edit your writing while you’re in first draft mode, aka thinking. Why waste time polishing up stuff that may not make it into the final draft? Instead, write as fast as you can, trying to capture every thought in your head. If you realize in mid-paragraph that you’re going nowhere, or off on a tangent, just space down and start a new paragraph with a new train of thought.

In particular, he advised that you not worry about the beginning until the end. The beginning of a piece of writing is important, worth a significant investment in time and trouble to make sure you hook your readers and properly advertise and lead into what’s ahead.  But you can’t possibly write it until YOU know what’s ahead.

The teacher did point out that your tolerance for first-draft looseness will probably vary. (He, for instance, is perfectly willing to let misspelled words sit there on the screen while he gets his thoughts down. My dear departed dad, who wrote 27 books but never learned to touch-type, was the same way. In his early pre-computer life, he knew that Mom and I, his designated secretaries, would fix the errors when we retyped his drafts. In his later life, he was legally blind so misspelled words on the screen, even in 30-point type, didn’t distract him one bit. Many writers, though, including me, can’t stand to see those zits in front of them and have to take the time to fix what autospellcheck doesn't, or what autospellcheck does wrong.)

But he advises that you correct only what you absolutely must. Later on, after you’ve written your way to understanding what the essay will say, you can go back and fix your sentence structure, edit out your redundancies, correct your spelling, improve your organization.

Saturday, May 14, 2011

Guest artist


I've written a couple of times about my "daily art" project for this year -- actually it's weekly rather than daily.  I am making bundles and packages out of stuff that's lying around.

Recently I had the pleasure of spending a week at the beach with a five-year-old.  As you know, one of the best things about the beach is picking up stuff that's lying around.  Usually you carefully wash the stuff, bring it home, and do nothing with it.  But if your art project is to assemble stuff into bundles, then you are certainly supplied with plenty of raw materials at the beach.

After several days of collecting, I assembled my packages, and came up with six for the week.  That's a good week -- my project rules call for "at least one" but sometimes there's more stuff wanting to be packaged.  Some of my packages consisted of shells, of course, but others were made of plastic and string that had washed up on the beach or been discarded by visiting slobs. 

As I made my packages, we noticed that the five-year-old was watching carefully.  He was intrigued by the concept, and started making his own packages, wrapping a few shells in paper and taping them up with a roll of packing tape we'd acquired along the way.  Then he decided he needed to make packages where you could see the stuff, and needed more plastic.  After a special collecting expedition, he had enough stuff to make five bundles.

Here we are taping them together. 

Finally, he numbered the packages.  (We both used a Sharpie pen that we found lying around in the rental house.)


Here's our total art for the week.

Friday, May 13, 2011

Thursday, May 12, 2011

Wednesday, May 11, 2011

Plan ahead -- or not

I’ve just spent some time on a cruise ship with an excellent educational program; on days when we didn’t have shore excursions, there were many lectures and workshops that we could attend. One was a series of classes on how to write.

Considering that I spent a 40-year career writing for a living and teaching other people how to write, you might wonder why I chose to go to these classes.  I suppose it was mainly curiosity: I was interested in how somebody else taught what I taught, how his methods and examples differed from mine, and if he had any insights I might find useful.

And sure enough, he did. He believes that there are two kinds of writers: those who plan and those who plunge. You can fit yourself into the right category by recalling how you approached your seventh-grade English assignment, write three pages about your summer vacation, and turn it in along with your outline.

If you plan, which is clearly what the teacher wanted you to do, you dutifully wrote your outline and then followed it to produce your composition. If you plunge, you wrote your composition, then produced an outline of what you just wrote.

Planners, in short, figure out what they want to say, then write it down, while plungers write in order to figure out what they want to say. I know this, because I plunge; always have, always will. It sometimes takes me a while to write something, because I make false starts, and then have to delete lots of lovely paragraphs that turn out to be tangential to what I eventually realize the composition is about.

The cruise ship writing teacher’s main message was that school was difficult for plungers; in order to get good grades you had to pretend to be a planner. But in real life, it’s OK to plunge. If you know how your own mind operates, then you should adopt working methods that complement that mindset. And he proceeded to suggest a variety of working methods that might work for some people, but certainly not all. The buffet approach to advice -- take what you like.

Of course we could be talking about making art instead of writing.

How many times have you been frustrated if, for instance, a teacher or guru says you have to keep a sketchbook, and you hate to sketch? Or if a teacher says you have to compose your entire quilt on the design wall before you sew it together, and you get so antsy you can’t stand it, needing to start sewing?

You might infer from the previous paragraph that I’m the person in the second clause of the sentence, the one who can’t stand to plan ahead. In art as in writing, I’m a plunger. I usually don’t know what I’m going to say or make until I make it. My thoughts tend to coalesce only when I’m sitting at the sewing machine or at the keyboard.

Sometimes teachers will tell me “you say you hate sketchbooks, but it would really be much better if you would use one; why don’t you just try it?” or whatever pet working method they espouse. Just like those teachers who wanted me to hand in the outline three weeks before the term paper was due. (I really had to work hard to get those term papers done three weeks early so I could do the outlines.)

I like to think I’m open to new techniques and new approaches, so occasionally, in the presence of a teacher I like and respect, I give it my best shot. I‘ll carry that sketchbook around, even make some sketches. I’ll try to arrange a lot of fabric on the design wall before I start to sew. But those approaches never take for more than a couple of days.

I know myself. I’m willing to risk sewing a wrong seam, and maybe have to rip it out later on, because it’s the stitching that gets my head in gear. Your mileage may (will) vary. Know yourself, and act accordingly.

Tuesday, May 10, 2011

Monday, May 9, 2011

Thread dispenser -- the budget version

Recently the Quiltart list got buzzing about a nifty product, the Martelli Kwik Spinner thread dispenser.  It holds big cones of thread, turns on ball bearings for easy feed, is adjustable in height so the thread comes out just right for your sewing machine, and is heavy enough not to tip over if you run into it with your quilt.  Don't you want one?

Maybe if I tell you the price -- $149 -- you don't any more.


I felt very smug.  Here's my Kathy Loomis thread dispenser.  It works with any size spool or cone and feeds out at the right height (above the sewing machine).


holds two spools/cones at once!

smooth path -- thread won't snag or escape!

with optional holder, even the skinniest spools won't tip over!


Maybe if I tell you the price -- about 10 cents for two bulldog clips -- you'll want one of these instead.

Saturday, May 7, 2011

Friday, May 6, 2011

Collaboration 3 -- in search of art

I've been writing about my project with Uta Lenk, in which we exchanged emails every day for almost seven months.  Since we're both serious artists, we tried to not be silly all the time, no matter how much fun it was to take pictures of blow-up vinyl Santas or World Cup toilet brushes.

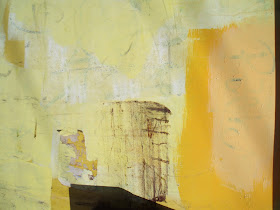
One of our recurring themes was "found art," which I most often discover by taking close-up photos of dumpsters.  After much observation I deduce that people like to write graffiti on dumpsters, which the owners cover up with whatever color paint happens to be at hand.  The result is often hard to distinguish from "real art" and I am always happy to find new color palettes.

Found art can also be found in other places.  Below is some that Uta found on the beach.

Here's some I found on the sidewalk.

Occasionally I'd throw in a detail shot of "real art" -- found in a gallery (below) -- and we realized how tenuous and arbitrary the definition of art can be!