Friday, June 12, 2020

Masks and the New York Times


After all the masks I've made, the subject of whether you should in fact wear them is always top-of-mind.  I've closely followed the story of whether masks do any good (early word from the medical establishment: don't bother if it's not an N95) and how it has changed.  Now the docs are agreed that yes, we should all wear masks.  Meanwhile, a substantial segment of the population agrees that no, masks are a symbol of tyranny and besides who wants to wear a mask when out having fun in a crowded bar or swimming pool.  Now I'm focused on how you can get the attention of those in the second group, and have become convinced that we're doing it wrong.

A couple of weeks ago the New York Times carried an op-ed piece on wearing masks, which prompted me to write a letter to the editor, and the letter was printed on yesterday's editorial page.


This is the first time in decades that I've had a letter published in the Times and I was interested in how carefully it was fact-checked.  I was asked where I got the 70 percent figure, and I sent two cites (here and here).  But revisiting these articles got me crabby again about how so many people use technical textile terms without properly specifying (or perhaps without even knowing) what they're talking about.

One of the articles cited showed the effectiveness of different materials in blocking 1-micron particles.  The surgical mask caught 97%; on down the line we find a dishtowel at 83%, a scarf at 62%, "linen" at 60% and "silk" at 50%.  I've seen several how-to-make-a-mask articles that similarly cite dishtowels and scarves as good raw materials.

But what is a dishtowel?  Are we discussing a cotton huck weave?  A printed linen souvenir tea towel?  (If so, a cheap one or an expensive one?)  A terry cloth hand towel?  (that's what I use to dry dishes)

Even more confusing, what is a scarf?  The graphic that accompanied the article showed a teeny weeny drawing of a fringed plaid scarf that might be wool, but might just as easily have been acrylic or who knows what.  And if you didn't look at the teeny weeny picture you might think "scarf" meant a cotton bandanna or a silk wrap.  I'm sure the particle-stopping power of those different materials varies hugely.

The second article was far more technical, and measured "different types of cotton (80 and 600 threads per inch)" as well as chiffon, satin, flannel and others.  The 80-thread-per-inch cotton was described as "Quilters Cotton" and I wondered what that was, since 80 threads per inch seems pretty flimsy to me.  It took several clicks through supporting tables and sections to discover that this material was totally unidentified.  While other materials were tagged as coming from Walmart, Jo-Ann or Wamsutta, the Quilters Cotton was N/A.

Interestingly, one of the materials tested in this experiment was a quilt -- two layers of 120-thread cotton with a 90% cotton batting.  As if many people are going to make masks out of a quilt!

I'm sure the scientists who did this research thought they were being highly precise in telling us that the thread pitch of the Quilters Cotton was 460-500 µm, while that of the spandex was 200-480 µm, but what is thread pitch?  Can I use this information to figure out what Quilters Cotton is?  More to the point, how does that help me decide what to use in sewing a mask?

I'm still waiting for some research and direction that combines scientific rigor with information that will help actual sewists make effective masks.  Rather than ask us to cut up a high-thread-count sheet -- and who knows exactly what the thread count is for a given sheet in their linen closet?? -- wouldn't it be better to provide information that would let us buy the right kind of fabric from the fabric store?  Aren't most of the people who sew masks going to be people who will work from fabric yardage rather than cutting up their fancy sheets?

I would like to know, for instance, if it's really better to use batik fabric rather than Kona cotton (I have yards and yards and yards of each in my stash).  Brand names would help.  Terms that we actual sewists actually use in talking to one another and in purchasing fabric would help.  Just because some guy in a lab says chiffon has a porosity of 3% while Quilters Cotton has 14% doesn't tell me whether I should be making my masks out of chiffon instead of the batiks and cottons in my drawers.

Hey, public health people!!  Now that you have told us that we should indeed be wearing masks, help us come up with the best ones to make.  Consulting a person who owns a sewing machine and uses it frequently would probably make for more useful research projects, as well as more useful construction directions.

Thursday, June 11, 2020

DIY fashion of the week


I know you've been waiting for the New York Times Designer D.I.Y. and today's is a big change -- it's an idea that actually might lead to some decent home craft.  That is, if you already know how to sew, and thus would not need the "directions" supplied in the story.

This week's famous designer is Todd Snyder, who makes "torqued all-American classics," whatever that means.  (Maybe the sleeves are all twisted between the shoulder and the cuff -- I made a shirt like that once....)

His idea is to sew patches on your jeans!  Functional, and totally original!!

Here's how you do it.  Todd, the story reveals, "dusted off my old sewing machine -- the same one I used in college to make shirts, and I used it to patch some jeans."  But the directions mostly show you how to do it by hand.  You should cut your patch from an old shirt, boxer shorts or bandanna, and make it at least an extra inch bigger on all sides so you can turn the edges under.

I think we're all with him so far, but then comes an offhand remark, "Place a matching piece of fabric on the inside of the patched area for reinforcement.  Affix the two patches to the jeans with straight pins to hold them in place."

As the 50-year proprietor of a three-male household, I have probably mended a hundred times more holes in pants than Todd Snyder has, and even I have to think twice about how to get that bottom-layer patch in place before sewing.  Especially when using a machine.  If you want the layers of fabric to properly enclose the hole and reinforce the mend, and lie neatly in place, you probably should stitch the bottom patch on first, then place the top one where it belongs.  Even if you're feeling bold and want to do them at the same time, it's going to be tricky to get them both in the right place, and "affix with straight pins" doesn't quite cover it in my opinion.

Anyway, let's say you get everything pinned in place.  Now it's time to sew.  "Using a whipstitch every quarter of an inch, or with a sewing machine, sew around the perimeter of the patch."  What is a whipstitch, you might ask, and the drawing shows you:

illustration from New York Times Styles section


Hmmm... what exactly are you looking at?  There are three horizontal lines in the drawing.  Presumably one is the folded edge of the patch.  What are the other two?  The drawing makes it look like you're sewing onto the edge of the jeans, which is obviously not what is supposed to happen.  No, actually it looks like you're supposed to insert your needle between layer two and layer three...  huh?  Anyway, let's be optimistic and assume that you figure it out.

Wait, what about that patch on the back side of the jeans?  Are you supposed to catch that in the whipstitch too?  (Good luck on that part, even having affixed it with straight pins.)  Let's be optimistic and assume that you figure THAT out too.

The directions for this step conclude:  "Don't worry: the sloppier the better." (This is the part of the directions that guaranteed, will be followed most accurately.)

OK, now to the fun part.  "Using the same technique as above..."  (above where?  you mean whipstitching?)  "...stitch back and forth across the patch in parallel lines."   Here's the helpful drawing:

illustration from New York Times Styles section


Hmmm... the top drawing makes it look like we're still whipstitching the patch onto the jeans, which I thought we had finished in step 3, but what is that double row of stitching to the left?  Where did that come from?  And whoa -- what are those fancy stitches in the bottom drawing???  How in heck would you go about making them if you wanted to?  .....Crap -- NOW you tell me to knot the thread?????

illustration from New York Times Styles section


And how great are these stitches going to look executed in sewing thread, which is the only stuff called for in the supply list?

Oh well, at least they didn't show us a drawing of putting both sides of the pants leg into an embroidery hoop, the way they did when they showed us how to embroider socks a couple of weeks ago.

In mocking previous articles in this series I have thought that the designer idea was dumb to begin with, but in this week's installment I am just sad that a perfectly excellent idea -- patching your clothes -- was given such a kissoff treatment.  These have to be the most feeble and confusing "directions" I've read in a long time, compounded by the kissoff illustrations that not only don't show the right way but seem to show the wrong way.

I suspect that 99 percent of the people reading this blog post could easily put a decorative patch on their pants despite the crappy "directions" in this article, but you're not the people the New York Times is presumably trying to reach.  Giving directions to people who have never tried a technique requires a lot more precision than the fashion-drawing style, which shows the ambiance but not the detail.  This is the place for photographs, not watercolor or pencil sketches.

I find it pathetic that the only one of the Designer D.I.Y. articles to use photography in its step-by-step directions was the one that showed us how to cut up beets.

 New York Times Styles section


Tuesday, June 9, 2020

Thinking inside the box 1


For years and years I have been enthralled by Joseph Cornell's mysterious box assemblages.  One of my large art regrets is that two days before I was due to go to Washington DC for a big Cornell show at the Smithsonian in 2007, my father died and I figured I'd probably better go to the funeral instead.  Several years ago I made some box assemblages of my own using blank wood boxes from the craft store, but it's been my intention all along to work with used/repurposed boxes instead.

Earlier in the pandemic lockdown I pulled out a couple of old boxes that I had been collecting and worked assemblage upon them.  It has been joy to root around in my lifetime supply of stuff and junk and find just the perfect bit for this or that construction.  And pleasant surprise to occasionally be able to recall exactly where that perfect piece of junk came from!


For instance, this box features a piece of transparent plastic that once protected the keypad in a pay telephone (raise hands, all those old enough to remember pay phones!!).  I found it while walking on Trevilian Way just west of Newburg Road, on the north side of the street right where the road goes into a tight S-bend.  I know the location doesn't mean anything to you, but I recite it to prove how vivid the memory, going on twenty years ago!  My first repurpose of this piece of plastic was as a resist for spraying bleach onto fabric, and because the pattern was so obviously from a telephone (at least to us old people) I titled one of the quilts "Double Talk."  Then I stopped spraying bleach onto things, but of course held onto the plastic until its second repurpose in this box.


Here's another box, which I think originally held two decks of cards.  About ten years ago when I was in my teabag phase, I carefully covered the box with old printed materials behind a layer of stained teabag. 

But as you can see, the box sat on a little pedestal or dais, so when displayed vertically it wouldn't stand up properly.  It took me ten years to solve that problem, by cutting up a ruler to prop up the front end of the box.  I am sorry to say that I don't remember where I got a whole bag full of old rubber stamps, which I suspect are going to show up in more boxes.

I had already started work on these boxes when I received a phone call from heaven that changed the whole course of this project.  I'll tell you more in a later post.


Thursday, June 4, 2020

Bad DIY fashion of the week


Good news!  It's Thursday, so we get another installment in the New York Times Designer D.I.Y. Series.  You will be happy to know that for the fifth week in a row, the great newspaper has maintained its quality standards in finding designers who will provide silly ideas and incomprehensible directions, guaranteed to nip readers' sewing/crafting impulses in the bud.

This week we're making a tote bag out of a linen or cotton dish towel, because "we have so many dish towels around and are always in need of reusable totes that we can also use as storage."  So says Laura Mulleavy, half of the design team Rodarte.

First we fold the dish towel in half, sew a Y-shaped pleat in the bottom to make a floor, and sew up the sides.  So far so good; the illustrations even show us how to do this, even that we should do this "so that the inside is on the outside."  When we're done sewing, they tell us to "invert the bag," which I guess means turn it right-side out.

Now comes the hard part -- handles.  We need "two costume jewelry necklaces, like the plastic beaded kind that are handed out at Mardi Gras, or one chain-link plastic necklace."  Step one: "Fold each necklace in half."

illustration from New York Times Styles section


The illustration, beautifully pencil-sketched, doesn't give much guidance on how we do this, since we can't tell what's happening.  Is that one thickness of necklace or has it already been folded?  Does the half-link on the right indicate that the necklace actually extends out of the picture?  What do the arrows show?  What if you started with one necklace instead of two Mardi Gras strings?  Beats me.

illustration from New York Times Styles section
Step two:  "Cut a ribbon in four pieces, each piece four inches long.  Loop each ribbon through each of the four ends in the two lengths of necklace..."

(I don't know about you, but I had to read that direction four times to figure out what was going on.  Again, the illustration didn't help, because you can't see exactly where the ribbon is going, nor can you see what happens offstage to the left after the necklace disappears from the pictures.  What has happened between picture 1 and picture 2?  And I still have no idea what to do it I started with one necklace instead of two.)

Now we stitch the ribbon loops to the top of the tote bag and we're done!!  The drawing shows only the most impressionistic idea of what it's supposed to look like, except don't you suppose a dishtowel with no reinforcement along the top edges is going to droop down past the handles instead of sticking out so crisply?  It does seem to go well with the dress and hairdo, which is pretty much what I'm wearing during quarantine.

illustration from New York Times Styles section


I couldn't find any Mardi Gras beads in my stash so I couldn't test out how much weight the cord can handle without breaking, but I suspect not much.  Even without actual beads I can easily imagine how those "handles" are going to slip and slide around, and how easily the folded-in-half string of beads is going to become one tight strand stretching from loop to loop and one very long strand drooping off to the side.

I was interested in how the Times has used fashion-type illustration for four of the five articles in this series, even though this style of drawing is lousy for how-to directions.  With the right artistic style, drawings can do an excellent job of showing people how to do things -- like this example from David Coffin's great book "Shirtmaking" -- but they have to show the details clearly, not gauze them over.


If the purpose of this series is to showcase prominent fashion designers and make them appear all warm-and-fuzzy helpful and concerned, then perhaps it is a great success.  If the purpose is to make the New York Times appear all warm-and-fuzzy helpful and concerned, then ditto.  If the purpose is to encourage quarantined readers who may have never done a craft project before to pick up a needle and thread and make something fun and useful, then I think it's a total failure.


Monday, June 1, 2020

Hand-stitching update


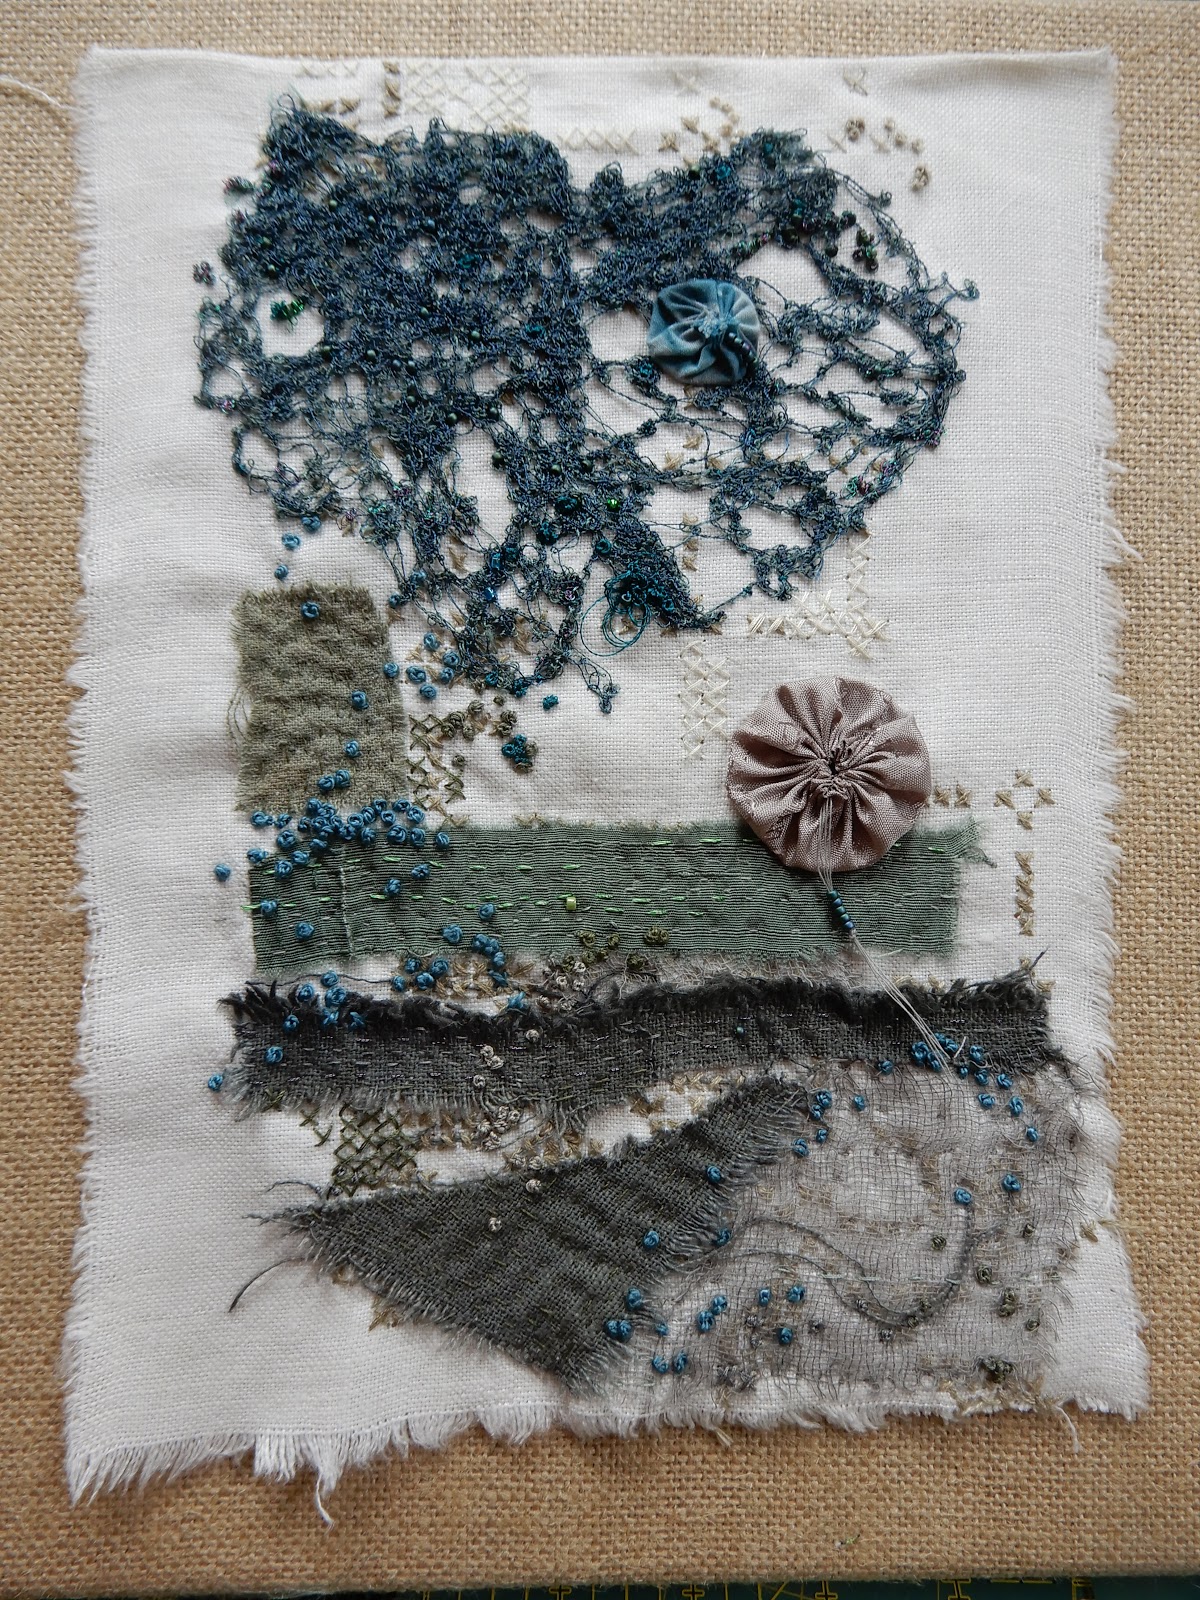
A few weeks ago I showed you a small piece in progress, a fabric collage made from kimono scraps and densely hand-stitched.   I got on a roll, and have now finished that one and three more in a similar vein, using scraps of old silk, linen and cotton.  I still haven't decided how to mount them for display; probably on stretched canvases, covered in either burlap or some other solid color fabric.

The one I showed you earlier; I added the red fireworks burst at top right because three shapes are generally better than two.

This one is stitched onto a scrap of a very old quilt, with the batting visible in some places through tears and disintegration of the cotton.  Lots of french knots, and a silk yoyo.


A linen support, with bits of silk and cotton.  The beige scrap at top right had a pre-existing machine-stitched seam which I echoed with three new lines of machine stitching.  I left long thread tails at each end of each line so I could make little french knot dots.


This piece has by far the most intricate, time-consuming stitching, and yet it's probably the least successful of the four.  I used a scrap of an old linen tablecloth that had been cross-stitched in tan, and put the teal blue webbing on top.  I have no idea what this stuff was supposed to be; it's made from some silky thread -- was it perhaps stitched onto a piece of Solvy to make a web?


I have no idea where I got it, but it called out to me.  I sewed it down with a lot of beads and french knots, added some silk shapes at the bottom, and then decided I didn't like what I saw.  Spent many, many hours with additional stitching and some yoyos to try to salvage the piece; not sure I did.

But they're finished!!


Thursday, May 28, 2020

More bad DIY fashion ideas


Today is Thursday, which means it's time for another well-meaning article in the New York Times Designer DIY feature, in which big names in fashion share silly ideas for people to try at home.  I neglected to bring you up to date on last week's feature, so that one first...

Emily Bode, a young luxury menswear designer who "expresses a sentimentality for the past through the study of personal narratives and historical techniques... with female-centric traditions of quilting, mending and applique," teaches us how to fix up a white T shirt to give to your sweetie.  First find some thread.  "This is a great time to use all of the pre-threaded needles from those miniature hotel mending kits," she says.

Now stitch (loosely, so the shirt can stretch when he puts it on) around the edges of the cuffs, collar and hem.  Add a cute heart and writing, if you want.  "There's no experience in sewing necessary.  The more homemade and messy, the better," she advises.

illustration: New York Times Thursday Styles section


Well, not to worry, I suspect every single shirt made from these directions will be messy.  Starting with the choice of thread. Two strands of sewing thread, stitched loosely around the neckline, are really going to make a statement.  (And unless you were in the habit of spending five night a week on the road in your pre-pandemic job, lifting hotel mending kits right and left, what are you going to use when you run out of them?)

I particularly liked the fact that they illustrated step 5:  wash your T shirt to remove the pencil marks.  Without that picture, I would have been lost.

illustration: New York Times Thursday Styles section


But enough kvetching about last week's project.  Today's project uses a T shirt again, but this time to tie-dye it.  Our designer-guide is Hillary Taymour, who treats "sustainability as something everyone can practice every day."  We're told she has been using tie-dye in her collections for two years, but I would bet money that she doesn't do it the way she advises the readers -- to use beets and turmeric as the dyestuffs.

I checked out what some highly googled websites had to say about using beets for dyeing.  What I discovered was that the amateur and mass-media craft sites love them -- beautiful color!!! -- but the people who know a lot about dyeing don't, because the color is notoriously fugitive.  In fact, because of that, beets made the list of  "Top Five Plants to Never Use for Natural Dyes" on Wearing Woad, a site that reeks of technical competence.  Turmeric's reputation isn't much better.  But that shouldn't stop our stir-crazy quarantined readers, because they'll add "a splash" of vinegar to the beets to "help your dye hold pigment."

photo: New York Times Thursday Styles section
Interesting to note that in this fifth installment in the Designer D.I.Y series, the Times has switched from gauzy watercolor or pencil illustrations to actual photos.  One shows you how to cut up the beets.  Six of them show you how to fold the shirt into a rectangular package, one shows how to bundle it with rubber bands.  Then you spoon on the yellow dye, and dunk into the red dye.

photo: New York Times Thursday Styles section


Let the bundle sit for ten minutes before opening, then lay it flat to dry, and "it'll be ready for you to wear the next morning."

Smelling of vinegar.

And kind of wrinkly.

I hope everybody who makes this T shirt enjoys wearing it once or twice.  Maybe they'll hit a sweet spot after one or two washes, when the vinegar smell will have disappeared, and the dye won't have disappeared quite yet.