Showing posts with label assessing your work. Show all posts

Monday, February 14, 2022

Asking for advice

I am of two minds when it comes to asking other people for advice, especially in large groups (whether in person or virtual).  There are people whose advice you respect, and there are those who just volunteer useless praise or counterproductive suggestions.  It's easy to ignore those in the second group, but what happens when those in the first group don't agree?
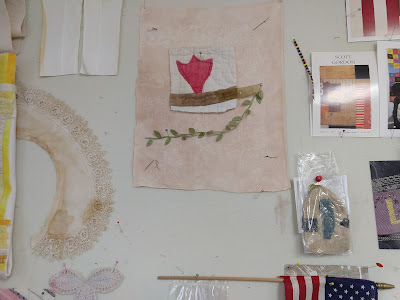
I have had a compositional fragment on my design wall for more than a year, a tulip on a branch cut out from a very old and distressed quilt, sitting on a torn piece from a linen napkin or tablecloth for background.  At some point a length of leafy vine joined it, but I couldn't figure out what else needed to be there.

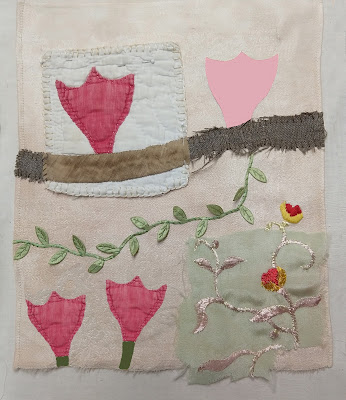
Last week I found a piece of embroidered silk that seemed to want to join the party, so I stitched it to the bottom corner of the linen.  The original embroidered stems and leaves had begun to disintegrate, so it took a fair amount of stitching with almost-matching thread to secure the fabric and restore the design.

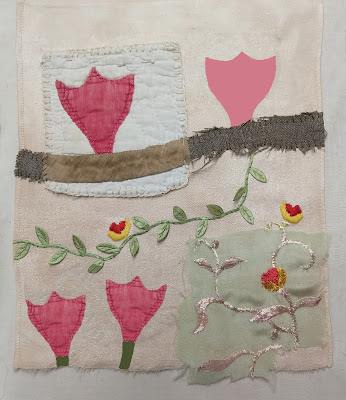
Next I extended the branch from which the quilt tulip was growing, and added another tulip.  Also another little yellow and red flower to match the one on the embroidered silk.


I also found a butterfly, cut from a vintage kimono scrap, but wasn't sure where or if it should go in the composition, so I just pinned it on.  I posted it on instagram as work in progress.  Two people whose opinions I respect suggested that it was finished (I think they meant without the butterfly).

Then I showed it to somebody else whose opinion I respect, and she was not happy.  She said, and I see her point, that the two halves of the composition don't really play well together.  The top half is big and bold, the bottom half is small, pale and delicate.  She thought each half would be better off on its own.

Hmmm.  I thought about it for a while and realized that it wouldn't be too hard to cut the piece in two, since the quilted tulip hasn't been sewed down yet.  I mentally tried out different ways to do this, but none of them seemed great.

Then I thought that maybe the trouble was the right hand tulip, which took on too much weight because of its dark value.  What if it were paler, to restore the focus to the original quilt tulip?  And I realized that the easiest way to consider the alternatives was via photoshop.

So here are four possibilities.  I put them out to you to share my thought process, not to put it up for a vote (I will happily read your comments but unfortunately the buck stops here and I'll be stuck with the final decision).  
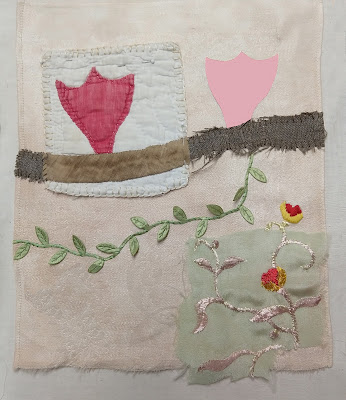
Pale tulip

Pale tulip + butterfly

Pale tulip, two new flowers

Pale tulip, three new flowers


I usually audition design decisions in person, pinning and repinning on the design wall; the advantage is that a possibility can stay on display for a long time and your opinion can change over time.  But doing it on photoshop certainly is quicker, and allows a side-by-side comparison with all the versions, or at least as many as you can tile onto your computer screen. 


Now I have a lot more to think about.  And I guess I should really photoshop some possibilities from cutting the piece in two...

Tuesday, January 28, 2020

Documenting the process -- part 2, words


Yesterday I wrote about taking a lot of pictures as you work.  But that's only half of documenting your work.  You also want to keep track of your thoughts, how you come up with ideas, how you progress from one piece in a series to the next, how you master and improve your technique, how you solved problems, how you do something that comes up only once in several months but it's important to remember how to do it right.

I can suggest many different ways that you might go at this, but the most important thing is to find a process that works for you.  I used to be in the habit of writing down, every evening, what I had worked on during the day, along with any notes and thoughts that I wanted to keep.  I always used a calendar book with either a separate page or separate box for each day.

Spaghetti was a quilt, not my dinner menu.

I kept track of details like what thread was used to quilt.


One year a friend regifted me with a very nice calendar book that she thought would be good for my notes -- but it was one of those books good in any year, with the days numbered days but not marked with days of the week.  I started out by labeling ahead a couple of weeks at a time, writing "S M T W Th F S" in the boxes.  But then I would forget, and then I didn't label for a while, and I couldn't remember whether today was the 27th or the 28th, and by the time I got to May I just quit using the book altogether.

That may seem like a pretty minor problem, but to me the format of the book was like a bit of sand in your shoe -- just annoying enough to take the pleasure out of my daily notes, a process that had always made me feel I'd accomplished something but now was making me feel crabby.  I don't know what kind of process will make you feel good rather than crabby, but suggest you try out some different ones and see what works.

Some people already have the daily habit of journaling, or "morning pages," or writing down their blood pressure, or sending an email to their mother -- maybe you could add your art notes to that routine.  Some people use a daily or weekly blog or instagram post to memorialize their art progress.  If you were really compulsive, and like to work on the computer, you might make a new Word document for each artwork, and write a narrative with pictures and text.  Whatever works for you -- whatever encourages you to actually follow through on your good intentions -- is the right answer.

By the way, Linda left a comment on yesterday's post:  "I don't really think about documenting along the way.  I guess posting to my blog is my only documentation.  Maybe I ought to be stepping it up."  So I checked out Linda's blog and indeed, she's doing a pretty good job of taking pictures and writing down what she's working on.  She's got that discipline down pat.  So my advice to her might be to stick with the blog as her format, but write a little bit more about the decisions she makes and ideas that come to her as she sews.

I do think it's better to write down your thoughts than to depend on memory.  In particular, write down ideas that did not get executed -- "might use contrast thread next time" or "what if the lines were twice as wide?"  Just rereading what you wrote about past work can help you jump-start your process, decide what to do next, get out of a funk and/or overcome artist's block.

Let me know whether any of this rings a bell with you!


Monday, January 27, 2020

Documenting the process -- part 1, pictures


Last week I wrote about Claire Henderson, who just finished a quilt she started in my workshop at Quilting By The Lake in 2017 and sent me a picture.  I looked back in my files and found some pictures I had taken of her quilt on the design wall, and it was interesting to see how the composition changed during the workshop and then at home.

Vickie left a comment: "I do love seeing the process.  I keep resolving to take and organize photos of my process, and add comments and reflections.  But, then, I think I'm too busy to stop and do that.  I've got to find a designated time for this.  Do you have any suggestions?"

Well, yes, I suggest you figure out a way to do it!  I firmly believe that understanding your own process, both the methods and techniques you use to make art and the way you come up with your ideas, is one of the major skillsets of the serious artist.  Maybe there are artiste savants out there who simply channel the universe into art without thinking about it along the way, but most of the artists I admire and respect don't do it that way.  They are able to articulate and recall what they have done in the past, so it's easier to plan ahead, solve problems and incorporate new ideas into their practice.

Vickie is right that there are two kinds of documentation: photos of the work as it progresses, and comments about how, why and how well you did what you did.  Of the many ways you can accomplish this, there's just one thing that absolutely has to be done RIGHT NOW as you work, and that's to take pictures.  So my first suggestion is to get into the habit of taking a lot of photos of what's happening on the design wall.

Making new habits is most effective one step at a time, and step one is really easy -- keep a camera at hand as you work.  Fortunately many people are already in the habit of carrying a phone on their person even when moving around their own house; if you aren't, then make a point of taking the phone or camera with you into the studio.  At the very least, take a picture of your design wall as you leave for the day.  And if you're working on anything complicated, take more -- you can't anticipate when your composition might fall prey to a gust of wind, a helpful toddler or playful cat, or when you lose your place between the design wall and the sewing machine.

(In the age of digital photos, there's no such thing as taking too many pictures.  When I snap the design wall as I close up for the night, I take two or three shots.  Why skimp?  You can always cull out the duplicates, or the ones out of focus or too dark.)

You can't go back and take a picture of what you had on the design wall last week, but you can always organize the photos later.  I was embarrassed, when Claire emailed me last week, to find that I had no folder for the QBL workshop.  So I went back and searched through everything I had taken in July 2017, pulled out the ones from the workshop and filed them where they should have been all along.  Two and a half years late, but now all is in order.  You should aim for a higher standard; maybe once a month?  once a year???


Tomorrow I'll talk about the second part of the process, keeping track of your thoughts.  Too bad there's no way to just shoot photos of what's going on in your head, and organize them later!

Tuesday, August 13, 2019

How -- and why -- I fixed my quilt


A month ago I wrote about a quilt top that I finished piecing but wasn't happy with.  I wrote "I think it's repairable, with a lot of fussy, fiddly ripping and remaking."

Shannon left a comment: "I wonder if you would be willing to share some of your critical thought processes or just general thoughts about what makes something good or not.  I struggle with this pretty often with my pieces.  Sometimes it's very clear that something isn't good, but when it's not so obvious I have a harder time.  I also really struggle with differentiation between pieces that are "good" and pieces that I just like.  I would love to hear your thoughts on this!"

I promised that I would talk more about this top, what I thought was not-so-good and how I fixed it, and last week I finally did pull it off the design wall and worked on it.

Here's the quilt in its original state, in mid-July:

When I evaluated the top, I realized I liked the inset effect of the multicolored lines in the northeast quadrant, but there were two parts of the composition that seemed weak.

In fine line quilts, of which I have made upwards of 40, I like the offset zig-zag effect that happens when you slice across an older seam and the two sides slip a bit before you sew them back together.  To me, that's the magic of this construction method (I even named a sub-series of these quilts "Fault Lines" because they reminded me of how the earth slips a bit in quakes).  But as more and more lines cross one another, the grid gets sloppier and sloppier.

So when I looked closely at this top, I realized the balance was off between the zig-zaggy lines of early seams and the straight lines of the latest seams.

First, I didn't like the wide area shown in the yellow circle.  It seemed too blowsy, too wide compared to the closer grids in the rest of the quilt.  I didn't like the contrast between the straight line on the right of that area and the wobbly line with multiple offsets on the left.  Worse, the straight line on the right went smack across the entire quilt, which emphasized its straightness.

You will notice that farther to the left is another wide area, with a looser grid than in the other three quadrants of the quilt.  But that one doesn't bother me, probably because it's near the outer edge of the quilt.

When I look at these designs I often see city maps, and I guess as you get toward the outskirts of town you expect the street grid to break down and the "blocks" to get bigger, but the yellow area, right on the main drag of this "city," bothered me.

How should I fix that?  I finally decided that the simplest way was to add another vertical road through the middle of the blowsy area, so it wouldn't be so wide and call so much attention to itself.

My second complaint was that vertical line that went clear across the quilt from top to bottom with no offsets.  I had originally planned that the fine line that went horizontally, shown in the blue circle, would be stitched back together with an offset where it crossed the vertical.  That would have put a zig into that long vertical line.  But I was careless in sewing, and the vertical line ended up just as vertical as before.  Yes, I noticed it at the time, but decided it was good enough.  (Bad decision.)

When I came back to reconsider and remake the top, I took the blue-circled seam apart and restitched it, adding the offset that was supposed to be there in the first place.  It would have been simpler to make this fix had I not compounded my initial sloppiness by slicing across the seam at the blue arrow.  I had to take apart the left-hand vertical seam, then make the cut-off segment longer so I could offset the blue-circled seam toward the right.  But when it got all sewed back together, the long vertical line in the center of the quilt now had an offset.

Then finally I added three more lines along the outer north, east and south edges.  I like the crossroads to be squared off; I think it makes the composition look more finished and balanced.  And the line at the north edge allowed me to put one more zig into that main vertical line, breaking it up a little more.

Here's the final version, ready for quilting:


Saturday, July 20, 2019

Last week on Art With a Needle


After I said that I thought one of my "crossroads" tops wasn't good enough and needed to be fixed, Shannon left a comment: "I wonder if you would be willing to share some of your critical thought processes or just general thoughts about what makes something good or not.  I struggle with this pretty often with my pieces.  Sometimes it's very clear that something isn't good, but when it's not so obvious I have a harder time.  I also really struggle with differentiation between pieces that are "good" and pieces that I just like.  I would love to hear your thoughts on this!"

Shannon, thanks for asking -- this question is one of the all-time big ones for artists, right up there with "what is art?"  Every artist, in every discipline, struggles with this every time a new piece is made.  So developing your critical eye is just as important a skill for an artist as actually learning to make things.

Sometimes you can learn and practice this skill by joining a critique group, or taking an art class where critique is part of the routine.  Sometimes you can learn a lot by reading comments from critics or teachers, or from books.  I have been a regular reader of the magazine Art in America for many years, as well as the art section of the New York Times.  I particularly enjoy the show reviews where at least one piece is pictured, along with the critic's comments.

Unfortunately, there is little published critique in the fiber art world, since Fiberarts magazine folded several years ago.  So you may get more out of discussions of paintings, sculptures, mixed media or installations.  The elements of "good art" apply across all mediums, so if you learn to detect good or bad composition or color use in a painting you can also detect it in a quilt. 

Here's the quilt I showed last week and said I needed to go back and improve it:

When I get to it, I plan to make at least one or two posts that describe my thought process, and how I go about making the fix.  Maybe thinking along with me will give you more insight into how I approach the problem of self-evaluation.  It won't be next week or the week after, because I need to let this stew a bit before I have at it.  But it will happen, I promise.

Here's my favorite miniature of the week:


Saturday, March 16, 2019

Last week on Art With a Needle


Great drama in our home this weekend; I was awakened at 6 AM Friday with beeping.  Was it a truck backing up?  No, upon exploration it was a never-before-heard alarm from the Bose radio in the living room.  Either the 8-year-old or the 1-year-old, both of whom had been visiting the day before, had apparently activated the alarm while playing with the remote.

After only three minutes of hitting the wrong buttons I managed to turn it off and stumble back to bed.  Mentioned this to my husband, who said he had the user manual in his desk and would look up how to turn the alarm off.

I was awakened again at 6 AM Saturday with beeping.  He had not looked up how to turn the alarm off, but at least I knew how to stop the beeping on the first try.  Later we got out the user manual, followed the directions, and couldn't unset the alarm.  Cussing.  Looked up the Bose website.  Nothing worked.  Cussing.  Finally I noticed that the remote in my hand didn't look like the remote in the user manual.  Guess what -- the Bose in the living room is a different model than the Bose in the kitchen, although they look the same and both have always responded to signals from either remote.  Not that we ever tell the radios to do anything other than turn on and off and change volume.

And the remote sitting in the kitchen belongs to the radio in the living room, while the remote sitting on the table in the living room belongs to the radio in the kitchen.  Since the 1-year-old likes to take things from room to room, we suspect her as the culprit, but then it's always more comfortable to blame somebody else.  The other remote worked.  The alarm will probably not beep tomorrow morning, although I wouldn't put money on it.

Anna left a comment on my post where I described my unsuccessful attempts to make stitched "homes" for our gallery show:  "Thank you for the insight into your process.  I love that you can just push through the try/fail cycle."  Anna, I guess I love that too, although the fail part of that cycle is not much fun.  However, it does help to document the failures.  First, I can often get an amusing (to you, at least) blog post out of the most abject mess.  Second and more important, analyzing failure helps you figure out what to do next, whether that's a tweak to the technical process or an understanding of why something didn't meet your artistic expectations. 

A couple of other readers left comments that they like the stitched homes, even though I rejected them.  I took heart from Mags' and Mac's comments that they like the pyramids, even though they look like they're falling on their faces.  Maybe I will finish them and make more, leaning, bent, crumpled, bulgy.  Among lots of other falling-down structures, they will look deliberate rather than pathetic.  At least that's the plan.  So thank you all for your words of encouragement!

Here's my favorite miniature of the week, a sprig of lavender from California:


Tuesday, February 19, 2019

Hand-stitching -- the workshop 2


I wrote last week about the workshop I led on hand stitching onto a finished quilt.  After practicing stitching onto sample sandwiches in the morning, people pulled out their own quilts and decided what to do.

Whenever you teach a workshop the first time, you are surprised at how it turns out.  I had anticipated that people would be productively stitching away within minutes.  But instead, we spent the entire afternoon on evaluation and auditions.

We put the quilts up on a design wall and talked about what they needed next.  Usually the maker already had an idea of what she wanted to do next, but sometimes after we kicked the tires, it turned out she needed to do something else.  Some people knew there was a problem with the quilt but weren't sure what it was, so we talked about design, composition, color palette.

Eventually each quilt got to the color-choice stage, where we draped floss in various colors over the quilts, stood back twenty feet, and contemplated which ones worked (and which ones were even visible!).


We did the first couple of evaluations with everybody listening, and from then on people could bring their work for "private" consults -- but many of the participants decided they would rather listen in on a lot of consults than do much stitching on their own.  That was good, because many times the comments from the onlookers were more helpful than the comments from the teacher.

So the workshop changed course in midstream.  Instead of a lot of practice in hand stitching, it turned into a lot of practice in evaluation and auditioning.  In the long run, practicing those skills is probably going to be way more valuable than practicing how to make french knots on a thick, densely stitched quilt (hint: use pliers to pull the needle through).

Thursday, January 17, 2019

Rising to be art?


A reader's comment: "One of your entries was about how there were many collages and how only few 'rose to be art.'  How did they?  How did you decide?"

Maybe the hardest question for any artist, in any medium, is "Is this art?"  Or as a variant, "Is this art yet?"  We're always evaluating our work for composition, design, craft.  We sketch, we audition, we turn it upside down, we let the piece sit in plain view for a week while we think about what to do next.  In the end it's a matter of judgment.  People without a good sense of artistic judgment, or those who hurry into completion without enough thought, often end up producing stuff that doesn't "rise to be art."

Here are the three collages that I decided were good enough to hang in the gallery, and what I like about them:

Gold Star


Gold Star:  I like the simple, perpendicular composition: a large rectangle of complicated straight-edge shapes hovering symmetrically over a small square and an even smaller star.  That stack is moved a bit off-center and balanced with the tall vertical line at left, and the massing of gray squares at left in the large rectangle keeps it from falling off the page.

I like the simple palette of yellow and gray, and the variety of textures that become apparent when you look at the piece up close -- smooth on the "quilt" piece, rough on the sew-off square beneath, smooth on the star, ridged on the oval bead sewed to the square, ropelike on the twisted cord.

Slick Dude


Slick Dude: I feel a bit guilty over calling this piece "art."  It's almost cute, which makes me uncomfortable, but this guy is so obviously made out of leftovers that he has a compelling personality.

The bit of snakeskin calls out to be part of a living creature (interestingly, Uta used this material twice in her collages, and both times ended up with creatures -- here and here) and the practice buttonholes gave him shifty eyes.  The preexisting hole in the snakeskin made a sneer.  All he needed to be complete was a spiky hairdo.

I liked the background interest of mounting him on four separate panels of linen, joined with subtle hand stitching to give more texture.

Pig Newton


Pig Newton:  I like the juxtaposition of the two varieties of text -- one a replica of the Gutenberg Bible, one a scratch hand-lettered screenprint -- and the serious animals on the background fabric.  I like the red-white-and-blue palette, accentuated with buttons and hand stitching.

I like the composition, the severe vertical of the old text and the flowering vine, lightened up by the horizontal fragment of the hand lettering and the curvy line of bubbly buttons.  The sewoff square at the bottom is almost invisible in the composition, anchored by a blue button, but it plays an important role in keeping everything grounded.

And I like the title.  It might have been more appropriate to call it "Pig Gutenberg," but that would have just been weird, not funny.

Maybe you won't agree with my analysis, and that's OK, but I hope that when you look at these three pieces -- or any other work of art that you're trying to describe and evaluate -- that you will think in detail about what you like (or don't) and why.  That's the most important part of developing and strengthening your own sense of artistic judgment.

Saturday, November 19, 2011

What do I think about this?

The question du jour on one of my email lists has to do with self-critique, and what questions you should ask yourself as you work on, and then after you finish, a new piece.  This is a subject guaranteed to get me to the keyboard, because I've long felt that a formal process of evaluation is necessary to a serious artist. 

I'm sure some of my former students and readers will be rolling their eyeballs if they read this -- oh no, here we go again!  But yes.  I don't see how intelligent people can conduct any part of their lives without self-evaluation.  Does this pair of jeans make me look fat?  Why do I always end up going out with losers? Can we afford to remodel the kitchen?  Should I rat out my co-worker who's sneaking money out of petty cash?  If I make this recipe again should I use less rutabaga?  How should I invest my 401(k)?  Is this art any good?

for instance, is this any good?  (detail below)

My hobby-horse is that the more serious the issue, the more it deserves a formal process rather than just some fleeting thoughts in passing.  So when it's your financial affairs or how to treat a blockbuster disease, do research, write stuff down, discuss it, get second opinions, revisit your decisions periodically. When it's your jeans, don't spend too much time on it.

But if you're serious about your art, or wonder whether you should get more serious about it, then it may deserve a more formal process.  Here's mine.  I suggest you review a just-completed work on four counts:

-- What you liked or thought was successful
-- What you disliked or thought was unsuccessful
-- What technical issues or problems you had
-- Decision points where you had to choose between equally appealing alternatives, and what alternatives you rejected

Then you use these answers to plan your next work:

-- Do more of what was successful
-- Don't do what was unsuccessful
-- Try to solve or minimize the technical problems
-- Try one or more of the alternatives you haven't used yet (you may go back to earlier pieces to find rejected alternatives to try this time)

Before you start a new work, define conceptually what you are planning to accomplish.  Think about how it fits into your body of work, whether it extends a current series and if so how, or whether there is a reason to do something outside a current series.  (Just playing is a valid reason, as long as you don't do it all the time.)  If you can't describe this clearly, maybe you shouldn't start.

Monday, July 18, 2011

Revisiting the past

We were talking at my support/critique group the other day about revisiting old work.  Some in the room opined that they felt compelled to finish what they start within a relatively short period of time.  If they didn't, they lost the flow and could never return to that work.  So if they didn't know how to resolve a piece, they would have to do SOMETHING pretty quickly, even if they still weren't sure it was the right solution.

Others said they often put a piece aside if they didn't know how to proceed.  I am in that group, so I will be able to expound on this way of thinking more than I can about the other.  In fact, I have been in revisit mode for the last two months, ever since I took a whole box full of unfinished projects to a master class with the objective of finding out which ones were worth completing and if so, how.

Some of the stuff in the box was there because I had hit a wall and didn't know what to do next.  Some was there because I hadn't yet had time to execute what I planned.  Some was there because I wasn't sure whether the piece was good enough to bother with.  Some was there because I'd frankly forgotten about it.

The good news is that I found several projects to finish.  I'd like to show you one of them, because it taught me some lessons.  I started this project several years ago and did a good bit of piecing, ending up with two large pieces that were clearly supposed to fit together along the diagonal in the center.  I had stitched a black strip to one of the pieces, planning to sew it to the other piece.  Here are the two pieces on the wall in May, in their intended orientation.


You can see why I got this far and stuffed the damn thing in a box.  What to do with all those raggedy edges?  I had been trying to end up with a rectangle but had done a bad job of it, especially along the bottom.  I seem to recall that this made my head hurt and I gave up.

So on to the lessons.  The first is never to allow your piecing to be separated from the bits and pieces of matching fabric that you're working from.  Unfortunately I didn't put the rest of the pale pink into the box with the finished pieces, and a good hour of searching last month failed to turn it up.  So already I had painted myself into a corner.

Some of the lessons are more positive.  I realized that some of the factors that had made me despair of finishing Pinkie in the first place had gotten less worrisome during her years in the box.  Lesson: when you think something is awful, put it away and reconsider it later.  (It may still be awful, but often it's not.)

I had started with a big piece of fabric, hand-dyed in a pale pink that was not uniform.  It wasn't mottled, but it did change color from side to side, some places lighter than others.  When I started cutting into the fabric and sewing it back together with a black strip between the pieces, my thought was to keep all the pink pieces in their original orientation.  So if I cut a slice of pale pink off and sewed it back, it would still be next to the matching pale pink, and the finished quilt would have the same gradual, subtle changes in color as the original piece of fabric.  But as the piecing got more complicated, I managed to lose that thought.  Paler pieces ended up next to darker ones, and the color differences became much more prominent. Years ago, I was unhappy with the effect.  But when I looked at the piece again, I decided I liked it. 

Another good lesson is to keep your teabags away from your fabric.  One day I had a cup of tea at the sewing machine and in some clumsy way managed to touch the teabag to the piecing.  Oops!  I decided I'd have to take out that part and repiece it with non-tea-dyed fabric.  But that never happened.  Upon revisiting, I decided the quilt had a distressed look to it and the tea stain fit in just fine.


But how to finish this poor, distressed piece?  My search didn't turn up any more of the original pink, but I did find some other pink, a bit darker but equally distressed in character.  And I noticed that the beige fabric I'd been using for another quilt also seemed to fit with the original pink -- that's a hunk of it in the top photo, on the design wall to the right of the pieced areas.  I had to use the new stuff around the edges to make the quilt rectangular, so it ended up with a "border" on three sides.

In the course of finishing this quilt I realized how much I have learned about the niceties of fine-line piecing in the course of making 20-some quilts.  This very early effort deserved a D, and had I not loved the design so much I probably would have turned it into placemats.


The back of the work was just too messy, with thread ends and fraying edges of the black fabric that would probably show through.  I spent a couple of hours with my tiny scissors trying to clean it up, but realized it would take all year to get it perfect.  So I decided to quilt in black and hope that the work would be hung in dim light so nobody would notice.

My final lesson came when I finished quilting and pinned the piece to my design wall to block it.  In my mind the quilt had always been a short, wide horizontal rectangle, but I had to turn it sideways to pin it to the wall.  And in the couple of days that it hung there in my peripheral view, I realized that it really wanted to be vertical!  It's often hard to change the way a piece sits in your head, especially if it's been sitting that way for years, but worth a try.

So here's the finished quilt, tea stain and all (I might put another stain or two on just to make it look deliberate instead of accidental).  Most of the things that bothered me the first time around don't bother me at all this time. 

Monday, August 9, 2010

Evaluating your work (always and ever...)

Somebody wrote to the Quiltart list yesterday asking us to look at a piece posted on her blog.  “I think this is a disaster, but need opinions – honest ones – as I have been looking at it too long and am not objective,” she said.  “I really don't like this piece right now, but am at a loss how to proceed. I'm tempted to just rip it up and walk away from it.  Is it as bad as I think, or should I keep working?”

I went to the blog and the piece – a whole-cloth screenprint – looked fairly nice to me; at least many of the details were gorgeous, and the overall composition was certainly adequate.  I posted a comment that said, “I am less concerned with what I think of this piece (I kind of like it) than with what you think of it.  What don't you like about it?  If you can articulate in as much detail as possible what you like and what you dislike, then you can answer your own question – should you walk away?”

I elaborate on this here because it’s an issue that every sentient artist faces at least once a week – is my work any good?  We all have moments when we’re tempted to just rip it up and walk away. 

Pollyannas have their response all ready, if we should ask:  No, you shouldn’t rip it up, it’s wonderful and you are just having a crisis of low self-esteem, which is BAD and you need to go have a nice cup of tea and then come back and keep working on your wonderful piece. 

With friends like this, who needs enemies?  All your work is not wonderful.  Even all of Matisse’s work was not wonderful (well, almost all of it was, but then, he was Matisse….).   Your friends do you no favors if their knee-jerk reaction is to love everything.  And you do yourself no favors if you insist on finishing everything you start – think of all the time you can waste by sticking with projects that deserve to be trashed or at the very least, turned into placemats.

But that internal critic who likes to denigrate everything you do is no friend, either.  Self-doubt can cripple you.  So the big question is how you look at your own work, to determine which pieces to walk away from and which ones to finish (and if so, how).  I am a firm believer in formal evaluation, whether it’s of your artwork or a new recipe or a pair of shoes you might buy or your allocation of time to various life activities or any other endeavor you embark upon.  Here’s a format that I have found valuable, and perhaps you will too.

I like to use formal evaluation when I finish a piece of art.  That helps me decide whether it’s good enough to enter in important shows, for instance, or whether it should just go lie down on the bed for the next five years.  More important, it points me in the direction I want to go for my next piece.  But formal evaluation can also help in midstream if, like the Quiltart writer, you aren’t sure where or whether to go next.

A process note: if it’s important to you, write it down.  That helps focus your thinking, because fuzzy logic is more apparent on paper than just sloshing around in your brain.  And you can save it for future reference, because most life experiences have some connection to previous life experiences, and you can often learn from your past.

First, what did you like about the piece (or the piece so far)?  This can include design issues (the asymmetrical layout, with more happening on the right side, is nice), theme issues (I feel strongly about the environment and like making work about that), process issues (complicated piecing is really exciting), or specific details (that red part on the top really turned out great).

Second, what did you not like about the piece?  Again, you can list details of the composition (wish I’d put the focal point higher up instead of dead center; that green in the bottom corner is too muddy) or process problems (Kona cotton is too hefty for fine-line piecing; I should have quilted this with the walking foot, not free-motion; sure not going to work with metallic thread again) or overall observations (this was nice but it's not me).

Third, where did you make a choice of equally appealing alternatives, and which alternatives didn’t get tried out?

If, like the Quiltart writer, you’re trying to decide whether it’s worth finishing the piece, you should add a fourth question: how much trouble would it be to fix the things in the second column that you don’t like, and are the things in the first column that you do like strong enough to make that worthwhile? 

If you’re finished with the piece and want to know where to go with your next piece, you draw up a plan based on your lists.  Choose some things from the first column and do those again.  Decide how to avoid the things from the second column.  And try out something from the third column that sounds interesting. 

I also advised the Quiltart writer, “Perhaps before you do this you should put the piece away for a week, or however long you think you can spare before the deadline.  When you start feeling negative about a piece it's often cumulative, and the more you see it the more you dislike it.  But if you can go away for a while you can often see things in a new light and realize it isn't so bad after all.”  I should have added that sometimes you will see things in a new light and realize that yes, sure is bad, for the following reasons, and this piece is going into the discard bag (not the trash – but I’ll write about that some day in its own post).

Friday, March 12, 2010

Assessing your own work

Elizabeth Barton had an interesting blog post this week about how artists should go about setting and achieving their goals. Her last point was that people need to experiment, but then need to assess what they have done and decide whether the experiment got them toward their goal or just took them around in circles.

This comment resonated with me because it fits in with the whole idea of finding your voice and not getting seduced off on tangents, which I commented on in the context of attending workshops. But tangents offer themselves in many other contexts as well – looking at people’s blogs, seeing other people’s work in a show or magazine, reading a new book. And too many times those tangents do not accomplish much except to take up time and produce work that may be nice, but doesn’t really get you closer to your goal.

I’m not saying that you must never take a tangent. Sometimes you need to take a little vacation from your real work. It can be emotionally refreshing to make the baby quilt, organize the wedding, sew up valentine hearts, whip out 50 sheets of handmade paper, practice some calligraphy, help your friend dye a bunch of fabric. But I don’t count that as art time, the time you are investing in your serious goals.

That’s a tangent. Back to my original point – that you need to assess what you have done. Elizabeth was talking about experimental work, but I will broaden the discussion and suggest that you need to assess everything you have done, and it’s more important to assess your “real” work than your tangents.

Sometimes people ask how you go about working in series – do you sketch out in advance what your next five pieces are going to look like? If not, how do you figure out what to do next?

As an aficionada of series, let me tell you my approach, and what I advise others to do.

After I finish a quilt, I ask myself four questions:
1. What do I like about this piece?
2. What do I not like?
3. What parts of it were easy to execute, and what was hard?
4. Where did I make choices between equally appealing alternatives?

Then I use the answers as a plan for the next work in the series.
1. Repeat some or all of what I liked.
2. Eliminate what I didn’t like.
3. Think of ways to make the hard parts easier, or avoid them.
4. Try one of the other alternatives that I didn’t choose the first time.

I try to be as specific and as rigorous as possible. For instance, my most recent big works were the two quilts that I sent off to Color Improvisations. I can’t show you the full pictures yet (we’re sworn to secrecy till the show opens in July) but I can share detail shots and my assessment of one of them, “Fault Lines 3.”   The quilt is 74 x 76 inches.  What you see in the larger detail shot is less than one-quarter of the quilt.


1. I like the complexity of the line work, the quilting was probably the best I’ve done in my life, I like the huge scale, I got a new burst of enthusiasm over the “Fault Lines” series.

2. The color choice could have been better; not sure I like the placement of accent colors achieved with quilting threads; I wish I had stirred the dye bath more so the back of the quilt was less mottled and more uniform in color.

3. It was surprisingly easy to piece, despite being huge, but very difficult and time-consuming to quilt.

4. I used four shades of red, ranging from light-medium to very dark. I could have used more than one color, or more variety in value, or less variety in value. I quilted each segment of the piece with a separate design rather than use an allover plan, and changed the quilting color occasionally for accent.

Having evaluated the quilt, so what? Now I use the answers to those four questions as a road map to the next quilt.

1. I will do the complex line work again in another huge “Fault Lines” quilt.

2. I will do more careful planning of colors, especially the accent color of the quilting thread.

3. I will quilt it in two panels and join them at the end, rather than struggle with one huge piece.

4. I will use more than one color. I might choose a different design approach to the quilting, and might not use a quilting thread accent color.

I should point out that I love this quilt; it’s one of the best pieces I’ve done. But I still can notice and evaluate the things that weren’t 100% successful, or that I could have done better. Indeed, you could argue that it’s more important to be rigorous in evaluating your best work than in evaluating your mediocre work. You raise the bar by exceeding your best rather than just exceeding your merely OK.

If you are working in series, or thinking about working in series but not sure how to proceed, this is a method that may help you along. Feel free to try it, and let me know how it works for you.