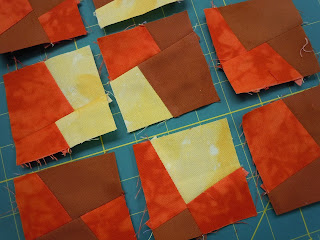
Time for another quilt date, and if you don't like this guy, too bad because I'm going out of the matchmaking business at the end of the year. Next year I'll try a different theme for my periodical forays into pedagogy and art inspiration. But first, here's Mr. December, fresh from the orthopedic ward.
Yes, Mr. December is all about fractures. One of the recurring pleasures and challenges of quiltmaking, in my opinion, is how to make your work complicated (which makes it more interesting) without spending the rest of the century at the sewing machine. I'm an expert at time-consuming complication, but every now and then I get a kick out of shortcuts like this technique.
As my examples of this technique, I will turn to my friend Marti Plager, who has had a long-running dalliance with Mr. December. She has most frequently used fractured blocks as the background for pictorial or semi-pictorial quilts, like these.
Marti Plager, Primrose Passion
Marti Plager, Along the Banks #2
With a minimum of fuss, you too can construct fractured blocks that combine several different fabrics and look deliciously complicated.
Start by choosing many fabrics and cut them into squares or rectangles of the same size. Then assemble sets of different fabrics -- three or five in a set give the most variation.
Stack your set in a pile, align the edges carefully, then slice through all of them at an angle and separate the two halves of the pile. Take the top piece off one of the piles and move it to the bottom. Then sew each pair of halves back together. You now have as many reconstructed blocks as you started with.
You can use these two-piece blocks in your composition as is, or you can restack the blocks, turn them 90 degrees and repeat the process to make four-piece blocks. For greater variation in fabrics, make a lot of two-piece blocks, then reshuffle them into new stacks of three or five before you make your second cuts.
I've done it both ways, but think it's best if all your cuts are made at the same angle -- either northwest to southeast or northeast to southwest. After you've made a project or two, maybe you'll want to experiment with mixing the two directions for more visual excitement. For a very controlled look, you may want to mark your cutting board with painter's tape so you cut all the blocks at exactly the same angle, but I think it's just fine to eyeball it. I also like to vary the placement of the cuts from set to set -- sometimes make one half of the stack quite skinny, as in the photo above, sometimes run the slice smack through the middle of the block.
Depending on how you choose the fabrics for each set of blocks, you can achieve a wide variety of color effects. For instance, you can make dark blocks and light blocks, or mix the values in every block.
Or, as Marti has done, while you have an interior seam open, you can insert a little sliver of contrast color before you sew the fractured block back together.
Marti Plager, Games: Jacks
Marti Plager, The Vineyard
If you like this technique, here are some ideas for the second date:
• Combine two-piece blocks with four-piece blocks.
• Make fractured blocks in different shapes and sizes, then combine them.
• Try different color strategies, or different proportions of colors in your mix.
• Or anything else that strikes your fancy.
Let me know how it works out. If you want to send me a picture of what you made, I’ll post it. Enjoy your date!
Subscribe to:
Post Comments (Atom)


always such an interesting blog
ReplyDeleteI'll be giving it a try! Thanks for not being afraid I would steal your idea!
ReplyDeletesorry to see your matchmaking go. I really liked these, you've given me wonderful ideas. Favorites were Mr April, and I think this one might be a very nice guy, too.
ReplyDeleteHi U.L. -- I'm not giving up on passing along quilt ideas, just the tyranny of every month!! I hope I'll come up with something new this year that you'll like too.
ReplyDelete