
Keeping track of your quilts is a huge task when you have made dozens and dozens of them, and especially if you have them out and about on exhibit. I have tried various recordkeeping systems including one I bought that was specifically for tracking show entries (that one didn’t work at all) and now I have cobbled together a combination of Word and Excel documents.
The Excel spreadsheet has the title, dimensions and year of each quilt, a category designation (for instance, selvage quilts), an image, a price, and a list of where it has been exhibited. I try to keep this up to date but confess that I don’t have full info on my earlier quilts. I could probably reconstruct the data and take new photos or scan in my old slides, but that has always been low on my to-do list.
The Word documents have bios and artist statements, sometimes specifically for a given quilt, sometimes by category of quilt, sometimes in general. When I need some words I look at what I have on file, choose the closest fit, and tailor it to the new purpose. Then I save that version too.
Although I think I’m pretty well organized, sometimes I am thrown for a loop. Like a couple of days ago when I got an email from SAQA regarding ”Crazed 1: Tricolor,” whose picture is over at the right on this page. It’s in the SAQA@20 exhibit, has been gone for several months and will be on tour for at least another year; it even was sold at the first venue.
The email asked whether the quilt has a bottom sleeve, because SAQA is planning to adopt a new hanging system for all its shows, and maybe they will use it later on this tour.
I usually put bottom sleeves on my quilts, but not always, and the thought of being able to recall whether this one has a sleeve gave me a real laugh. Today we got another email saying we shouldn’t feel bad if we didn’t remember. (Not to worry, I didn’t – feel bad, that is.)
Maybe I need to start taking photos of the backs of my quilts and stick them into the spreadsheet too. A great project for my future spare time; I think it will be about #3,587 on my to-do list.
PS – I'm off today on a European expedition and probably won’t be able to do any blogging till I come home. Hope you don’t forget about me in my absence, because I do love writing this blog and having you visit. Next month I promise exciting pictures and commentary on my travels, and there will be a Quilt Date on July 15. Have a good month, everybody!
Sunday, June 20, 2010
Friday, June 18, 2010
My new quilting system
We all know we ought to write this stuff down, and sometimes we even do! My cookbooks are annotated with notes like “way too much sugar” and “pretty bland -- needs garlic or onions.” But better than just writing it down at the end of the project is to do the task over again to cement and refine the good ideas.
That has just happened to me, not that I can take credit for doing it on purpose.
I am trying with some urgency to get my Quilt National entries completed. The deadline isn’t till September but I have two overseas trips between now and then. I finished my piecing a while ago and for the last month have been quilting nonstop.
A couple of weeks ago I was complaining that my quilting was sheer torture. The quilt was fighting me at every turn, as so frequently happens with large pieces and a home sewing machine. There’s just no good way to make a huge, bulky, heavy bunch of fabric move gracefully under the needle when half of it has to be forced under the narrow harp. I love, love, love to quilt on small pieces where you can make swooping curves and intricate patterns at the very touch of a fingertip. But many times I hate, hate, hate to quilt on big pieces, which are unfortunately the kind of quilts I like to make.
Last year I spent months quilting two very large pieces (75 x 78” and 79 x 82”) that are going to be shown in the Nancy Crow-curated exhibit, Color Improvisations. I thought it would be easier to free-motion quilt them than to use a walking foot, simply because the bulk of a huge quilt seemed more problematic in that process. I’m not sure that was the correct evaluation, because the free-motion was anything but easy, but in any case I decided to use the walking foot this time around. So here I am with five slightly smaller pieces (all about 41” wide and 60-75” long) that I am quilting with the walking foot in grid patterns.
The first piece was just hard work. The second piece was hard work plus frustration, almost to the point of hysteria. I was an unhappy camper, but I fought my way through and finished the #$*@#* thing. In a parallel universe that would have been the end of the story, and I would have gone on to start piecing a new quilt and dreaded the part where I had to actually quilt it. But in this universe I had to immediately sandwich another piece and get quilting on it that very evening.
And something magical happened. I was thinking so much about the frustrations of working on pieces one and two that I started running some inventive what-ifs through my head. I started on piece three with the determination to avoid the frustrations of piece two.
There are two big problems with the process of quilting parallel lines across the whole width of the quilt. You generally start by making a scroll, rolling each edge in toward the center and exposing only the narrow part that you will quilt. First problem: the roll wants to occupy the same space you do, and if you try to heave it into some other space, farther to your left, it resists arrest in different creative ways. Second problem: the roll doesn’t want to stay neatly rolled; it wants to explode and bulge and get in your way, and require you to re-roll it after every couple of rows, especially on the first pass when you’re stitching the layers together for the first time.

So after two weeks of nonstop fighting with these frustrations, I had a couple of insights.
First, I realized that rolling the quilt into a scroll was counterproductive. You can force a roll to bend off toward your left, to get it out of your own space, but when you do so, it often springs back at you. But if you fold your quilt like flat-fold fabric instead of rolling it, you can easily fold it again to stay wherever you put it.

Second, I realized that I needed to keep the folded sides of the scroll where they belonged so the bundle didn't come open while I sewed or repositioned. The ends were easy -- you can put a binder clip or clamp over the folded edges -- but the middle needed to be secured too.
I haven't yet figured out the perfect way to secure the bundle, but a couple of different things I've tried worked pretty well. Probably the best way to secure the middle of the bundle is by sewing two long, heavy threads (I used button-and-carpet weight) through the quilt, then tying them around the bundle. I'm ambivalent about how best to secure the ends -- with clamps or by machine-stitching the edges of the folds.


clamping the end of the bundle

Clamps -- pro: it's quick and secure. Con: clamps make the bundle heavier to move back and forth, and you can bop yourself in the face with a hunk of metal if the bundle is in transit or flopping down from your shoulder (ask me how I know that’s a problem).
Sewing -- pro: it's secure and doesn't add weight to the quilt. Con: it takes a couple of minutes to sew the ends, especially when the bundle is fat and you need to be careful getting all layers under the needle; it also takes a minute or so to rip the seams when you need to unscroll and reposition.
Using a combination of these approaches, I quilted the third piece in about half the time it took for the second.
The bundle is so firm, almost rigid, that I can often “drive” by holding the bundle rather than placing my hand(s) flat on the quilt, thus much easier on the wrists. But it’s easy to fold the bundle 90 degrees off to the left so it’s supported by my table and out of my way at the start of a long stitching run. I found myself sewing pedal to the metal, faster than I think I’ve ever quilted in my life. (So fast, indeed, that I can’t hear when the bobbin runs out of thread.)
I'm now on piece four, adapting my system to a quilt in which the walking-foot “grid” is on the diagonal. That is making for more awkward bundles, because the ends don't fold into neat edges; instead, there's a point sticking out at the end of the roll and it's a little harder to figure out how to sew or clamp it. But with the bundle tied in the middle, it's so secure that I am even able to sew halfway across the width of the quilt, then turn the entire bundle and sew back in the opposite direction to make V-shaped rows of stitching. When I do this, it takes a little muscle to coax the bulk of the quilt under the harp, but nothing comes apart. If you've ever tried to make a big quilt change position under the needle, you know what a coup this is.
I'm feeling quite pleased with my system. It proves that when you run into difficulties, sometimes the best thing you can do is immediately embark upon another of the same project.
Art-A-Day

June 13 -- rest stop

June 14 -- Flag Day

June 15 -- chests

June 16 -- sky view

June 17 -- possum tail
 June 18 -- soccer camp

Wednesday, June 16, 2010
Sinking thread ends
A couple of days ago I wrote that Katy, one of my internet friends, sent me a whole pile of needle threaders after I complained about having to sink the thread ends on some huge quilts. One of the comments to that post asked, "what do you mean by sinking the thread ends, and how does a needle threader help?"
A good question!
If you have begun or ended a line of machine stitching in the middle of your quilt, you have to deal with the two thread ends. Some people backstitch to secure the threads, or perhaps use very tiny stitches as they get to the end of the line, then cut the thread ends off right there.
But I have seen too many such finishes that don't look finished at all. The scissors can't reach exactly to the surface of the quilt, so the thread ends stick up in little eyelashes. Or the backstitch didn't really secure the threads, so over time the quilting comes unsewed. I think it's much more professional to pull both ends to either the front or back of the quilt, tie them, thread them into a needle and make the threads disappear between the layers of the quilt.
This is time-consuming, of course, even if your eyes are good enough to thread a needle without difficulty (mine aren't). I have used self-threading needles but they tend to shred rayon or shiny polyester thread. It's much easier to just use a needle threader.
I should give a shout-out to Robbi Joy Eklow, another Quiltart list maven, who champions an alternative method of sinking thread ends. It really works, and I have used it on occasion but not enough to really get into the rhythm and internalize the method. I'll show you how it works (wish I could send you to Robbi's website, but I can't find this anywhere publicly posted) but as for me, I'm just so happy with all the needle threaders that Katy sent me last year, I'll probably stick with my own method forever.
In either case, here's the tutorial:
My method -- with needle threader
 step 1: Insert a needle into the quilt exactly where you want your thread ends to disappear. Run the needle between the layers of the quilt for about an inch, feeling from underneath to make sure the needle doesn't poke through on the back. Bring the needle up to the top of the quilt.


 step 1: Cut a piece of thread about a foot long. Robbi suggests orange so you can keep that threaded needle in your pincushion forever and find it easily the next time you need to sink thread ends. Double the thread and thread both ends through the needle. Adjust the length of the ends so the loop is longer than the cut ends.


A good question!
If you have begun or ended a line of machine stitching in the middle of your quilt, you have to deal with the two thread ends. Some people backstitch to secure the threads, or perhaps use very tiny stitches as they get to the end of the line, then cut the thread ends off right there.
But I have seen too many such finishes that don't look finished at all. The scissors can't reach exactly to the surface of the quilt, so the thread ends stick up in little eyelashes. Or the backstitch didn't really secure the threads, so over time the quilting comes unsewed. I think it's much more professional to pull both ends to either the front or back of the quilt, tie them, thread them into a needle and make the threads disappear between the layers of the quilt.
This is time-consuming, of course, even if your eyes are good enough to thread a needle without difficulty (mine aren't). I have used self-threading needles but they tend to shred rayon or shiny polyester thread. It's much easier to just use a needle threader.
I should give a shout-out to Robbi Joy Eklow, another Quiltart list maven, who champions an alternative method of sinking thread ends. It really works, and I have used it on occasion but not enough to really get into the rhythm and internalize the method. I'll show you how it works (wish I could send you to Robbi's website, but I can't find this anywhere publicly posted) but as for me, I'm just so happy with all the needle threaders that Katy sent me last year, I'll probably stick with my own method forever.
In either case, here's the tutorial:
My method -- with needle threader


step 2: Pop the needle threader through the eye of the needle. Arrange the thread ends underneath the wires of the needle threader.

step 3: Using a tweezer, grab the thread ends and pull them up through the wires of the needle threader. Pull on the needle threader to get the thread ends through the eye of the needle. Pull the needle through the quilt to sink the thread ends. Clip off the thread ends where they emerge from the top of the quilt.
You will cleverly notice that you could have threaded the needle before you ran it between the layers of the quilt. Yes, but what if your thread ends weren't long enough? We always try to leave plenty of thread when we start or stop, but sometimes things happen. This way you can pull the thread ends through the needle even if they're only a half-inch long.
Robbi's method -- with needle and thread
 step 1: Cut a piece of thread about a foot long. Robbi suggests orange so you can keep that threaded needle in your pincushion forever and find it easily the next time you need to sink thread ends. Double the thread and thread both ends through the needle. Adjust the length of the ends so the loop is longer than the cut ends.
step 2: Insert the needle exactly at the point where you want your thread ends to disappear. Run the needle through the layers of the quilt, feeling underneath to make sure the needle does not poke through on the bottom. Bring the needle up about an inch away.

step 3: Pull the thread through until only a small loop is left.

step 4: Pull the thread ends through the orange loop.

step 5: Pull the orange thread, which will carry the thread ends through the layers of the quilt. Trim off the thread ends where they emerge from the top of the quilt.
June quilt date report -- and more thoughts on daily art
Gerri Congdon, whom I "know" from the Quiltart list, had a date with Ellsworth Kelly yesterday.
She and many others from the Quiltart list are participating in a sketchbook project sponsored by the Brooklyn Museum of Art. Gerrie's plan for her sketchbook is to make a fabric collage in her book every day, which warms my heart because I am a fan of daily art.
So my question to Gerrie and others who are doing sketchbooks and other small daily art: what happens next? Does the sketchbook or the little piece of art function as a true sketch (in other words, you subsequently make a larger piece of "real art" based on the small preliminary version) or has it become art already just by being made?
In my own case daily art falls more into the latter category. I see no point in the ritual of doing something every day, instead of as the spirit moves me, unless that "dailyness" is part of the art itself. To me, posting seven photos per week has meaning when I know one was taken each day -- but if I just chose my seven favorite photos of the week, and five of them were taken on Friday, the project would lose something in translation.
But I know that other people like daily art because of its aspect of self-discipline. It makes you sit down and do something whether you feel like it or not. It's a way to pluck inspiration from nowhere. And presumably you later do something with that hard-found inspiration. When my local fiber art group did a daily art challenge, one of the participants said she had made small trading-card-size collages every day and put them into "my idea box." What a good idea -- but I hope the ideas don't just stay in the box.
I've always resisted the idea of sketchbooks, one reason being that I often feel people stop by doing the beautiful sketchbook rather than using it as a tool to help make "real art." But maybe I've been too hard on those people. Maybe the sketchbooks are the "real art."
On the other hand, maybe my challenge to myself is whether I need to think more rigorously about my own daily art, whether I can use it as a jumping-off place to larger, more substantial pieces of "real art." Hmmm.
Tuesday, June 15, 2010
Quilt date for June
Time for another quilt date – this time, with a famous artist. The guy is Ellsworth Kelly, a great American painter born in 1923, known for his hard-edge Color Field work. I have loved his work in many different museums and spent many hours with three or four books of his work.
 here's a picture of an Ellsworth Kelly painting that I took at the Norton Simon Museum in Los Angeles


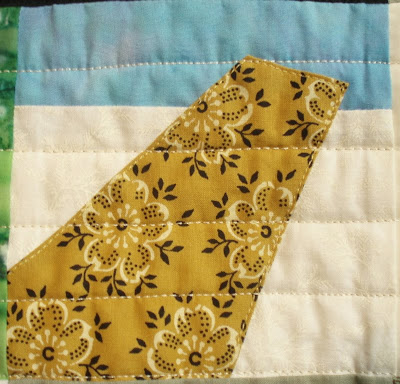
 Kathleen Loomis -- Landscape 2
 Kathleen Loomis -- Landscape 3

Kathleen Loomis -- Landscape 4
For some reason I abandoned this series before it matured, but when I revisit these quilts I sometimes wonder whether I quit too soon. I particularly like the subtlety of the low-contrast areas in the left-hand columns.
If you’re intrigued by this approach and would like to go out with Ellsworth Kelly, you could either use hand-dyed fabrics and take advantage of the low contrast of piecing a fabric against itself, or be more true to his Color Field nature with commercial solids.
Then you have to decide the following specifications for your quilt:
How many columns? (I suggest either three or five.)
Which (if any) column will be “empty” – with no stripes or low-contrast stripes?
How wide will each column be? (You could work in miniature with four-inch columns, or much wider. My three quilts had 10-inch columns.)
What proportion will you use for the two color stripes? (The contrast color could be equal in width to the background stripes, or very narrow in comparison, or wider, or anything in between.)
Will you cut your stripes with a ruler, or as straight as you can get them freehand, or curvy? If you choose straight or straightish edges, will your stripes always be exactly horizontal, or will you have some on the diagonal or wedge-shaped? You might want to doodle some of these alternatives before you start cutting, or make sketches by cutting construction paper, as Kelly himself did.
And finally, which two colors?
All three of my quilts were made by constructing the columns independently, then putting them up on the design wall and only then making minimal adjustments if I didn’t like the way the stripes in one column abutted those in the next column. The composition might have improved if I had laid out the entire quilt before sewing the columns together – but on the other hand, it’s very hard to know in advance exactly where a certain strip is going to fall before you have actually sewed it and used up all the seam allowances.
If you like your first date and want to explore this approach farther, just go back to the list of questions and choose another combination of answers. Before I abandoned my series I had actually planned out a half-dozen future possibilities. For instance, I was going to experiment with having the two colors be higher or lower contrast (Kelly’s original was hot pink and orange, so close in value that you could hardly tell them apart) and with having the “empty” column be somewhere besides at the far left. You could make similar changes with any of the other specifications; all the columns don’t have to be the same width, and there are a multitude of different ways to cut a “stripe.”
And you could emulate the first Kelly picture I posted above, by using square or rectangular striped blocks instead of long striped columns.
As always, if you try this date, let me know how it works out. If you want to send me a picture of what you made, I’ll post it.
Have fun!

Kelly was a prodigious doodler, as I learned from one book that reproduced hundreds of sketches on little scraps of paper or the corners of newspapers and other ephemera. One of Kelly’s recurring practices was to cut free-hand strips of paper and paste them into two-color compositions, then slice the collage and rearrange it. Sometimes the resulting compositions were executed as paintings. Seeing several variations on this approach, I was intrigued by how much they resembled quilts – hard edges (seams) between two colors (solid fabrics) in block or column organizational structures.

Ellsworth Kelly -- Study for “Cite”: Brushstrokes Cut into Twenty Squares and Arranged by Chance, collage of ink on paper, 1951

Ellsworth Kelly – The Meschers, oil, 1951
The piece that I used as inspiration for a series of quilts a few years ago resembles the two pictures shown here, but not exactly. Like the blue-and-green painting, it is organized into five columns, but the first column has no “stripes,” only a single color. (Sorry I can't find a picture to show you.)
I liked this approach and made three quilts using the same plan. To perfectly translate Kelly into fabric, I would have used commercial solids for flat color areas, and I would have used a single piece of fabric for the non-striped column. But I was using hand-dyed fabrics with a fair degree of mottling. And I chose to piece the “plain” column in stripes just like the four other columns, but use the same color fabric for minimal contrast.


Kathleen Loomis -- Landscape 4
For some reason I abandoned this series before it matured, but when I revisit these quilts I sometimes wonder whether I quit too soon. I particularly like the subtlety of the low-contrast areas in the left-hand columns.
If you’re intrigued by this approach and would like to go out with Ellsworth Kelly, you could either use hand-dyed fabrics and take advantage of the low contrast of piecing a fabric against itself, or be more true to his Color Field nature with commercial solids.
Then you have to decide the following specifications for your quilt:
How many columns? (I suggest either three or five.)
Which (if any) column will be “empty” – with no stripes or low-contrast stripes?
How wide will each column be? (You could work in miniature with four-inch columns, or much wider. My three quilts had 10-inch columns.)
What proportion will you use for the two color stripes? (The contrast color could be equal in width to the background stripes, or very narrow in comparison, or wider, or anything in between.)
Will you cut your stripes with a ruler, or as straight as you can get them freehand, or curvy? If you choose straight or straightish edges, will your stripes always be exactly horizontal, or will you have some on the diagonal or wedge-shaped? You might want to doodle some of these alternatives before you start cutting, or make sketches by cutting construction paper, as Kelly himself did.
And finally, which two colors?
All three of my quilts were made by constructing the columns independently, then putting them up on the design wall and only then making minimal adjustments if I didn’t like the way the stripes in one column abutted those in the next column. The composition might have improved if I had laid out the entire quilt before sewing the columns together – but on the other hand, it’s very hard to know in advance exactly where a certain strip is going to fall before you have actually sewed it and used up all the seam allowances.
If you like your first date and want to explore this approach farther, just go back to the list of questions and choose another combination of answers. Before I abandoned my series I had actually planned out a half-dozen future possibilities. For instance, I was going to experiment with having the two colors be higher or lower contrast (Kelly’s original was hot pink and orange, so close in value that you could hardly tell them apart) and with having the “empty” column be somewhere besides at the far left. You could make similar changes with any of the other specifications; all the columns don’t have to be the same width, and there are a multitude of different ways to cut a “stripe.”
And you could emulate the first Kelly picture I posted above, by using square or rectangular striped blocks instead of long striped columns.
As always, if you try this date, let me know how it works out. If you want to send me a picture of what you made, I’ll post it.
Have fun!
Saturday, June 12, 2010
Art-A-Day


June 10 -- from the deck

June 11 -- behind the restaurant

June 12 -- hollyhocks
Photo thoughts 6 -- close-ups
Finally, let me talk about extreme close-up pictures. Not sure that really counts as a genre but I find them fascinating, ever since I discovered how to use the macro shooting mode. Unfortunately this occurred many years into my digital camera experience, which should teach me to read the user manual more carefully.
Close-ups are great for showing the beauty of a single leaf or blossom (no wonder they use a picture of a flower as the icon for macro mode). They are great for revealing textures.
I like close-ups for two somewhat contradictory reasons: they allow you to see detail and thus understand things better, but they also can fool you by concealing the whole of what you’re looking at. They can help orient you, but be profoundly disorienting if there is no context.
Sometimes it's nice to include a detail to help viewers figure out what they're looking at, but sometimes I like photos that are hard to read.


Friday, June 11, 2010
My calendar quilt
I have written several times about my interest in daily art, projects where you make a commitment to yourself to make a certain type of art every day (or every week, for those with larger ambitions and/or less time).
My first daily art project was a quilt that has a block for every day in a year. The year was 2001, and I was inspired by a really dumb thing: the title of the old movie 2001: A Space Odyssey. I thought it would be really original to hijack that title and call my piece 2001: A Quilt Odyssey. Of course, it wasn’t original at all – in five minutes on Google I just came up with at least five shows with that title or theme – but it did start me on a wonderful piece of work.
The key to a daily art project, of course, is to set rules for yourself, and to write the rules in your own favor. You want to set the bar high enough so you will be challenged but low enough so you will actually keep on jumping. I did some serious thinking about this quilt in the last days of December, and decided that I would make a five-inch square block for every day. It didn’t have to be made on that day, but it had to document something that happened that day. Eventually I planned to sew the blocks together into a quilt.
On days when I worked in the studio, it was easy to make the block. At night, just before I turned out the light and went upstairs, I would gather up scraps from whatever I had been working on and sew them together till they were five inches square. So the quilt became a diary of the quilts I made that year (I was amazed to count up at the end of the year and realize that I worked on 42 different quilts).


On days when I didn’t sew, I looked for the most striking visual image of what I had done during the day. This was the biggest challenge for me. Since I don’t draw, I struggled with how to represent these days – and even if I had been able to draw, what could I execute in fabric within the confines of a five-inch square? I had to force myself to simplify, simplify, simplify. Turned out to be excellent training for my quest to become an artist.
Here’s one such block: we saw the opera “Daughter of the Regiment,” a frothy comedy where the guys all wore fancy uniforms. My first thought was to depict soldiers (which I couldn’t figure out how to do) but after many sketches, each one simpler than the one before, I came up with the essence of the fancy uniforms.

In a quilt this busy, it was nice to have some recurring blocks for continuity. I made up two blocks for travel days, a highway block and an airplane block. And a beach block for my calm vacation.


I’ll write more about this quilt in subsequent posts.
Subscribe to:
Posts (Atom)


