Showing posts with label machine quilting. Show all posts

Wednesday, June 21, 2023

Blast from the past

My friend-since-graduate-school sent me an email the other day with a photo of a quilt:


I made this quilt 50 years ago for her son Kimo, who is about to have his big birthday.  It's obviously still in circulation in the household, perhaps used by one of his kids.  

I had never taken a picture before I mailed it off, and I am thrilled to see it again.  I remember the actual design and construction, and how I struggled to make it.  I had cut out the beautiful curvy motif, turned under the edges and pinned it carefully to the background.  But when I started to sew, it slithered around and thus became all puffy and bulgy.

With hardly any quilting to hold things in place, the bulges have survived the decades.  So have the vivid colors, since the fabric was largely polyester (that's pretty much all we had in the early 70s).  

For me, the photo is a reminder of how little I knew about quiltmaking in those days -- and no wonder, because I was totally self-taught, without benefit of the myriad books, magazines, workshops, quilt shops and quilt guilds that later turned quilting into an easily-accessed industry.  Fortunately, I have learned many things since then, and not just about quilts!

The photo also reminds me of my enduring love for the curvy shapes that I stole from Henri Matisse.  You probably know about how the great artist, having lost almost all his sight, turned to scissors and paper when he could no longer paint.  He cut these shapes, along with dancers and stars, and made a body of work that is stunning in its simplicity and power.

Henri Matisse, The Sheaf
Kimo's quilt was the first time I had used this motif, but it would certainly not be the last.  Years later when I learned how to do free-motion quilting, I used this same curvy rhythm to fill space.  I called this pattern "Matisse" and have taught it to many students.  

Sometimes I make little motifs in rows.


Sometimes I let the curves sprawl across large areas.  


Just looking at the photos makes me want to go down in the studio and sew Matisse curves onto something!


Monday, July 12, 2021

Form, Not Function 5 -- more people

More portraits of people at FNF, but not in the hyperrealistic style of those we looked at last week.


Clara Nartey, The Gele Skyscraper, detail below

The elaborate headdress looks like it's pieced from commercial striped and dotted fabrics, but it's actually digitally printed and then enhanced with thread painting, especially on the face.


Pamela Mick, Riders on the Storm, detail below

This quilt also looks pieced but isn't -- it's painted with dye and then quilted with multicolored thread painting. 

Holly Cole, Come and Go, detail below


Here the technique is raw-edge collage, with loose drawing and wash on pale fabric to sketch in the women carrying and wheeling their goods to and from the market.  Meander quilting gives texture in the background, perfectly complementing the loose drawn lines in the portraits,

Wednesday, June 2, 2021

No-pressure quilting

Since I started posting daily to Instagram at the start of the year, I have been looking at a lot of posts by other quilters, because the Instagram algorithm is so great at identifying what you're interested in.  And while I have seen a whole lot of wonderful work, I've also seen a lot of photos that make me cringe. 

If you would like to cringe for yourself, go to instagram and search on #improvquilt or #improvquilting.  (The links also work if you're on a computer, not your phone.)

Specifically, photos where people have apparently lost the use of their irons.  It's obvious that if there was any pressing at all during construction of the blocks, it was slapdash.  I can imagine what these quilts are going to look like after quilting and finishing, and the picture isn't pretty.

All photos from other people's
Instagram posts


When I teach quilting I give my signature spiel in which I say I don't care about almost all of the quilt police rules.  Don't care if your seam allowances are 1/4 inch.  Don't care if your points match at the seamlines.  Don't care if your blocks are exactly square, or if your seamlines are exactly straight, or your quilting stitches are all the same length.  But there is one thing that I REALLY care about, enough to make up for all those that I don't bother with.  I care that you press obsessively and thoroughly, that you press every seam open before you cross it with another seam. that you press every block perfectly before you trim it to size and join it to others.


It's particularly important with curved seams; even if the two pieces don't match exactly you can usually coax them into perfect alignment with a spritz of water and a hot iron to urge the bias threads into obedience.  

What disturbs me even more about these unpressed blocks and entire tops that people are so proud of that they post them to instagram is that many of them have made their pieces in workshops with (presumably) qualified teachers.  

I don't know how online quilt instruction works, but I would hope that teachers are asking their students to send photos, and that they are pointing out pluses and minuses of the work.  And how could teachers possibly overlook the glaring lack of pressing?????


I would hate to think that the teachers don't notice, or that they notice but don't care.  In my opinion any teacher who approves of work like these examples should lose her teaching license.  Oh wait, you don't need a license to be a quilt teacher, anybody who stays one block ahead of the rest of the class can promote herself as a guru and apparently attract lots of people willing to pay to "learn" from her.


I just read an instagram post, complete with photo of unpressed blocks, in which the author adorably tells us "Okay here's all the secrets to making an improv quilt."

Secret #5 reads: "Iron the seams once in a while but only when your butt starts falling asleep and you have to stand up."  

I know this is meant to be charming and humorous, not really serious, but it helps spread the idea that pressing is optional, that improvisational quilting = sloppy quilting.  And that makes me crabby.  Way more than crabby, if you must know.


Want to learn how to press your quilts in progress?  Check out my tutorial here, and then read on for curved seams.  Take my word for it, if you learn to press properly, and more important, if you make yourself do it all the time, your quilts will look vastly better and it will be vastly easier to work with them.  

Now to figure out how to get the word out to all those people on instagram!


Monday, May 24, 2021

A present arrives

I received a wonderful present today from Paula Kovarik, a great quilter whose work I admired even before we got to meet and become friends,  It's a small quilt, densely stitched, of course, since that's her modus operandi, but a bit different from her signature quilting in that it has no funny creatures, just straight lines.  In fact, the quilt is called "Sightlines," which I'll explain in a minute. 

I couldn't wait till I find a place to hang it, so Ken obligingly modeled the quilt right out of the box.


This quilt is special not just because I get to have another Kovarik original in my collection -- which is special enough right there -- but for how it came to be mine.  Paula has written a book about her quilting process, and I had the privilege of editing and proofreading it for her.  "Sightlines" is my pay for the job.  

Having read every word of this book four or five times, I am uniquely qualified to tell you that it's a fine piece of work.  It has several kinds of text: detailed stories about how she came to make some quilts, tutorials and exercises on how to emulate her style of drawing-through-stitch, thoughts on her creative process and why she works in this medium.  It will even tell you how to (gasp!) cut up and reconfigure quilts that you're bored or dissatisfied with.  (Paula even did this with a Quilt National piece after it came home from touring.)

The book is called "At Play in the Garden of Stitch: thoughts that come while eyeing the needle" and it should be ready to purchase very soon.  (One advantage of self-publishing, which I shared with Paula while she was still in the planning stages of this book, is that you don't have to wait for months and months for a publisher to slot you into a huge schedule.)   I'll let you know when that happens.


But back to my new quilt.  Paula pieced the quilt from her scrap bag, and when it came time to quilt it, decided to not just stitch on all the pieced lines, but to extend those lines all the way to the edges of the quilt.  That led to a very dense network of lines, which made a web of interesting shapes, especially in the large black and white areas of the quilt.  Wherever she saw a triangle, she filled it in with dense stitching in gold.  

The gold areas jitter, giving excitement to the plain white foreground and making the black "sky" alive with sparks or fireworks or maybe auroras.  I can't wait to get this quilt into a permanent place so I can see it every day. 

Wednesday, August 19, 2020

Form, Not Function 2 -- improvisational piecing


There are only 19 pieces in this year's Form, Not Function show, so you can't help but notice when you seem to see the same one more than once.  Don't say to your friend, "Did you like that improvisationally pieced one, the really big one, with lots of white and all that machine quilting? It won a prize." -- because that only narrows it down to three.

Here's what won the second prize, in effect:

Susan Lapham, Playland #3, 85 x 82" (detail below)

It's densely machine quilted with horizontal lines barely an eighth-inch apart.  Yes, as the title suggests, there's a hint of playfulness but the subdued palette of off-colors gives a calm feeling despite the complex piecing, especially the tiny squares of black scattered on the large white areas. 

Honorable mention went to:

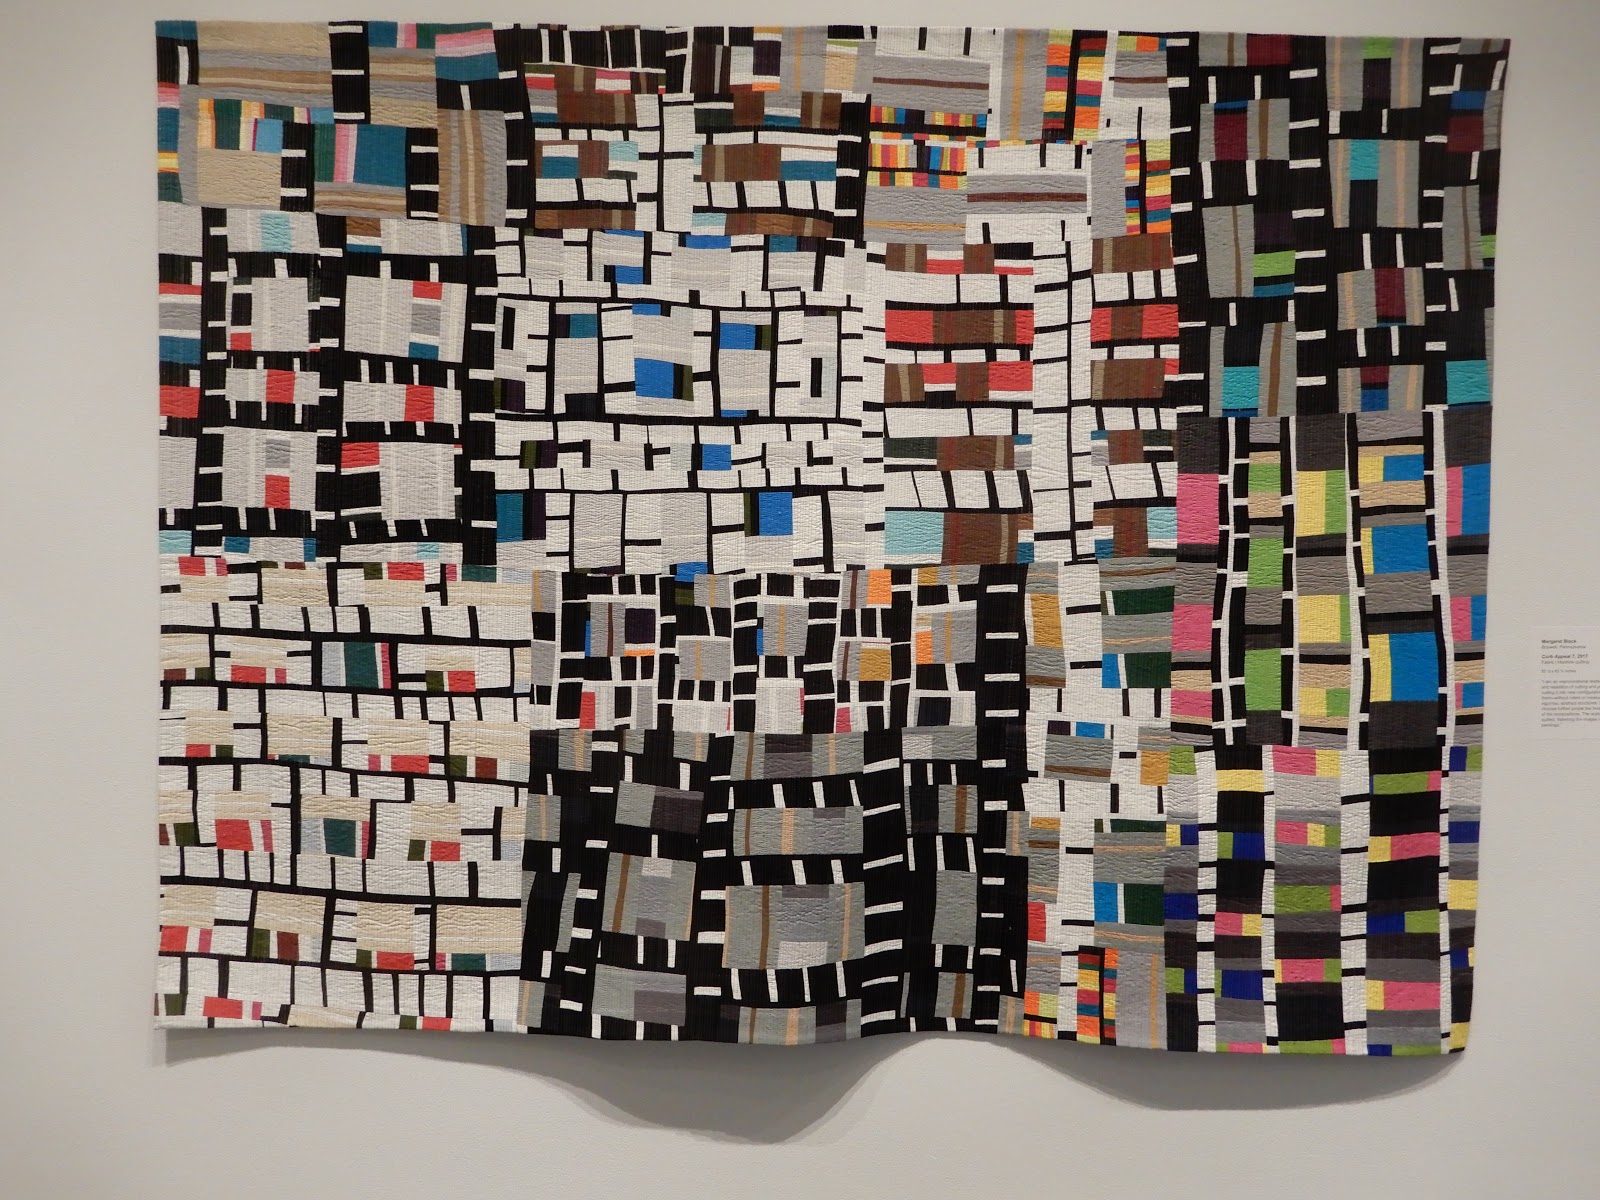
Margaret Black, Curb Appeal 7, 84 x 64" (detail below)

Black won a prize at last year's FNF for Curb Appeal 6, somewhat larger and more complicated than this year's entry.  (She also took best in show at Quilt National '17, before she embarked upon this series.) 

What's to say about this one -- it calls out to all of us who love to piece and cut and piece and cut and keep going forever.  Like Lapham's quilt, this one is densely machine quilted with parallel lines, except these go vertically.

And another honorable mention:


Susan Michael, All That You Dream, 75 x 64" (detail below)

It's the tiebreaker in the machine-quilting department, making two out of three with vertical lines.  The bold black-and-white palette gives a more assertive character and graphic quality than was seen in the other two quilts, with overtones of African prints and sparing accents of red and yellow.  Unlike the other two quilts discussed today, this one mixes fabrics, with canvas, ticking and some little shiny fabrics side-by-side with quilting-weight cottons. 

As one who does improvisational piecing with mostly right angles and dense machine quilting with parallel lines, I find it difficult to say anything bad about these quilts!  I'd be happy to have made any one of them.

All three of these quilts, especially the first two, suffered a bit from being displayed on white walls.  It was hard to tell where the quilt stopped and the wall started.  A gray or beige wall would have made them sparkle and sing.

More important, when one-sixth of the whole show consists of basically the same recipe, I have to wonder whether it might have been more interesting for viewers if the jurors had found a little more variety in approach and appearance.

Saturday, February 29, 2020

Great quilts on display


My dear friend and quilting pal Vickie Wheatley has a great show of her bright, intricate quilts at PYRO Gallery.  I have been working closely with Vickie for more than a year and it is a particular thrill to see pieces that we spent all day rearranging on the design wall finally on the gallery wall.  But I was most interested in the variety of small details in the many pieces on display, which so clearly show her trying out new things and progressing in her body of work.

For some time now Vickie has been exploring a design that starts with strips of random black and white piecing that make a "road" diagonally through the middle of her block.  Once that's in place, she fills out the corners of the block with colored strips.  When she sets the blocks in fours, you see a big diagonal grid of black-and-white roads, or maybe a bunch of colored squares or diamonds floating above a sea of black-and-white, depending on how you look at it.

Then she adds a twist: she sticks little miscellaneous bits and cuttings under the quilting thread.  And I do mean little -- some of the bits are only a quarter-inch wide.  The contrast between these wildly irregular bits and the meticulously pieced quilt top adds excitement and texture.

As the series progresses, you can see her experimenting.  In #1, the black-and-white strips are cut to a strict 45 degree angle, but in #5 they're wonky.  In #4 she has put so many bits and cuttings on top that you can barely see the underlying pattern of the blocks. 

Anxieties #1: Imperfections

Anxieties #4: The River Lethe


In #3 and #4 she adds sashing between the blocks, and cuts some of the square blocks into rectangles before sashing.

Anxieties #3: Breakdown


As you can imagine, when you sew strips together and then cut triangles from them to make the corners of your blocks, you end up with a lot of leftovers.  Vickie sewed more than a dozen small quilts from the leftovers, and it was fun to see how she varied their colors and personalities, even though she was working from the same huge scrap pile.


In the next post I'll show you the many different ways Vickie finished her small pieces for display at the gallery. 

Meanwhile, the show is up at PYRO Gallery through March 21.  Well worth a detour if you're anywhere near Louisville!


Saturday, August 3, 2019

Last week on Art With a Needle


After I posted about it last week, two readers informed me that the huge quilt hung next to mine at the Stitched: Celebrating the Art of Quilting show in Memphis was made by Els van Baarle, an artist whose work I have greatly admired over the years.  Thanks, and I will update my previous post for the record.

We had a household emergency this week -- the cleaning ladies were determined to make a good impression and decided to clean the tops of the ceiling fan blades in the kitchen.  Note to self and cleaning ladies: I think it's probably better to ignore the tops of the ceiling fan blades, no matter how filthy and nasty.  For one thing, after years of duty the plastic coating tends to flake off when you scrub hard.  More important, when you scrub hard the whole damn ceiling fan may come loose from the ceiling and cascade down upon you, throwing sparks as the circuit shorts out.

Fortunately somebody caught the fan as it dangled from the ceiling on its cord, and I jerry-built a structure to hold it.  (Note how clean the tops of the blades are.  Too bad, all that elbow grease gone to waste.)


Now comes the unbelievably good part -- I called the electrician, who apparently was taking the afternoon off.  He said he could be there in an hour, and if we ran out to Home Depot and bought a new fan he could install it.  So within two hours of calling for help, we were back in business.  When's the last time you ever got service like that???

On the art front, I've been quilting this week; did two tops, all ready to bind or face (haven't decided exactly how to finish them).  I am pleasantly reminded how easy it is to quilt something that's only 30 inches square, compared to something more than 80 inches across. 

Here's my favorite miniature of the week, made from the thin, thin wires inside a cable from my old computer.  Between the computer and the fan I have enough interesting parts to make lots of future miniatures and assemblages.


Friday, January 12, 2018

Tension headaches


Our fiber art group just scored two huge garbage bags full of old doilies and tablecloths in a variety of techniques -- crochet, tatting, hairpin lace, cutwork, bobbin lace, embroidery and who knows what else.  As we sorted through, contemplating what we'll do with them, I noted how some were obviously made at less-than-expert level craft.

And I thought, as I have so often in the past, that in every single fiber art, the key to mastery is control of tension.

Check out this cute little crocheted doily, made in granny squares.  The white is tighter than the pink, hence the 3-D effect.

When I first learned to crochet, taught by my mother-in-law, I made a fairly large afghan.  I was proud of how neatly it was done, flat and even -- until I finished and tried to fold it up.  Oops -- one end was a good six inches longer than the other!

What had happened, of course, was that as I got more comfortable with the yarn and the stitch, I eased up on the tension and the finished fabric got more expansive.

I have taught many beginners how to crochet, sew and embroider, and have watched myself try to learn knitting, weaving, felting, macrame and many other techniques.  In 99% of the cases beginners' work is too tight.  We clench up on the needle or hook or whatever tool we're using, we pull too hard on the thread or the yarn, we hang on too tight to the underlying material.  We grab that quilt in a death grip and resist the pull of the sewing machine; we wrap the french knot so firmly that we can barely pull the needle through; we tug the weft through the weaving so hard that the selvages bow inward. 

(Weavers may correct me on that last remark -- I think some beginners err in the other direction, leaving the weft too loose so the selvages are uneven and loopy.  But that's the other 1% of tension headaches.)

The problem usually disappears with practice; we relax, we learn to let the yarn flow easily, we develop muscle memory so all the stitches have the same tightness throughout the whole work.  In knitting parlance, we automatically maintain the right gauge without having to stop and measure all the time. 

That's not to say we can stitch in oblivion.  It's still good to stop every now and then, lay the work out flat, check how it's coming along.  Note whether your afghan is still the same width as when you started.  Check that the second sock is the same size as the first one.  Make sure your seams are smooth, not drawn up in a ruffle.  Look at the back of your work and see that the threads are well-behaved, not forming tangles and knots. 

It's not just the sewist that can have tension problems -- the machine can too.  In my experience, Bernina sewing machines, which I love, adore and have used exclusively for almost 30 years, have one achilles heel, and that's tension control.  I have had to learn tricks to keep them from spoiling my work: avoiding threads that the machine doesn't like, making sure the bobbin thread matches the top thread so if it's pulled up too far, it will be less visible. 

All these issues are part of mastering the craft of our art.

 

Wednesday, August 9, 2017

Form, Not Function 4 -- more machine quilting


More machine quilting that I liked in the FNF show --


Barbara Nepom, Emergent (detail below)

The contrast of diamond-shaped puffy unquilted areas with perfectly regular straight lines gave some excitement to a calm composition.


Erika Carter, Refresh IV (detail below)


Dense echo quilting in the background, sparser meanders on the flower forms made the flowers stand out.  The quilt won an honorable mention.

Deborah Hyde, Sam in Sunlight (detail below)

For the second year in a row, Deborah's clever technique of letting a portrait emerge from a traditional around-the-world piecing pattern wowed FNF viewers.  The composition alone is worthy of admiration, but more subtle is the use of quilting to complement both pictorial and geometric elements. Contour quilting emphasized the facial features and helped them emerge from the background, while geometric quilting lines flattened the other areas and made them more like a traditional quilt.

Several posts to go before I exhaust the possibilities in this excellent show.  It's on display at the Carnegie Center for Art and History in New Albany IN through September 16.

Wednesday, August 2, 2017

Form, Not Function 3 -- machine quilting


Most of the quilts in Form, Not Function are machine quilted, which isn't really surprising (what surprised me was how many quilts had both machine and hand quilting).  But few of them had what I might describe as fancy quilting -- most of them simply had parallel lines of straight stitching, or perhaps two sets of parallel lines to make a grid.

I'm not one to poke fun at this method of quilting, since it's my default design, but I did think that some of the quilts in the show would have benefited from a little higher degree of complexity or pattern in the quilting.

The only really masterwork quilting in the show was done by Sandra Palmer Ciolino, whose very large quilt won an Award of Excellence presented by River City Fiber Artists.

Sandra Ciolino, Precaria #8: Crucible  (details below)


Sandy is well known for her wonderful free-motion quilting, in which she frequently changes designs as she moves from one part of the quilt to another.  And this quilt did not disappoint.

I also liked the machine quilting on Beth Schnellenberger's quilt, which won the Inspired by Nature Award, presented by Juanita Yeager.

Beth Schnellenberger, Scorched Earth (detail below)

More quilting in tomorrow's post....