Showing posts with label quilt date. Show all posts

Friday, October 31, 2014

The old boyfriend returns


If you've been reading the blog since 2010 you may recall the Quilt Dates, in which you were introduced to some of my old boyfriends aka quilt techniques or approaches.  By far the favorite guy was Mr. April, the technique of piecing in fine lines.  Heck, even I liked him the best, but was never jealous when others enjoyed his company.  Many of those others have written back over the years with reports of their dates, and here's another.


Evelyne Wheeler writes:  "Here are two photos of quilts made by me using your skinny strips technique.  I didn't read your tutorial carefully enough so initially I made some errors however these errors made me wonder if I could make curved lines, hence the black and white sampler and then the green and red quilt influenced by arches in Gaudi's Casa Millar in Barcelona.

"Thanks for sharing this technique -- had some fun with it but now on to something else."


And my thanks to YOU, Evelyne, for sharing.  I think your curved lines look great (I've experimented with curves too but they're a lot trickier than straight lines) and am glad you had fun with them.


Wednesday, October 5, 2011

Mr. April -- still our favorite quilt date

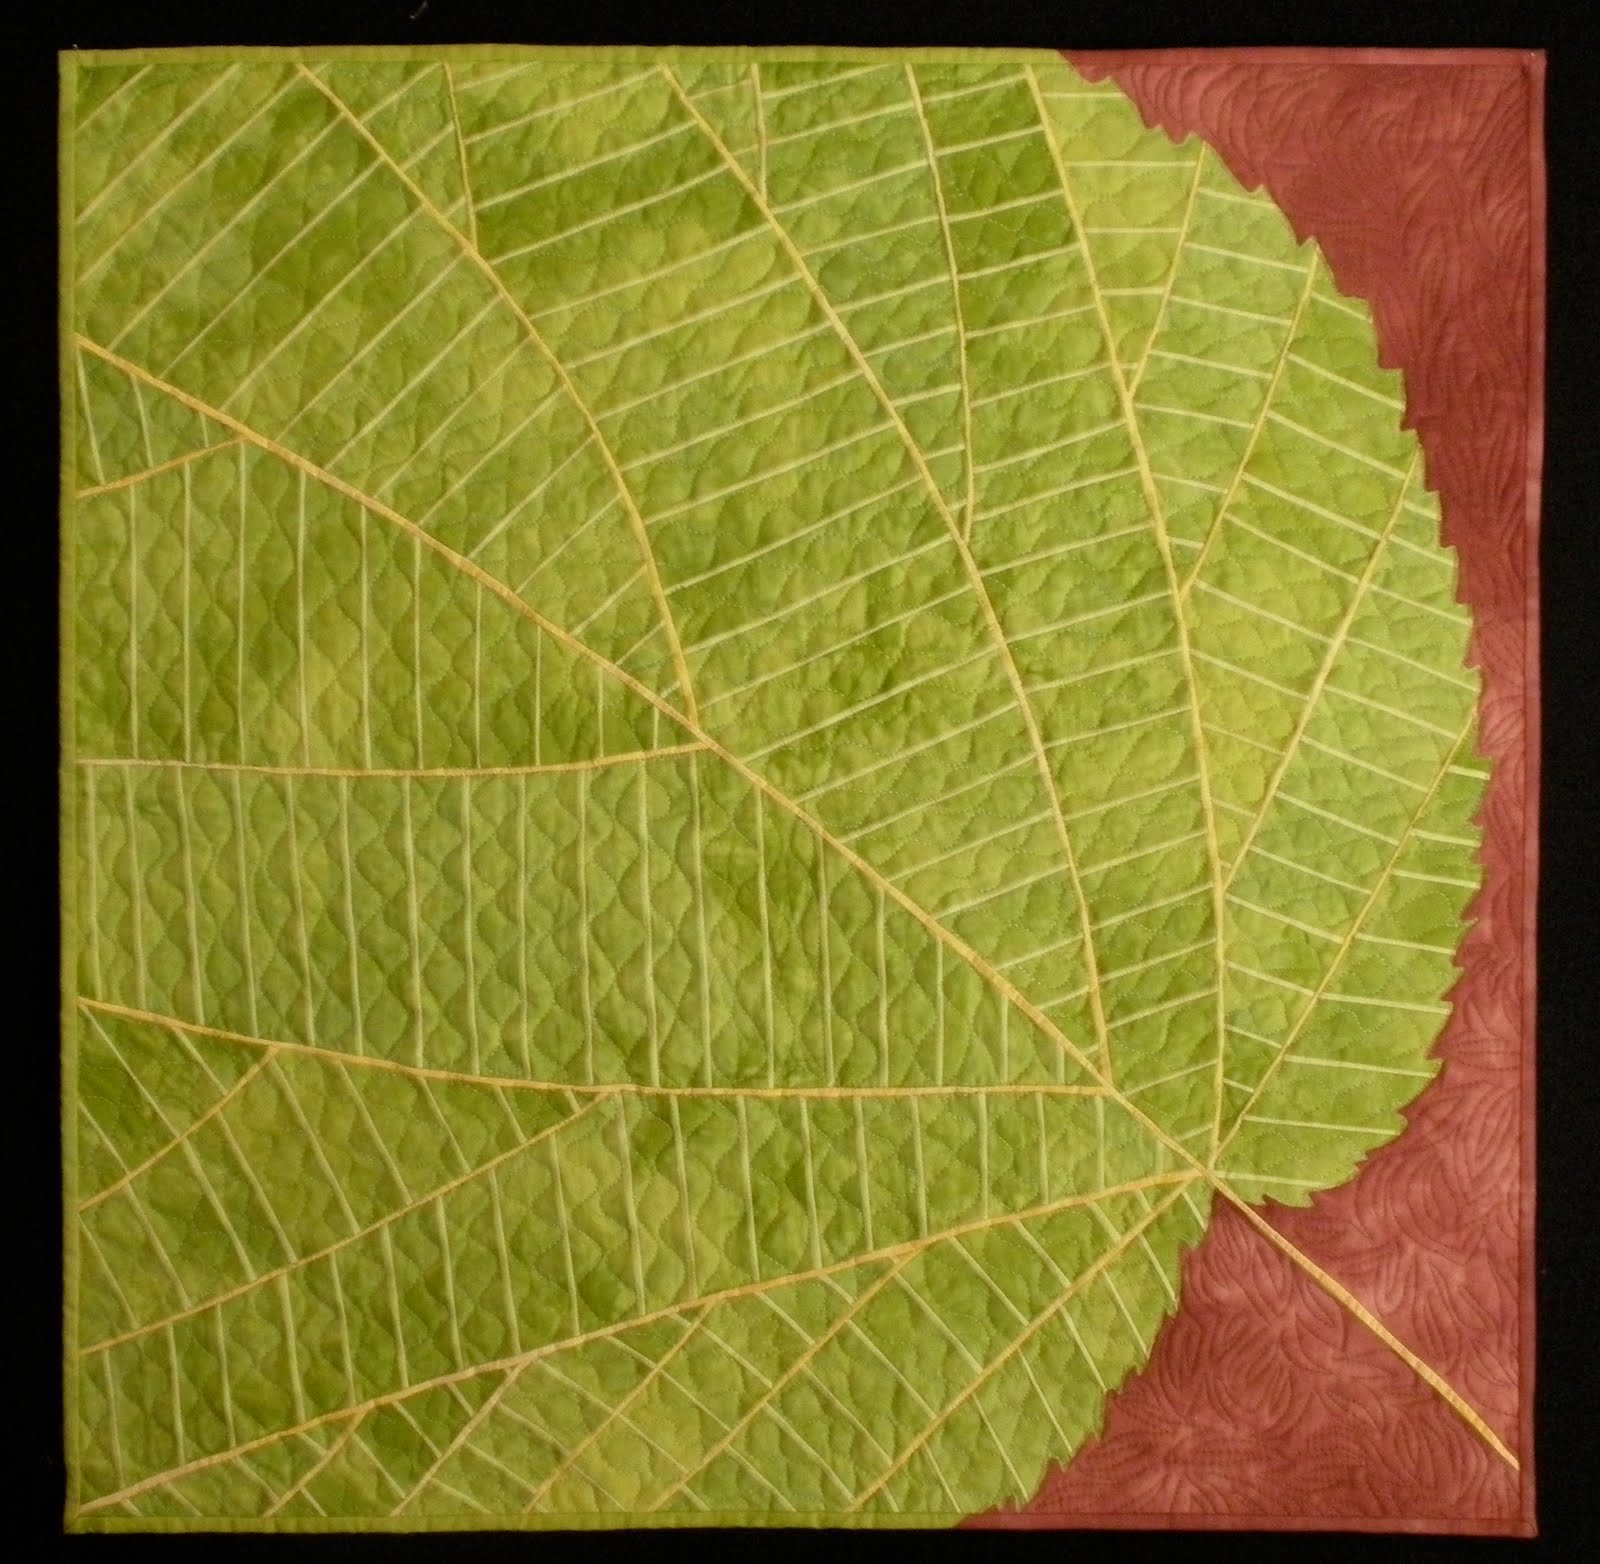
Last year I heard from Lynne Croswell that she had finished a piece made from the fine-line technique in my April quilt date.  She recently entered it in a small, fairly traditional quilt show and was pleased to learn this week that it had won the viewers' choice award, with more than 2,000 visitors voting.

Lynne Croswell, Witch Hobble

The bad news is that the judges apparently didn't realize that all the intricate fine lines were actually pieced in.  Lynne deduced this from their comments at the opening reception -- they talked about the "folds" on her quilt! 

If I may be forgiven for a snarky comment, I must observe that traditional quilt judges are supposed to be really up on matters of technique, even if they're not always so knowledgeable about nontraditional design and composition.  Bad marks to them for not noticing the tremendous amount of work that went into this quilt.  And good marks to the viewers for recognizing a good piece when they saw it.


Wednesday, August 31, 2011

Quilt date report

Last year I gave a little tutorial in piecing very fine lines, as a Quilt Date.  Among the readers who sent in photos of their fling with this technique was Linda Laird, who made two pieces.  She wrote me again last week with an update.

"Attached is a photo of my piece 'Calm Down!' that I made last year using a variation of your skinny line piecing technique; I think I wrote you about it back then, because I used bias strips to piece some gentle curves. I made it for a challenge at the open-entry San Diego Quilt Show, where it was pretty much ignored.

"Fast forward to this year: I entered it, and it was accepted into the PAQA-South show...  Long story short -- it sold!!  My first sale!!!  I am still so jazzed!!!  This technique has really resonated with me, and I'm planning something new with it even as I write."


Linda, thanks for sharing this good news.   It's always nice when somebody gets an idea from you and does something good with it.  Kind of like having grandchildren.

Wednesday, December 15, 2010

Quilt Date for December

Time for another quilt date, and if you don't like this guy, too bad because I'm going out of the matchmaking business at the end of the year.  Next year I'll try a different theme for my periodical forays into pedagogy and art inspiration.  But first, here's Mr. December, fresh from the orthopedic ward.

Yes, Mr. December is all about fractures.  One of the recurring pleasures and challenges of quiltmaking, in my opinion, is how to make your work complicated (which makes it more interesting) without spending the rest of the century at the sewing machine.  I'm an expert at time-consuming complication, but every now and then I get a kick out of shortcuts like this technique.

As my examples of this technique, I will turn to my friend Marti Plager, who has had a long-running dalliance with Mr. December.  She has most frequently used fractured blocks as the background for pictorial or semi-pictorial quilts, like these.

Marti Plager, Primrose Passion

Marti Plager, Along the Banks #2


With a minimum of fuss, you too can construct fractured blocks that combine several different fabrics and look deliciously complicated. 

Start by choosing many fabrics and cut them into squares or rectangles of the same size.  Then assemble sets of different fabrics -- three or five in a set give the most variation.


Stack your set in a pile, align the edges carefully, then slice through all of them at an angle and separate the two halves of the pile.  Take the top piece off one of the piles and move it to the bottom.  Then sew each pair of halves back together.  You now have as many reconstructed blocks as you started with.


You can use these two-piece blocks in your composition as is, or you can restack the blocks, turn them 90 degrees and repeat the process to make four-piece blocks.  For greater variation in fabrics, make a  lot of two-piece blocks, then reshuffle them into new stacks of three or five before you make your second cuts.


I've done it both ways, but think it's best if all your cuts are made at the same angle -- either northwest to southeast or northeast to southwest.  After you've made a project or two, maybe you'll want to experiment with mixing the two directions for more visual excitement.  For a very controlled look, you may want to mark your cutting board with painter's tape so you cut all the blocks at exactly the same angle, but I think it's just fine to eyeball it.  I also like to vary the placement of the cuts from set to set -- sometimes make one half of the stack quite skinny, as in the photo above, sometimes run the slice smack through the middle of the block.

Depending on how you choose the fabrics for each set of blocks, you can achieve a wide variety of color effects.  For instance, you can make dark blocks and light blocks, or mix the values in every block.


Or, as Marti has done, while you have an interior seam open, you can insert a little sliver of contrast color before you sew the fractured block back together.

Marti Plager, Games: Jacks

Marti Plager, The Vineyard

If you like this technique, here are some ideas for the second date:

•  Combine two-piece blocks with four-piece blocks.

•  Make fractured blocks in different shapes and sizes, then combine them.

•  Try different color strategies, or different proportions of colors in your mix.

•  Or anything else that strikes your fancy.

Let me know how it works out. If you want to send me a picture of what you made, I’ll post it.  Enjoy your date!

Monday, November 15, 2010

Quilt date for November


Since I was moved to post yesterday about my sewn jewelry, I thought it would be a good idea to tell you more about my technique of sewn cords.  And since it's the fifteenth of the month, time for a quilt date, it seemed serendipitous to do both at once.

This technique uses the zigzag stitch to embellish cords or bundles of cords.  Great for necklaces, and also additions to quilts. 

War Rationale 2 (detail)

Crop Management  (detail)


The first step is to find a cord or multiple cords to be the base of your stitching and decide how long you want the finished cord to be.  Then choose threads for your machine to match or complement your cord.  Sometimes you want the same color for all three; sometimes you want a contrast color.  Metallic threads work particularly well in the bobbin, where they have little chance to break or misbehave, and add a bit of sparkle. 

For the photos in this post, I've used different colors for the base, top thread and bobbin thread, so you can see better what's going on.  In real life you'll probably have lower contrast, so the bits of base cord peeking through the stitching won't be as obvious as they are here.  Or you can stitch densely and cover every bit of the base.  For these pictures, my base is three cords held together in a bundle.

The basic sewn cord is just thread zigzagged over a base.  To make it easier to see what's going on, and to give you more control over the stitching, remove the presser foot.  This makes you vulnerable to sewing over your own fingers, so BE CAREFUL!!!  Don't try this after two glasses of wine with dinner. 

You need to lower the presser foot lever to engage the tension disks and make sure the top thread feeds evenly.  But since there's no actual foot to hold down the cord, the feed dogs will not pull the cord along as you sew.  Instead, you'll have to grab the cord behind the needle and pull it along as you sew, and hold the cord in front of the needle to keep it taut and guide it directly under the needle. 

If you pull quickly, the zigzag stitches will be spread out along the cord.  If you pull slowly, the stitches will bunch up and cover the cord densely.  If you pull backward, it's like hitting the reverse control -- your stitches will go back over your previous stitching and make a double layer.

If you want the stitching to wrap snugly around the base cord(s), set your stitch width just a little wider than the cord itself (make a sample first).  If you want the stitching fairly loose for special effect, use the mazimum width.  But there's a tradeoff here -- the narrower the stitch width, the harder it is to feed your cord smack down the middle without the needle hitting it now and then.  After you've practiced a little you'll figure out what width suits you best.

The zigzag stitching usually encases the base cord but doesn't pierce it.  That allows the thread to slide up and down the base cord, which allows certain special effects.  But when you start your stitching, you want it to stay put.  Anchor your first stitch either by sewing through the cord or by making a knot in the base cord and stitching through the knot.


Now you have thread ends that you may not want to be visible.  So pull the thread ends toward you and incorporate them into the bundle with the base cord.  Hold them there with your fingers or tweezers, in front of your needle.  Grab the cord behind the needle with your other hand, and pull gently while the machine stitches. 


Go for a while and see what happens -- try pulling the cord at different speeds, and different stitch widths, and see how that changes the look of the finished cord. 

Now it's time for tricks. 


-- Make a thread bobble.  Make several fairly long stitches by pulling the cord quickly.  Now stop and pull the thread back toward you.  The stitches will pile up behind the needle.  You can leave them just so, in an airy little swirl, at left in the photo above, or you can stitch back and forth over the pile a few times till it's densely covered to make a solid bobble, at right in the photo. 


-- Make a thread burst.  Hold the back of the cord firmly.  Take your tweezers or other narrow sewing tool  (toothpick?  skewer?  seam ripper?) and pull an inch of thread out of the bobbin.  Continue stitching; the extra bobbin thread will be caught in the stitching and make pretty loops.  Especially nice if you have metallic thread in the bobbin -- the loops will sparkle.


-- Make a cord bobble.  Grab the free end of the cord and bend it back on itself.  Hold the two ends together with the hand behind the needle.  Grab the U of the bend and pull it a quarter-inch toward you (or longer, if you want a longer bobble).   Stitch over both cords, pulling gently away from you, till you get to the U.  Again, grab the U and pull it toward you till the overlapped section is as long as you want the bobble to be.  Bend the free end of the cord back toward you so there are now three cords in the bobble area.  Stitch all three together till you get back to the end.  If you want, go back and forth a couple of times to make the bobble really dense.

-- Make a cord loop.  Grab the free end of the cord and pull it to the side to make a loop.  Let the loop hang to the side while you continue stitching onto the free end of the cord.  If you want, you can put a knot into the loop, or run the loop through a bead, then catch the end of the loop back into the stitching.  This way the cord loop will not be stitched, just showing its natural color.


If you want the loop to be covered with zigzagged thread, stitch for a couple of inches down the cord, then stitch back (pull with your front hand, not your back hand) to the starting point.  Now thread your beads and make your loop or knot.


-- Leave thread ends hanging from the cord.  At any point, you can pull out a length of thread and let it hang free of the zigzagging, just as you did with the thread burst.  Or you can incorporate a new thread into the stitching and let the ends hang free at beginning or end.  Or you can let the loose thread end parallel the cord for a while, then pull the ends back into the sigzagging. 

-- Join two or more cords by zigzagging them together. This is particularly nice if you want a multi-strand necklace to hold together at the back of the neck.

This technique lends itself to incorporating beads or other embellishments.  You can string beads on the cord before you start zigzagging (dip the last half-inch of the end of the cord into Fray-Check and let it dry; once it stiffens it's easy to thread small beads). In the photo below I threaded seed beads onto just one of the three cords in the base bundle. 


For larger beads, thread them onto your finished cord.  Or you can thread beads onto a second cord and incorporate that into the zigzagging.  When you string beads onto a cord, make sure the other end is knotted, or don't cut it off the spool yet.  this prevents your beads from escaping onto the floor, from which they will probably never return. 


If a bead has a large enough hole for your sewing machine needle to go through, you can simply attach it while you zigzag.  Carefully place the bead underneath the needle and lower the needle through the bead, turning the wheel with your right hand and holding the bead in place with your left hand.  Keep your foot off the foot pedal while you do this; it could be dangerous to accidentally stomp on the gas and send the needle hurtling downward while your fingers or your tools are in the way.

If you want a bead to hang at a certain level, make a thread bobble or a knot underneath to keep it from slipping down. 

If you want to make a slip-on necklace (no clasp), finish the cord and string the beads.  Check the length, then cut the cord an inch longer than you need.  Overlap the two ends and zigzag them together.  To make sure one end doesn't slip out of the bundle, make sure your stitching pierces both cords.  Or put a knot into each cord and make sure to stitch through each knot. 

If you want your cords to hang loose, decide how to finish the ends.  When I use these cords in a quilt, I catch the top ends into a seam or under a binding, so the cords emerge from between pieces of the quilt.  I usually put an overhand knot into the bottom end and let the threads hang free into a little fringe.  If the free thread ends look skimpy, you can incorporate an extra thread or two into the last couple inches of stitching, so you have more thread ends in your "tassel."

I suggest the first date be a little necklace, because everybody has some beads lying around.,  It's highly unlikely, but if by some awful luck your necklace is too ugly to wear you can always cut the cord, remove the beads and start over.  Try a monochrome color palette; ordinary sewing thead is fine, and glitzy threads like rayon or metallic are flashy.  For the cording, anything you have on hand will work, from as lightweight as two or three strands of carpet and button thread, to as heavy as rattail cord or household string. 

Let me know how it works out. If you want to send me a picture of what you made, I’ll post it.  Have fun!

Friday, October 15, 2010

Quilt date for October

You probably thought that because there was no quilt date last month I was out of the matchmaking business.  Not so; just too sick and demoralized to go search out some cute guy to introduce to you.  But this month I've done better.  I know you all loved Mr. April and I know he's much better looking than Mr. October.  You certainly aren't going to want a lasting, exclusive relationship with this new guy.  But maybe you'll get something out of this quilt date that you can stick into work in progress.

It all started with a trip to Office Depot, one of my favorite stores.  I can always find some stationery supply that I really, really need to take home with me, and this particular time, I bought a pack of 2-inch adding machine tapes.  Then I had to find a way to justify the purchase.  Decided it would be good as a base for paper-piecing strips of triangles, which are a favorite motif of mine.

You have probably heard about paper-piecing, also known as foundation piecing (it can be done on fabric as well as on paper) and perhaps you think of it as a fussy, tedious technique.  It is a bit fussy, but it's unparalleled for giving you perfect points that line up exactly where you want them to -- an effect that sometimes we like to have in the arsenal even if we don't work that way all the time.  So here's a fast run-through on how to piece nice strips of points.

If you have adding machine tape, it's perfect for this date; if not, just get some paper and rule two lines as the edge of your strip.  You can use plain typing paper, newsprint or tissue paper.

The trick of foundation piecing is that you work from the back of your foundation, where you can rule perfectly straight lines as a guide or pattern, then sew along them for perfectly straight seams.  Again, that's an effect you may not want to use all the time in your work, but it's nice to be able to do it when you want to.  In general, you sew with the foundation up, then flip it over to press and trim the fabric before you do the next seam.

Start by drawing a pattern on the paper -- anything will work, as long as each seam goes across the entire foundation (no stopping in the center).  Here I've made regular triangles, two inches wide at the base.  I numbered the pieces for this demo but you don't have to.  Start by pinning the red fabric for piece #1 in place.  Note the piece must be wider than your two-inch strip, because you need a seam allowance on either side of the pieced section.

*  (if you've ever followed patterns for knitting and crocheting you know what the asterisk means)  Place the green fabric for #2 on the table, right side up, with a straight edge making a horizon in front of you, and the expanse of the fabric coming from the horizon into your lap (or not quite so far, depending on how big a piece of fabric you use).

Turn your strip around so the seam between #1 and #2 also makes a horizon -- #1 closest to you, #2 away from you.  Carefully place the strip on top of the #2 fabric, aligning it so the seam line drawn on your paper falls about a quarter-inch below the edge of the #2 fabric.  This quarter-inch will be your seam allowance.  It's helpful to use a much larger piece of fabric for #2 than you really need (you can trim later) so you can be sure the two pieces are aligned properly.  Make sure you can see the edge of the fabric on either side of your strip, and make sure there's a quarter-inch seam allowance extending above the seam line.

When you have the pieces aligned, either pin them in place or grasp them firmly as you shift the package 90 degrees and position it in front of your needle.  Sew along the drawn seamline. 

Trim off the extra red fabric from piece #1, leaving just a seam allowance. 

Fold the green piece #2 away from piece #1 and press it.

Trim off the extra green fabric from piece #2, leaving just a seam allowance along the edge of the strip.  You could also trim along the #2/#3 seam line if you're careful to leave yourself a seam allowance, but I hadn't done it yet in this photo.  *

Repeat  from * to * with turquoise fabric for piece #3, and all subsequent pieces.

After you've made a strip as long as you want, stitch it along one of its long edges to some other part of your quilt.  The edge of the paper is your guide, but stitch just a hair outside, not on the paper.  Because paper, unlike fabric, doesn't stretch or wobble, your seam will be perfectly straight.

Tear off the paper, a mindless project for while you watch TV, supervise homework, or attend a board meeting.

If you draw your sewing lines to the edge of the strip, your modules will look like the first two below, with all the triangles the same height.  But if you draw your lines so the triangles don't extend all the way across the strip, the triangles will be different heights, as in the last module.

If you like this technique, here are some ideas for the second date:

• Do the same thing on a larger scale than your sample.

• Make several modules on the same scale as your sample, and join them into a larger piece.

• Experiment with different widths and heights of triangles, regular or irregular spacing, and different color combinations.

• Make your foundation wider or narrower than 2 inches.

• Make your foundation wedge-shaped or triangular rather than rectangular.

• Or anything else that strikes your fancy.

Let me know how it works out. If you want to send me a picture of what you made, I’ll post it.  Have fun!


Wednesday, September 8, 2010

Yet another April quilt date report

It's clear to me that of all the guys I've introduced to you, the one from April is the hunk of the crowd.  (He's the one with the very fine pieced lines.)  Here's a reader who had a wonderful date with Mr. April.

Lynne Croswell writes:  "I have wanted to try your technique since you started showing your fracture pieces, and now I'm glad I've had the chance to give it a go.  There are many pitfalls in the way I chose to use what you do but I think some of that enhances the organic nature of my subject matter.   I have to say it was a bit tedious and time consuming to make my initial fabric, but I would do it again.  It was so exciting to see the way the piece evolved and came together to express what was in my head."

Lynne Croswell, Witch Hobble, 25" x 25"

For more on how Lynne made the underlying fabric with very thin lines, then pieced the large leaf with more very thin lines, check out her blog -- this post and the one right underneath it.  I had not thought to use this technique to make "fabric" for additional piecing, but it is beautiful.  Good work, Lynne, and thanks for sending along the photos!

Wednesday, August 25, 2010

Another April quilt date report

Sally Field, who sent a picture last week of the little piece she did with the April quilt date, sends another of the finished work.

She writes:  "Just finished my Intersections. I think of it as a road map.  The piece finished at 18" x 12.5".  The more I did on it the better I liked it. It is the first thing done (and completed) in quite a long time. Felt good to be back at the machine. Thanks again for your tutorial."

Sally, thank YOU for sending in the picture.  I'm so glad it turned out well for you -- I like the way you have quilted in ghost lines to complement the ones pieced in.  Now that you're back at the machine do something wonderful.

Wednesday, August 18, 2010

August quilt date report

Terry Jarrard-Dimond reports in:

"Here is my quilt I made for our quilt date.  This is what I would make but I'd make it 60" x 60"."


(The typographic observer observes: doesn't that sentence above look really weird with the two " symbols at the end?  But it's grammatically correct.  Go figure!)

So Terry -- if you hadn't done the quilting you could have just said it was 60" x 60" and I would have believed you!  And this gives me a really good idea for my next big quilt... won't take too long to piece...

Thanks for sending this beautiful baby quilt to me.

Tuesday, August 17, 2010

April quilt date report

A couple of people report they had fun with the April quilt date, piecing fine lines.

Sally Field sent a photo of a study that she hasn't quilted yet. 

"I have not been at my machine to really work at something for a long, dry period," she wrote.  "I tried your method of slice and splice.  I have made a small piece (about 18 x 14 untrimmed) and have had a good time with it.  I probably will not do much of this type of work but it did get me back to using the machine again."

"Definitely not my style but had fun with it.  Can see a usage for inserting small bits here and there.  Also I'm not a person who can do 'simple'.  I have to keep adding and adding.  Had a photographer years ago tell me that my quilts were intricate."

Here are a couple of images of Sally's quilts you might like to check out. Here hers is the third one on the page; unfortunately here you have to scroll down past 15 other artists to find her work, but you do get to go past some nice stuff on the way.    

I would say the quilt date has served its purpose for Sally -- you don't have to marry every guy you go out with, and if this got her over a dry spell then it sounds like a success.  (By the way, Sally, keep making more and more cuts and this technique could easily satisfy your desire for intricacy!)

By contrast, Sandy Ciolino liked the quilt date so much she's finished her third piece and is still working with the concept.

Sandy Ciolino, Fractures #3: Intersections

Thanks to Sally and Sandy for sending in these pictures. This seems to be the most popular quilt date so far and I'm glad that my boyfriend is making other people happy, too. I'm willing to share him!

Sunday, August 15, 2010

Quilt date for August

I'm in the mood for triangles today, having recently sorted through all my little quilts and rediscovered how many of them have triangles as their basic building blocks.  All the work I'm going to show you came from leftovers, either my own or somebody else's; there's nothing I love more than getting a scrap bag of strange new fabric.  But there's no reason you couldn't use new fabric.

When I find myself in possession of a bunch of scrap triangles, the first thing I do is sort them by angle and then by size.  I search for a pair that are generally the same shape and size and then sew them together to make a square or rectangle.  I make a lot of these little blocks and set them aside in a pile. 

When the pile gets big enough or I get tired of matching and sewing, I start sewing the blocks into rows or squares.  If you do rows, you have your choice of two patterns, which I call "sawtooth" and "mountain."  In a sawtooth pattern, all the triangles point the same way, like a line of Rockettes.  In a mountain pattern, they're arranged in pairs, back to back to make, well, mountains.  Of course, you can mix and match your patterns at will.

top row, sawtooth -- bottom row, mountain

If you do squares, you usually sew four or nine blocks together, and have your choice of various arrangements that are familiar from traditional quilts, such as pinwheel or broken dishes, in addition to sawtooth and mountain.  If you go to sixteen blocks you can use any of the myriad traditional patterns such as card trick or dutchman's puzzle.  Or you can just sew the squares together at random without worrying about a specific arrangement.

broken dishes

pinwheel


sawtooth

mountain


Now that you've sewed some of the blocks together to make rows or squares, put them back on the design wall to see what they want to do next.  You may want to sew the rows or squares into larger modules, or you may want to frame them with some larger pieces of fabric.   

You can do this kind of free-association piecing at any degree of precision.  If you find yourself with a bunch of triangles that were all cut to size for a previous project, your blocks will all end up the same size and you might like to square them up and use a more traditional arrangement.  If they are random sizes, they probably won't fit together without some creative manipulation.  If you want to sew two blocks together and they aren't the same size, add a strip of fabric to the small one to make it the same size.  Or sew two blocks to three.  Or whatever else seems to work. 


The quilts I show here are all pretty small, but that's OK.  Little quilts make nice little presents, or they can serve as studies for larger pieces.  I don't think this date will become the love of your life -- big quilts made of little triangles can seem very traditional, even if you assemble them from various size blocks in non-traditional arrangements -- but you might have fun using up a bunch of leftovers, or testing out a new color palette.

Let me know how your quilt date works out!  If you want to send me a picture of what you made, I’d love to post it.