

Sunday, June 30, 2019
Saturday, June 29, 2019
Last week on Art With a Needle
My big news of the week is that my newly cleaned-up sewing table has indeed motivated and enabled me to start sewing on a quilt. I think this is the first major quilt I've worked on in at least two years. Can't exactly tell you why I decided to take a sabbatical from quiltmaking, or why I decided to start again just now. But it does feel good to be back at the sewing machine.
Here's what I've done so far.

Here's my favorite miniature of the week. I sometimes feel that it's unoriginal to just find some random object and make a lot of knots onto it, usually with a couple of beads for good measure. But then I realize that's an important recurring theme in my art, and I should just embrace it. And I do love tying those knots -- so zen.

Thursday, June 27, 2019
A small project -- finished!
Yesterday I finished a small "commission" -- from my sister, to make a piece of liturgical linen for her church. It is 26 inches square, made to cover a funeral urn on the altar if the decedent has been cremated. She's going to have a butterfly, symbol of new life, machine-embroidered on it (although I offered to hand-stitch one -- she probably thought it would take me forever, which is probably true).
I asked if she needed new linen and she said no, a repurposed piece would be just fine, and symbolically appropriate. So I rooted around in my stash and found a beautiful old tablecloth, with a woven pattern of roses and stripes, acquired from who-knows-where, obviously well-used in its past life because the hemstitching is frayed and there are a few faint stains. But I found a large enough clean patch in the middle to cut my square. Actually, I tore it, because I wanted to make sure it was on grain.
I cut it four inches bigger so I could turn back one-inch hems. Pressed carefully, mitered the corners of the hems and stitched them shut so they would not gap after being washed and pressed.


Maybe this will give me the impetus to work on another sewing-machine project -- maybe an actual quilt.
Saturday, June 22, 2019
Last week on Art With a Needle
Two weeks ago Idaho left a comment on my blog about doing research before purchasing new stuff and I responded by saying how I know I should do that, but I find it hard -- my inclination is always to dive right in and learn by doing, even if that brings missteps. Last week Idaho commented, "My art group is split between those who just go for it and those who dip toes in cautiously after gathering lots of info... Info gathering can often be seen as procrastinating, and that can be true -- If I find just one more relevant piece of info I'll be confident enough to give it a go -- that sort of thing. I DO find myself doing that and have to suck it up and proceed to diving in!"
That made me remember one of the most commented-upon blog posts that I ever wrote, in 2011, about a writing teacher who divided people into two groups: planners and plungers. If you're a planner, you're big on writing outlines, filling sketchbooks, making diagrams and templates before you get to work on the actual product. If you're a plunger, you dive right in and start working. If the teacher makes you turn in an outline before the paper is due, you write the paper first and then write the outline. Maybe you'll have some false starts and sections destined for the trash can, real or virtual, but working is how you figure out what is it you want to say, what it is you want to make.
I re-read that post just now, including the comments that many people left on it, and it did me good. Made me realize, again, that you have to figure out how your brain operates and then develop work habits that go with that rather than fight it.
Shannon suggested that if I'm trying to do calligraphy that's more-like-art-less-like-letters I should look at Arabic script. "I frequently find it exquisite, and as a non-Arabic speaker I'm drawn to it simply for the artistic forms," she wrote. Shannon, you are absolutely right, and in fact it was seeing the work of Golnaz Fathi, a wonderful Iranian artist who makes art from Arabic script that helped me decide to do calligraphy as my daily art this year.
 |
| Golnaz Fathi |
I am so glad that you reminded me of looking to Arabic as an inspiration, because it's been on my to-do list since I made this decision. I promise to start something this week, and I'll show you what I come up with.
Here's my favorite miniature of the week:

Thursday, June 20, 2019
Calligraphy update -- brut style
The other night I was intrigued by the label on our wine bottle, what you might describe as calligraphy brut.


I like it! Legible, but not beautiful. (Legibility is not a requirement for successful calligraphy, in my opinion, but it's OK in its place.)


I keep searching for a calligraphic style that would let me use letters in a more abstract way, more like art and less like writing. Maybe this is a first step in that direction, but I'll have to work on it. It's still too pretty, and I want a little more grit.
Different sizes of letters? Overlapping letters? Letters going in different orientations? Script? Less legibility, more brutalism?
I'll try again this evening.
Saturday, June 15, 2019
Last week on Art With a Needle
After I complained about a bottle of long-ago-purchased-but-just-opened acrylic ink, Cheryl pointed out that the globs on my bottle and pen are due to the acrylic medium drying out. In this type of ink, pigment is suspended in a dilute acrylic medium. Then Idaho pointed out that with india ink, pigment is suspended in water, so it behaves differently. She wrote: "I am a firm believer in understanding the makeup of what you are using and what it is best for, thus avoiding some pitfalls and frustrations, wasted time and materials.... once you know 'the rules' then you can more effectively experiment by breaking them."
Oh my, how I hate to be reminded that there is a better way than just buying something, opening it up and seeing what happens! She's right, of course, I should look things up before I leap in. But it's so much more fun to just leap in. Yes, this occasionally brings pitfalls and frustrations and wasted time and all that bad stuff but for some reason I keep doing it.
Shamed into it, I did a little more research and discovered that acrylic ink not only has the pigment suspended in plastic, it has the pigment permanently bonded to the plastic. So it is more durable and lightfast than other varieties of ink, including india ink. Perhaps worth putting up with some globs. Or I suppose I could go buy a new bottle... but I want several bottles, in lots of different colors, and by the time I use them all, they'll all probably have globs....
Idaho also found in her research that you should clean the pen or brush before acrylic ink dries. I'm always pretty obsessive about this part with all kinds of ink, even more so when I'm using brushes rather than pens. But I don't believe that I ever saw my father, lifelong user of old-fashioned india ink, clean his pen -- in fact, some of the pens I inherited from the mug on his desk still had ink on them, decades later, and they worked just fine.
By the way, I've wondered why my colored inks vary so much in value, while my black ink is always black.

Some comments also on my post about mending a silk blouse with the help of organza. I love mending and am always happy if I can persuade somebody else to give it a shot instead of throwing away something with lots more life in it. Warning: you can get very fiddly with mending, especially when you don't have enough material, or you're trying to make the mend invisible, or it's a slithery fabric, or any other tricky situation. I find myself sinking into a zen state when that happens, and quite enjoy it -- but it's easy to spend more time on a mend than the salvaged garment really deserves.
Anyway, thanks, friends, for reading and commenting.
Here's my favorite miniature of the week, a little fish trailing a halo of bubbles:

Friday, June 14, 2019
Another mending project
My friend showed up the other day with a blouse she had bought at the second-hand shop, which after she brought it home turned out to have a tear where the sleeve meets the body, the sure sign of a garment that's too tight between the bust and the shoulder. Could it be fixed? she wondered.
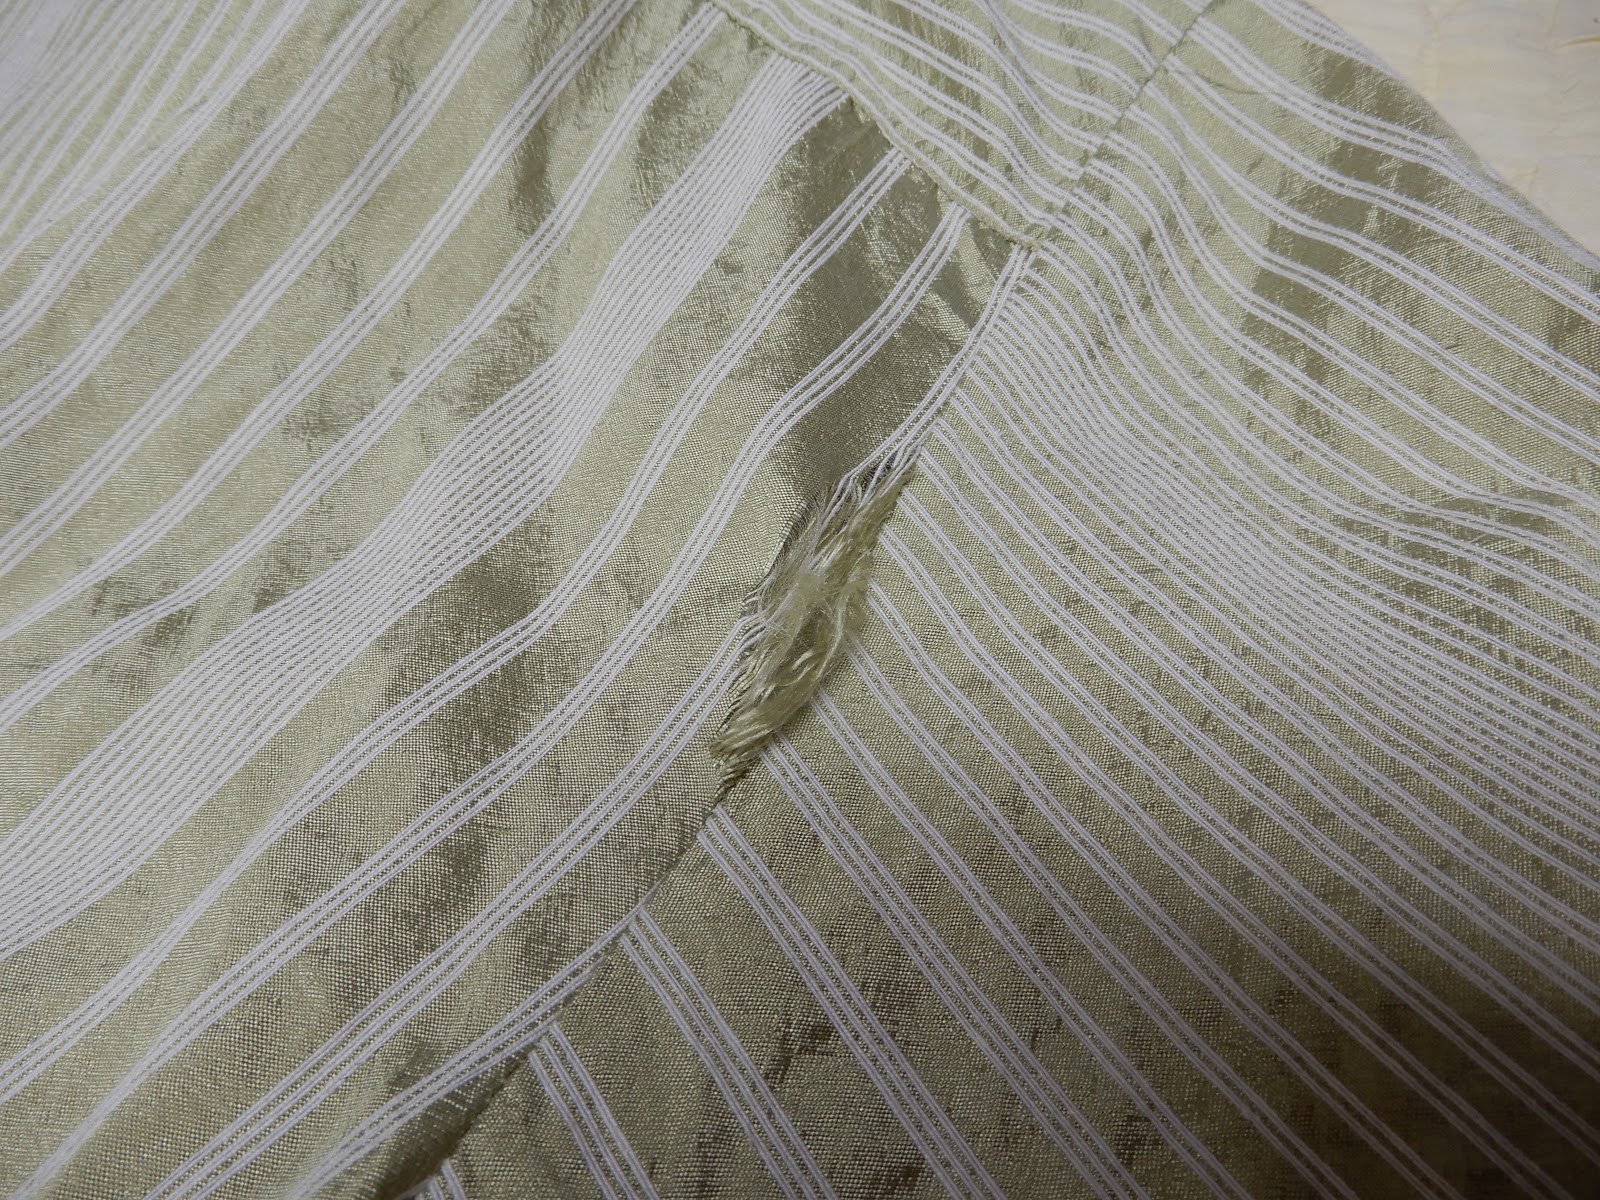
Because the blouse was mostly silk, it not only tore but shredded, and I didn't want to re-cut the entire bodice of the blouse, so I needed a patch that would be strong and stable enough to prevent further shredding. Fortunately the shredding was only on the bodice, not on the sleeve, so I would only have to use one patch before re-stitching the seam.
The blouse didn't have a turned-up hem or turned-back placket with enough material to yield up a patch, but it did have a breast pocket. I unstitched most of the pocket, cut a hunk of fabric out from underneath, and closed it back up with a double layer of organza, a lightweight-but-strong fabric that makes great mending material.

Opened up the armhole seam, cleared away all the thread bits, trimmed off the shredded fabric. Started to get the patch ready to sew, when -- klong -- I noticed that there was a twin tear/shred on the other sleeve as well! We hadn't noticed that in the initial inspection.
It was exactly like the first tear/shred, except a little narrower. Easily patched -- except that I had only the one piece of fabric. The pocket was already mended and sewed back together and I was NOT going to go back and do that again to get another patch!
So I cut the fabric piece in two, one side a little wider than the other. I sewed each one just barely covering the shredded area, as much as I could spare from my salvaged fabric. Clearly these patches couldn't constitute the entire repair; the seams were only an eighth-inch wide, and they would pull apart under the slightest bit of stress.


But I had several minutes of cussing and self-flagellation when I discovered that second tear. There are several morals to this story: If you find one tear in a too-tight garment, keep looking -- there may be others. Don't close up your surgical incision until you're sure you don't need anything else in there. Organza is really good to have around. But most important, don't give up!
Tuesday, June 11, 2019
Ink woes
I have always had the habit of buying art supplies on spec -- they look so delicious in the store, and I know I'll find some use for them any minute. Then they may sit on my art table for a long time before the use appears. This year, because of my daily calligraphy project, I'm finally using a lot of things that have been waiting. For instance, a bunch of pens and nibs that belonged to my father, so last used somewhere between 14 and 50 years ago, are getting revisited.
But this week I decided to revisit a couple of jars of acrylic ink (whatever that is -- I have no idea how it compares to ordinary ink) that have been waiting on my table for a couple of years. I used the olive green with no problems on Sunday, then yesterday went to the bright red.


When I started the daily calligraphy project my objectives were not only to make good-looking letters but to learn about different methods, techniques and materials. Figuring out the possibilities of various brushes and pens, learning how to use different inks and paints. So it's not all bad to find out that acrylic ink, whatever it is, seems to have a shorter shelf life than india ink, whatever that is. Or maybe it's just this bottle. I will probably keep using it, because it's so beautiful on the page, but will keep observing its behavior.

Saturday, June 8, 2019
Last week on Art With a Needle
After I wrote about going back and improving the three small machine-stitched houses, Margaret left a comment that "had you not been DONE with them, I might have suggested a cord-and-gel-medium horizon line, knowing full well that horizon lines are not to everyone's taste." I am generally a big fan of horizon lines, but these houses appear to be sited on the top of hills, with the viewer sited considerably downstream, so that the top of the artistically unmowed grass constitutes the horizon line. At least that's my story.
But she's right. I am DONE.

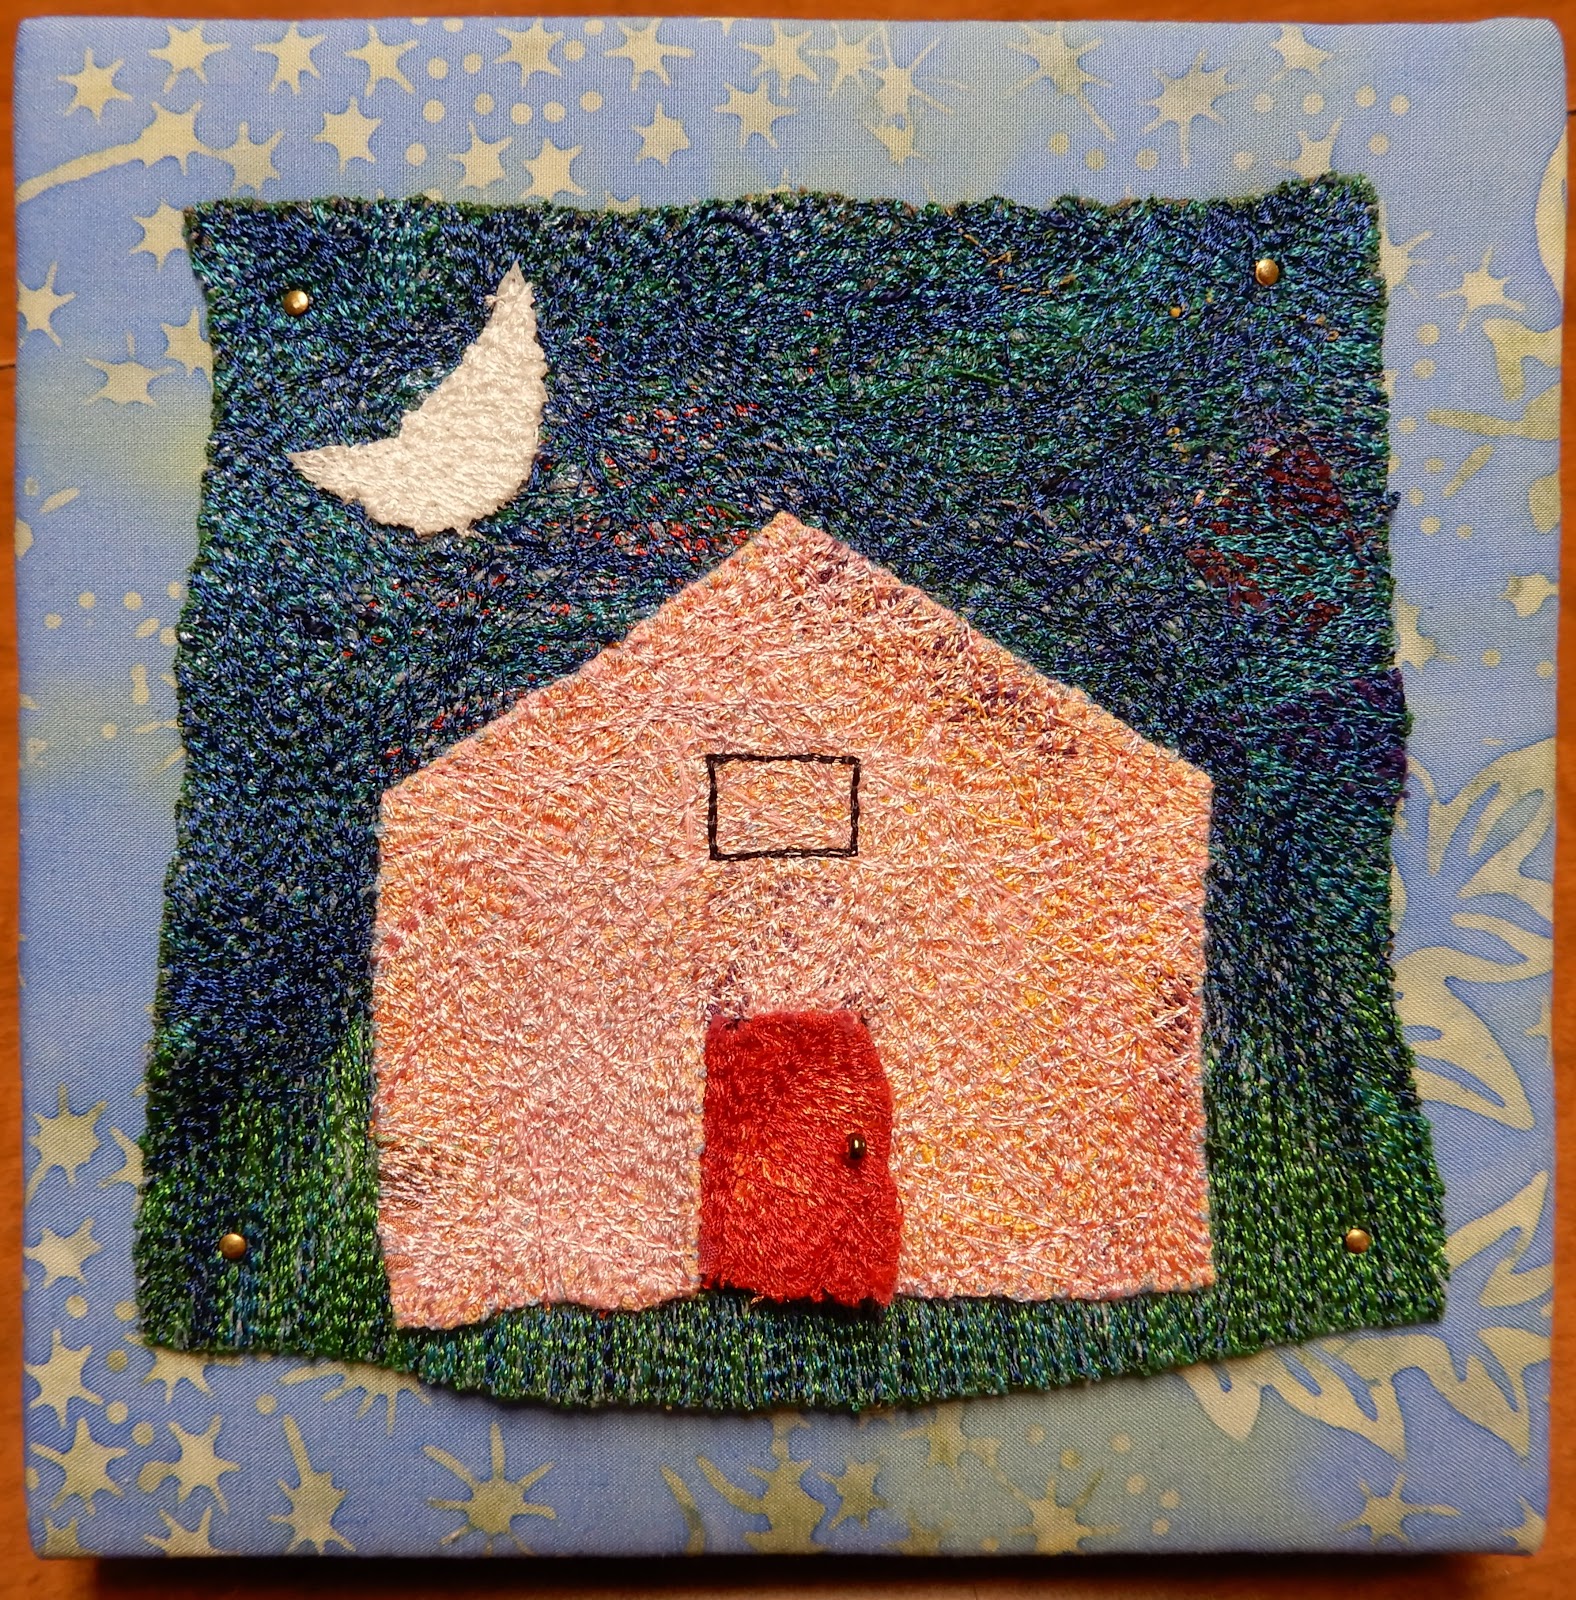
Now that they're mounted on batik-covered boards, I think they have come a ways in terms of complexity. I did feel I had to improve them (as my readers so rightly suggested) a bit, but there's also a point at which you have to say "enough," this work has exhausted its rightful claim on further effort.
I do like the dense machine stitching, combined with the simple, stylized house shape. I might return to this series sometime and try for a more nuanced treatment, but not now.
My favorite miniature of the week: a bit of wool roving needle-felted onto a piece of wool felt:

Thursday, June 6, 2019
Home improvement
Several weeks ago I wrote about three small pieces of art that I started to make for the "home" show at PYRO Gallery this spring. Although I didn't use them for that show, I did go back and finish them later, and posted the final results. Readers Sylvia and Sandy both commented that they thought the pieces looked unfinished, and I had to admit that they were right; I was thinking the same thing but decided to repress the thought.
 |
| before |
 |
| before |
After these comments I decided I needed to un-repress and do something about it. (I knew this all along, but pretended I didn't. Self-deception is a bad practice.)
Sandy had helpfully suggested that maybe just a dark line of stitching around the houses to separate them from the sky would be sufficient. And that would have been the easiest thing in the world to do, if I had only been able to remove the nails holding the machine-stitched pictures to the batik-wrapped wood panels on which they were mounted.
But I had done too good a job of nailing. I tried various pry bars with no success. I generally hate to use glue of any sort if I can stitch instead, but that didn't seem possible, so went to Plan B: gel medium. Found some navy cord, twisted two plies together for a heftier line, and pasted them around the houses. Definitely an improvement. Thanks, Sandy!
 |
| after |
 |
| after |
|
| after |
And now I am DONE with these babies!
Monday, June 3, 2019
Form, Not Function 4 -- the Quilt National connection
When FNF was started, the show ran early in the year, but after a while the Carnegie Center decided to change the date. Winter weather made faraway visitors think twice about driving, and the entry process was too close to the holidays. So the show tried several different schedules -- February, March, April, July, May. After visiting Quilt National several years ago, the museum director and curator thought it would be a good idea to overlap FNF's dates so people might be able to see both shows in a single road trip.
This year, there are many overlaps between the two shows, and not just in scheduling.
- Both shows opened on May 24.
- Judy Kirpich, who was one of the QN jurors, won best in show at FNF. (Judy also won a big prize at FNF in 2013.)

Judy Kirpich, Circles No. 6, FNF 2013
- Arturo Alonzo Sandoval's quilt Pattern Fusion No. 18: Motherboard 9, won a big prize at FNF. Meanwhile, a quilt that looks like its twin brother, Pattern Fusion No. 16: Motherboard, won a big prize at QN. (click here and scroll down a bit to see it)
- Margaret Black, whose quilt Curb Appeal 6 was a prizewinner at FNF, had the best in show quilt at the last QN two years ago, even though I wouldn't have known these two works came from the same artist had I simply seen them both on a wall. (click here to see it)
I haven't had a chance to see Quilt National yet this year, although I hope to do so in July en route to a family reunion. There may be other overlaps and cosmic coincidences yet to be discovered; if I find some, I'll let you know!
FNF is on display through July 20 at the Carnegie Center for Art and History, 201 E. Spring Street in New Albany IN, just across the river from Louisville. Quilt National is on display through September 2 at the Dairy Barn in Athens OH.
Saturday, June 1, 2019
Last week on Art With a Needle
After I wrote about the prizewinners at Form, Not Function, Vivien left a comment: "Cool that you got to serve as a prize judge. How did that compare to a time when you've been a juror?"
Good question, Vivien! In the world of juried art/quilt shows, I've been all over the waterfront. Several times I've been a juror, selecting which pieces get into the show, but not a judge, awarding prizes. Once I've been a juror with others, and we all got together to see the quilts on the wall and agree on the prizes. Once I've been a juror with others, but got to award the prizes all by myself. Once I was the sole juror and also awarded the prizes. Once I was the sole juror in a show with no prizes. This year I got to award prizes in a show that I did not jury, and there may be one or two shows in there that I have forgotten.
The hardest part of jurying comes at the bottom end, the quilts that do or don't make the cut. The top end is a no-brainer: the pieces that are really good and get chosen with hardly any discussion at all. It's at the low end that the arguments and persuasion and horse-trading occur, either among your fellow jurors or with yourself if you're the only one. It's hard to choose among three or a half-dozen pieces that are equally good, but you're limited to a certain number of quilts or a certain amount of wall space.
Sometimes the hard part of judging also comes at the bottom end, if the big winners are obvious but a half dozen seem equally almost-great, vying for three or four prizes. Which one gets the money, which one gets the honorable mention? But other times the hard part comes at the top end, when two or three are clearly the best of the bunch, but what order to rank them in? As always, arguments and persuasion.
One important difference between jurying and judging is that jurying always happens from images, while judging often happens from the actual work on the wall. I know some big shows, most notably Quilt National, select winners from images too, because they need the lead time to publish catalogs and summon winners to the opening, but I've always thought it's much better to be able to see the work in person.
So many times I've seen quilts on the wall after jurying them in, and been amazed at how they differ from my mental picture. Perhaps one is much larger or much smaller than you thought (yes, you can read the dimensions, but the image up there on the screen has its own presence that is quite independent). Perhaps one has sloppy craft or hangs wonky on the wall, qualities that weren't apparent from the great professional photo but greatly detract from its impression in the gallery. Or the opposite, perhaps one didn't photograph well but is a knockout in person.
On balance, I think it's harder to be a judge than a juror. Others may disagree.
Here's my favorite miniature of the week:

Subscribe to:
Posts (Atom)


