Some time ago I wrote about doing circles and wreaths in my 2012 daily hand-stitching project.
Shannon left a comment: "Do you do them completely without marking? I think mine would always look lumpy on one side!"
I posted a short response to her comment, but thought that maybe it was worth a more complete discussion. So here it is. First, I did almost all of my daily stitching without marking, and at the beginning of the year, my circles did indeed look lumpy on one side. I improved with practice. But on many other projects I want to make some guidelines before sewing.
I have a terrible fear of visible marking. I'm afraid that the marks will misbehave and somehow ruin my work. I've heard too many stories of people who have used the alleged disappearing markers, but later found ghost traces, to ever try that approach.
The most I'll ever do is put a pencil mark on the back side of the fabric, but even that scares me. If I absolutely have to, I keep the mark in the seam allowance. I keep a white pencil around to mark dark fabrics if necessary (white pencil seems to wear off more easily than black).
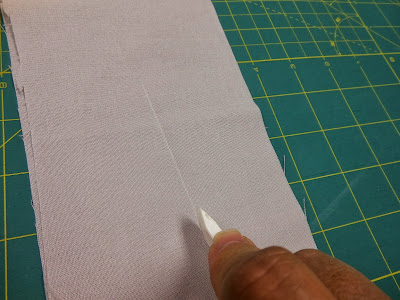
Instead, I like to mark things without writing implements, and that means creasing the fabric. We know that you can press in a straight line with an iron. But you can also set a temporary crease with your thumbnail or with a blunt or round-edged tool.
Some possibilities, from the top:
- a plastic hera tool
- the pointy end of a crochet hook
- the blunt end of a needle
- or this nifty marking wheel. My friend Terry Jarrard-Dimond gave it to me several months ago and I have been delighted at how well it works.
And then another friend, Heide Stoll-Weber, pointed out to me that the marking wheel is also good for making freehand curves. Some time ago I posted a tutorial on sewing freehand curves that depended on a paper template that you made with a rotary cutter. This allowed you to use the action of a rotary cutter to make nice, loose, artistic swoopy lines. Heide noted that if you use the marking wheel instead of the rotary cutter, you can eliminate the template and cut to the chase (or perhaps I should say chase to the cut).
Layer two pieces of fabric where you want the curve to go, giving yourself plenty of fabric underneath (you don't want your curve to run off the edge). Limber up your arm and make a swoopy curve, pressing hard enough to crease both layers of fabric.
Now separate the two layers, noting carefully which direction you need to extend for seam allowances. Switch to a rotary cutter and by eye, follow your creased curve a quarter-inch away.
The creased lines don't show up all that well in the photos but they do in real life, at least long enough for you to cut and sew as needed.
Tuesday, October 8, 2013
Subscribe to:
Post Comments (Atom)


Thanks! What is the name of the rotary marker?
ReplyDeleteThe heads-up on the marking wheel is timely - this weekend is the Knitting & Stitching show, full of vendors - I'll mostly be going for the displays, but will look out for one of these wheels.
ReplyDeleteHi Kathy
ReplyDeleteThanks for mentioning me and my favorite tool on your blog!
The tool is called Soft Tracing Wheel and it might be easier to find it in the (clothes) sewing sections than in the quilt notions section. Prym/Dritz "invented" it (of course not a new invention, it is just a better version of the old fashioned wobbly tracing wheel with the serrated blade that I know from the fifties when my mother used it to trace dress patterns on to newsprint paper with carbon paper in between). It is part of their "Ergonomics" line, and it actually is pretty ergonomic.
As I already pointed out to you there are a million uses for this little thingy, you can for example set in a circle by layering two fabrics both right side up on top of each other, drawing a nice circle and, also using the tracing wheel, marking a few points with a small line crossing the circle, so that you know the exact spot for pinning. Then just like when tracing the soft curves you add the seam allowances and clip the background fabric where necessary.
Instead of a circle you can also set in any amorphous shape, just do not forget to mark a few short marking lines to know where to pin before sewing.
And if you need to replace a piece of fabric in a quilt top that is already pieced, because you find it is not the right color - just put a piece of fabric underneath and trace along the sewing lines and voilà, there is the exact copy of the original shape, this time hopefully in the "right" color.......
Anything that normally needs a template because spontaneous improvisational rotary cutting would not do the job if the shape has an edge somewhere and turns from concave to convex (which would "eat up" the seam allowance) can now be done improvisationally.
It is the perfect synthesis between precision piecing and improvising.
And although having construction lines in improv piecing is a nice design element when using solids, it might not work so well if you are using fabrics with a distinct color transition (like my multicolored hand dyes) where a construction line would eat up two seam allowances and disrupt the color transition.
You see, I love this tool and think it should be one of the BSS (basic sewing supplies)
Thanks so much! I'm off to hunt for one.
Delete