Wednesday, January 31, 2018

Daily art report 3 -- word collage


One of my objectives in defining my daily map art so loosely was that I wanted to be able to experiment with different mediums, techniques and concepts.  If you're committed to a certain size and shape and kind of support every day you can't always explore a wild idea.  But this year I am empowered to do anything I want.


Years ago I made these two studies in a workshop led my my dear friend and wonderful artist Suzi Zimmerer.  She is a master of surfacing paper: using paint, stencils, and other print techniques she builds up complex patterns and then uses the paper for collage.  I made these papers using alphabet stencils, then cut out nonsense words and collaged them on top so the lettering is almost illegible.  I had always liked the effect and wanted to do more.

So I had the idea to cut words out of maps.  Leafing through one of the old road atlases that I'm cannibalizing for art, I stopped at Michigan and got the idea to focus on Bay City, where my father was born.  Inspiration: I would cut my top collage layer from Texas, which also has a Bay City, and juxtapose the two places.


 I liked the idea of letters blending into the background, but after I cut my script out of Texas and laid it on top of Michigan it blended in so well you couldn't begin to find it.  Note to self: in future, cut the layers from different atlases so you get different color and density effects.  But for now, I outlined the cutout letters with walnut ink before I pasted them down.

Verdict:  I love this concept and would like to try it again, even though it was time-consuming.  Not sure it worked as well with the maps as it did with the surfaced paper, but maybe I can combine both -- how about first surfacing a map with various paint and print effects, and using that as one of the layers?  I'll try that some day.

Monday, January 29, 2018

The excellent Christmas display


I know Christmas is over, but I wanted to show you the wonderful display that my dear friend and art pal Marti Plager had up for the holidays.  I've known Marti for 20 years or so and have been giving her and George Christmas ornaments almost that whole time.  This year Marti hung up a beautiful quilt of her own hand-dyed and -printed fabric, in a subtle green that made a perfect background for a whole lot of ornaments to be pinned up.


Many people have told me that they give some little place of honor to my ornaments, but I've never gotten such a great compliment as to have a whole wall full on display.  I am honored!

Sunday, January 28, 2018

Friday, January 26, 2018

Daily art report 2 -- imaginary places


Two years ago when I did a daily drawing, I bought a couple of sketchbooks that I really liked.  Each time I went through a sketchbook I would buy a slightly larger one for the next volume, gradually forcing myself to draw larger and larger as the year went by; the largest one was 6 x 8".  So when I decided on the map project for this year I thought that some of my daily pieces would be sketches, and again I bought a slightly bigger book -- this one is 6 x 9.

I called this Book 1 and decided that it would hold any kind of sketches, either totally imaginary maps, accurate maps depicting (perhaps) my travels that day, or chimeras that combine real and imaginary components.

I'm starting slow, still finding my balance, so it's not surprising that I returned to comfortable  patterns that I did many times during my year of daily drawing.  Several of the sketches have shown imaginary lands and cities in different scales, much like those I drew two years ago.  I was happy to see that my Micron pens in many different colors have not dried up in the interim, even though I have rarely used them.


When I was an early teen I would spend many hours drawing maps of imaginary cities.  As I recall, they were pretty boring cities, set out in rigid grids.  I especially liked naming all the streets.  I'm not doing that in my current maps, although I confess to sometimes thinking about potential street names when I'm walking, and I'm partial to alphabetical patterns so travelers can tell immediately that Maple Street is only one block beyond where they are now on Locust.

Hmm -- maybe that's an idea for a future day's map.

I'll show you more of my sketchbook maps in the next post.


Thursday, January 25, 2018

Daily art report 1


Three weeks into my new daily art project, it's time for a first report.  I have to say, I'm feeling kind of off-balance about this project.  I always expect that at the start of a year, no matter how the project is defined, but this year seems worse than usual.  My project is to do something with a map every day, but with no strictures on what that "something" might entail.

One of my great joys in doing daily art is watching the work accumulate -- the pile gets higher, the stitched areas get bigger, the sketchbook fills up, there's a new blog post every day or every week.   But because of the way I defined the project this year, that's not happening with the regularity I've grown to expect and like. 

In the first 24 days, I've worked on a 3-D assemblage, two different collages, a stitched piece and a large drawn map.  I've drawn in one sketchbook 10 times and in a second book once.  I've spent several days on the computer, getting Google maps for two different projects printed out to the proper scale and pasted together.


Every night I write down what I did in my master calendar, the only place where everything is recorded.  But the various things that I have made or worked on are scattered around in the studio or the office or the dining room table or the backseat of the car (because I had to take my Odyssey map to show off at book club).  That makes me feel a bit uncertain.

Also, so far I haven't made a single post to my Daily Art blog, where I usually document everything I do, because I haven't figured out how I want to treat work in progress.  I guess the best way is to wait till it's finished and then photograph it, whatever it is.  And meanwhile, I'd better develop a place to put the completed work, or at least a list of where I've stashed it, considering that pieces will be of different sizes, shapes and natures and won't fit comfortably into a single box.

I knew this project was going to stretch my comfort zone, but I didn't know I would feel this nervous about the bureaucratic part of the task.  I feel pretty good about the artistic part, so I suppose my best plan is to start taking pictures and showing you whatever I can about what I'm making and talk about what I've learned.  I'll do that in several posts coming up.

Tuesday, January 23, 2018

The blessings box


I went to a meeting at a downtown church, and was intrigued to find two glass-front boxes on the sidewalk in front.  One was the standard Little Library box, with some books in it, but the second was labeled "Blessings" and contained a couple of bars of soap and some packages of cheese crackers.  The neighborhood gathers a large number of homeless people, with various overnight and day shelters and soup kitchens, as well as freeway overpasses and secluded camps, so this seemed like a good way to dispense small useful things to those in need.

The next time I was in the neighborhood I brought a big bag of hotel soaps and shampoos that had been accumulating in my cupboards.  The box was empty and I was happy to restock it.  I was corresponding with my daily email pal and remarked that for those at the lowest end of the ladder, soap could be a luxury.  She wrote back, "but where will they use the soap?"


I decided I should be responding to more immediate needs, so the next time I was at the grocery store I bought eight jars of peanut butter.  That seemed like a good offering: nutritious, won't spoil, stand-alone if necessary.  I drove past the box a couple of days later and the PB was all gone, so apparently somebody wanted it.

I mentioned this to my son, who has way more knowledge of downtrodden people than I do.  He said food was always welcome, but maybe I should think about some other supplies that might be hard to get and warmly welcomed.  He suggested bandaids, painkillers, toothpaste and toothbrushes, tampons, hand sanitizer, wet wipes.  Also shoe sole inserts, because when you can't afford a new pair of shoes, the inserts make the old ones a bit less awful.  And, of course, sox, underwear, gloves, toboggan hats.

On our next grocery trip, while my husband browsed the produce, I browsed the pharmacy and found two bags full of things for the blessings box.


We've always given money to several agencies that help the homeless, but somehow I feel more personally connected now that I can put things into the box and see that they have been taken and used.  I'm going to try to keep that box stocked; maybe next time, a whole case of PB, and a lot of tube sox. 

Perhaps there's a blessings box in your town; if so, I recommend it for your charitable impulses.  Especially on very cold days.

Sunday, January 21, 2018

Wednesday, January 17, 2018

Odyssey 3


I had deliberately made my map smaller than my piece of canvas, to keep my options open for finishing.  I decided I liked the fringey torn edges, so I tore the sides to give me a similar border distance as the bottom of the work.  The right side tore neatly, but the left side didn't want to get started.  Maybe I hadn't cut enough of a starting point; I cut a little more.  Still resisting, so I grabbed both sides of the cut and gave it a really good yank.

It tore quite nicely, but not the whole way across.  When I released my whole-fist grips on either side of the tear, I was appalled to see what had happened.

For some reason, the tear, coming down from the top of the piece, took a right-angle left turn halfway across the canvas and extended a good six inches into the map!

What now?

The old Kathy would have probably
freaked out, and indeed that's what I started to do.  But I am happy to report that within seconds the new mellow Kathy who embraces accidental effects decided this was not a deal-breaker, it just required mending and people could just wonder what that was all about.

Fortunately I told my dear friend and art pal Uta about my mishap and she emailed back, thinking maybe there was a stitch I could use that would reference Odysseus.  And then I realized -- DUH! -- how about referencing Penelope, who took out her weaving every night?

So I mended the tear, leaving the long threads in the center intact, using just enough machine stitching to hold the piece together.  And here's what it looks like.

Like the mythical Odyssey, this journey ended up with more twists and turns than originally planned or anticipated.  But it's finished.

PS -- coincidentally, the canvas is technically a "Penelope canvas" -- that is, it's a plain weave but two threads are held together and used as one.  Perhaps that structure explains why it was so hard to tear.

Tuesday, January 16, 2018

Odyssey 2


The first problem in my mapmaking of the Odyssey came when I finished the stitching, pulled all the loose threads to the back of the work, and proudly showed it off to my husband.  As I displayed it, I realized that while the map showed the entire Mediterranean, it was hard for me to orient the part that is now Turkey to the world map in my head.  Except for the tuft of thread marking Troy, I couldn't figure out what I was looking at -- where was the Dardanelles?  the Sea of Marmara?  where was Istanbul?

I realized that for me, at least, I needed the Black Sea on my map to help me know what I was looking at.  Fortunately there was enough room on the canvas to add it.  So I went back to Google Maps and printed out the sheets to paste up (a brief dead end when I found that my printout was at the wrong scale).

Again, I cut out along the shoreline, positioned my template against the already-stitched sections, and added the seas.


How to get the complicated route onto the piece?  I didn't want to put any visible markings on the front of the work, and I also wanted the route to be more prominent than the background map.  I solved both those problems by flipping the canvas over and marking the route on the back in pencil.  I put a heavy thread in the bobbin and stitched from the back.

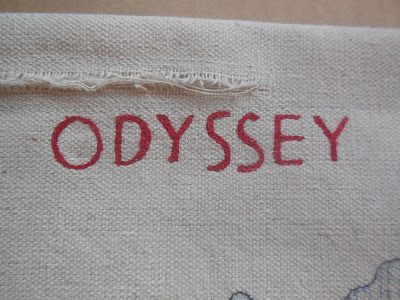
I added lettering to mark Troy and Ithaca, the two end points of the journey, and the title "Odyssey."  It looked pretty good. 

But wait.  Stay tuned for my final adventure in fiber art.

Monday, January 15, 2018

Odyssey 1


My daily art project for this year is maps, and I have finished the first large one that required several days' work.  It came about as a prompt from my art book club that never reads books: "myths and legends."  I'm not much on myths and legends per se so I thought maybe I could kill two birds with one stone and do a map of a myth.

The obvious choice is the Odyssey, a myth in which the hero spends 20 years going to and fro.  Since it's a myth, many of the locations are mythical, although scholars and archaeologists have put considerable research into trying to pin them down.  Some of the locations are clear: Troy, where the war occurred is still there (we visited it a while back) as is Ithaca, Odysseus' home.  Scylla and Charybdis are on opposite sides of the Strait of Messina between Italy and Sicily.  Ancient Carthage is modern Tripoli.

But other locations are less certain.  I looked at several maps and chose the one where Odysseus traveled the farthest west, making it to the coast of Spain, because it would spread the route farther out on the map and fill the entire Mediterranean instead of just making a knot of lines in the eastern part of the sea.

I printed out the maps from Google at a scale that was big enough to work with and small enough to fit on a piece of canvas that was waiting on my work table.  This took several sheets of paper, which I pasted together to make a single sheet.  Then I cut out along the coastline and used the shore parts of the template to stitch around, carefully with a free-motion foot.  I cut out the larger islands from the ocean and pinned them to the canvas for templates.  I marked the 14 stops on the journey with tufts of turquoise thread.  Finally I cross-hatched the water in blue, still with the free-motion foot.

But, like Odysseus, I ran into problems on the way.  I'll tell you more in subsequent posts.


Sunday, January 14, 2018

Friday, January 12, 2018

Tension headaches


Our fiber art group just scored two huge garbage bags full of old doilies and tablecloths in a variety of techniques -- crochet, tatting, hairpin lace, cutwork, bobbin lace, embroidery and who knows what else.  As we sorted through, contemplating what we'll do with them, I noted how some were obviously made at less-than-expert level craft.

And I thought, as I have so often in the past, that in every single fiber art, the key to mastery is control of tension.

Check out this cute little crocheted doily, made in granny squares.  The white is tighter than the pink, hence the 3-D effect.

When I first learned to crochet, taught by my mother-in-law, I made a fairly large afghan.  I was proud of how neatly it was done, flat and even -- until I finished and tried to fold it up.  Oops -- one end was a good six inches longer than the other!

What had happened, of course, was that as I got more comfortable with the yarn and the stitch, I eased up on the tension and the finished fabric got more expansive.

I have taught many beginners how to crochet, sew and embroider, and have watched myself try to learn knitting, weaving, felting, macrame and many other techniques.  In 99% of the cases beginners' work is too tight.  We clench up on the needle or hook or whatever tool we're using, we pull too hard on the thread or the yarn, we hang on too tight to the underlying material.  We grab that quilt in a death grip and resist the pull of the sewing machine; we wrap the french knot so firmly that we can barely pull the needle through; we tug the weft through the weaving so hard that the selvages bow inward. 

(Weavers may correct me on that last remark -- I think some beginners err in the other direction, leaving the weft too loose so the selvages are uneven and loopy.  But that's the other 1% of tension headaches.)

The problem usually disappears with practice; we relax, we learn to let the yarn flow easily, we develop muscle memory so all the stitches have the same tightness throughout the whole work.  In knitting parlance, we automatically maintain the right gauge without having to stop and measure all the time. 

That's not to say we can stitch in oblivion.  It's still good to stop every now and then, lay the work out flat, check how it's coming along.  Note whether your afghan is still the same width as when you started.  Check that the second sock is the same size as the first one.  Make sure your seams are smooth, not drawn up in a ruffle.  Look at the back of your work and see that the threads are well-behaved, not forming tangles and knots. 

It's not just the sewist that can have tension problems -- the machine can too.  In my experience, Bernina sewing machines, which I love, adore and have used exclusively for almost 30 years, have one achilles heel, and that's tension control.  I have had to learn tricks to keep them from spoiling my work: avoiding threads that the machine doesn't like, making sure the bobbin thread matches the top thread so if it's pulled up too far, it will be less visible. 

All these issues are part of mastering the craft of our art.


Tuesday, January 9, 2018

Why I hate my washing machine -- Exhibit A


A couple of years ago we made a huge strategic error in buying a new washing machine instead of repairing the old one.  Now we have a fancy water-saving model with no center-post agitator.  It supposedly cleans by gently sloshing the clothes around in two teaspoons of water, tossing and kneading and forcing water through them.

I hate it, but that's a topic for another discussion.

The other day I opened the tub after the wash was finished and this is what I found:

The entire load had been tossed and kneaded into a ball, wrapped in a flannel shirt.  So neat and taut, it looked like a ball of dough rising in a bowl.


Sunday, January 7, 2018

Weekly art for 2018 -- Found poetry 1


In the 17 years I've been doing daily art, I've always ended the year with a bit of sadness.  I have always been so happy with my choices of daily art projects that I've been sorry to see them go -- the last couple of days are always a desperate choice among several exciting ideas, some of which have been left on the table unexecuted.  I take that as a ratification of my decision to do daily art; somehow it taps into some deep need in my psyche, and that's why I keep doing it.

Last year my project involved text.  I would find phrases in the newspaper or in magazines and present them in ways that said something interesting.  As the year began I wasn't sure exactly how this was going to work out.  I had been in the habit of doing haiku from found text so I spent many, many hours finding, clipping and organizing 5- or 7-syllable phrases.  But as it turned out, I used only a fraction of those haiku bits.

I also experimented with other recurring formats, which I will tell you more about in a few subsequent posts.

At about mid-year I figured out how to find "poems" from clippings that didn't follow the haiku format, and thus much richer in possibilities.  Those turned out to be the most rewarding of the formats I used during the year.  After spending many, many more hours finding and clipping these text fragments, I found myself with hundreds of potential "found poems" in my pile that had never made it to fruition.

When the year ended I first rued all the hours spent on unused clippings.  I don't even want to think about how many hours we're talking about -- certainly hundreds.  I was sad to see the 2017 text project end not just because I loved doing it, but because of all that investment that might go to waste.

As I contemplated my daily art rules for 2018 I thought I would continue doing "found poetry" -- not daily, but weekly, as my regular Sunday blog post.  I like having a regular feature on Sundays, for many of the same reasons that I am drawn to daily art: I like the structure, and the discipline of the recurrence.

So here's the first of my Sunday Found Poetry posts for the new year.  I hope you will enjoy reading them.  And you can check out all the daily texts from last year HERE on my Daily Art blog.

Wednesday, January 3, 2018

The very first Christmas present


I should have posted this a week ago, but was having too much fun walking on the beach.

For purposes of family documentation, here's Vivian's very first Christmas present ever.  As you might expect from somebody 7 1/2 months old, she had lots of fun ripping the paper off and wapping it to make noise, and paid absolutely no attention to the present inside.

Family lore has it that the Christmas when I was 18 months old I loved to unwrap gifts.  In between, I would yell "More packies!  More packies!"  My parents cleverly rewrapped empty boxes and put them in front of me for several days of delight.  Perhaps all parents should do that for all children forever, to increase fun and decrease consumption.

Over the decades, "More packies!" has been our family euphemism for greed.  We forget that at first, the only greed in very young children is to learn new things, to practice and get better at them, and to delight in the world around them.  May we all stay greedy in those ways for the rest of our lives! 

Monday, January 1, 2018

Daily art for 2018


I've been doing daily art for almost 20 years, in which I determine a rule at the beginning of the year and then follow it every day.  In the past I've made quilt squares, sent postcards, taken photographs, made collages, done drawings and hand-stitching.  In all of these projects the rules have determined the format of the daily work -- all the quilt blocks would be five inches square, the drawings would go sequentially into sketchbooks, the photos would be posted to my blog. The format was set, but the subject matter was totally open.  That approach made it easy to keep track of the work, and made it easier to get started every day, because I knew pretty much what the finished product was going to look like.

But this year I decided to try a new approach, and choose a theme rather than a format.  In effect, it's the traditional rule turned inside out.  Every day's artwork must involve a map, but any format or medium is OK.

When I started thinking about my next daily art project, in October and November, I was a bit apprehensive about this approach.  Was it too loosely defined?  Would I be afraid to work without the net of the strict format?  Fortunately, the minute I heard myself think that last question, I realized that was the dumbest thing I had thought in a long time.  If at this point in my artistic career I couldn't work without a net, I didn't deserve to call myself an artist.

As I was contemplating, I thought of many different ways that I might choose to do a map a day.  I would probably want more than one sketchbook, one for each size and theme.  And I would absolutely require a master book in which to record what I did each day.  But having been away from home for 10 days over the holiday, and sick for a week before that, I have not yet been to the art store to get the requisite books.

When we returned from our vacation on New Year's Eve, I found a package on the front porch: a calendar from my friend Rosemary Claus-Gray.  Illustrated with pictures of her art, it's intended as a permanent notebook of birthdays and anniversaries, but the second I opened it I realized it would be the perfect master list for my daily art.  Clearly the universe is smiling on this project.

On Day 1 I worked on a collage/assemblage piece that's covered in a map, and here it is recorded in the master book.


You can look at the last eight years of my daily art on my daily art blog HERE, and I'll be posting the daily map work too, every week or so.