Thursday, April 29, 2010

Writing on fabric

A couple of people have written me about my recent post on writing, and said they are interested in writing on fabric. Following my breakthroughs on writing on paper, I have also begun to write on fabric.

You may have read that I participated in a collaborative venture last year organized by Terry Jarrard-Dimond, and she gave me the leftovers from that project to sew together. One of the participants, Gayle Pritchard, had drawn with fabric marker on red fabric, and not all of that fabric had made it into the finished quilt. I considered whether to discard that fabric in making my leftover project, and decided not to. I was pleased that the marks gave a little extra life to the piece I sewed.

I thought maybe it would be fun to make my own marks instead of just cut up Gayle’s work, and decided to write rather than draw. Having recently taken my eye-opening workshop with Laurie Doctor, I thought it was a good idea to keep my writing unreadable. I didn’t want people to focus on what I was saying, just see that the writing was there as a secret subtext that they might guess at but could never decipher.

My work method in many of the quilts I’m working on now is to strip piece expanses of fabric, slice them into more strips and then reassemble. I used a fabric marker and wrote relatively large – a line of writing would fit comfortably onto a 1-1/2-inch strip.

Here’s a picture of stage one in the strip piecing. You can still make out some words but that will be impossible once I slice the strips in the other direction.

Here’s a picture of the finished piecing, with a ruler for scale.

As I piece, I’m playing with how I distribute the writing across the quilt. Some areas are relatively dense, with writing in almost every little piece. Others have sizable expanses with no writing at all. I like the overall effect and think I’ll continue to use it.

Tuesday, April 27, 2010

Channeling Dad

My father was quite a guy in his day. He was one of the most important figures in newspaper typography, changing the looks of newspapers throughout the Americas in the 1960s and 70s. He took them from stodgy, gray and ponderous to light, readable and appealing. He was totally self-taught as a visual practitioner and connoisseur; as a very young man he took up lettering and made signs, invitations, certificates and cards by the gazillion for the rest of his life. He loved art, painted occasionally, drew wonderful cartoons and was a prodigious collector, although I don’t think he ever took a course, either in art history or art studio practice. He raised all his children to be art lovers and art owners, equally at home in museums and art shows. (Not galleries – we preferred to acquire our art cheap and direct.)

As a little child, I sat in my high chair while he would simultaneously make art and babysit. As I grew up, I retained my customary position over his left shoulder watching him at his drawing board. I can’t tell how many hundreds of hours I spent in my life watching him at work.

Curiously, for a much-doted-upon Daddy’s girl, I never had my own drawing board or my own pens to work with in parallel to him.  He didn't provide them (although I did get my own typewriter at age 4) and I never thought to ask.  At a certain point in my teenage, Dad suggested I might learn calligraphy, and I obediently got a broad-nib pen and tried to write a fine Italian hand. But my taste in calligraphy was light-years ahead of my ability and I couldn’t stand to look at my own clumsy writing, so that endeavor was quickly abandoned.

I had known from early childhood that I couldn’t draw, and now I knew I couldn’t do beautiful writing (my ordinary handwriting was decent, and totally legible, but it sure wasn’t calligraphy). Decades later when I decided to become an artist I realized that I had a huge mental block regarding pens, pencils, brushes, crayons or any other standard mark-making tools.

I could make marks with confidence and character using a squeeze bottle. This allowed me to make good work using dishwasher gel for bleach discharge. (It also allowed me to make beautiful marks with olive oil in a frying pan, somewhat less applicable for my artistic ambitions.) I could also make great marks with a sewing machine, leading to lots of beautifully quilted work.

But put me in the same room with a piece of paper and I froze. For some reason this was a source of unhappiness. I could easily make art for the rest of my life by sewing – and I still think of sewing as my “real” art – but I want to do something with paper. I did make some tentative progress with collage (not too bad with scissors and glue) but could not do anything with writing implements.

Then something wonderful happened. Last winter I took a series of workshops with Laurie Doctor, a calligrapher and painter whose work I love. She set us to work with an exercise she calls “writing, writing, writing” – you spend 15 or 20 minutes writing continuously, never lifting your pen or pencil from the paper, writing backwards and forwards and on top of stuff you already wrote, sometimes with your eyes closed, sometimes with a white pen so you can’t even see what you’re writing. She told us to write actual words, rather than scribbles, but that we could (should?) make them illegible and thus secret so we didn’t have to feel self-conscious.

A few hours into the class I felt a door open up in my head. In this new place, writing didn’t have to be readable!! You have to understand that my entire life had been spent believing that the sole purpose of writing was to convey information. My dad’s whole professional life, summed up in one word, was readability, and as a family we believed in legibility and readability right up there with God. So this new idea was life-changing.

Next, Laurie had us write with a mussel shell, dipping the pointed end into the ink. It made an irregular and unpredictable line and I was enthralled by how crudely I could make my letters and still be happy. In fact, the cruder the letters, the happier I was! Wobbles and blobs and lopsided ovals only added to the character and strength of the writing.

Another door opened up – writing didn’t have to be beautiful!! That was another life-changing idea. We had always revered beautiful type and beautiful writing and scorned awkward handwriting and clunky typefaces. But maybe I didn’t have to do that any more.

Laurie wanted us to practice at home in between workshops, and about then I came upon a jar of Dad’s pens. He died in 2007, my mother died in 2008 and I still don’t have all their possessions totally organized and in place. So finding the pens right when I could use them was a little omen. I was amazed that my five minutes a day of writing turned into an hour or two – all I wanted to do was turn on the radio, make a cup of tea and write with a pen.

And in that lovely zen state I feel so close to my father, as though now he’s sitting over my left shoulder watching, just as I watched over his shoulder for so many years. I feel that I am channeling his inner calligrapher, the one that has now been liberated from being readable and pretty and nice. I suspect it never crossed his mind to be liberated from all that he held dear. But I also suspect that the same secret rooms existed in his head – maybe exist in all our heads – and he just never had the chance to see those doors open. What a joy now for me to be walking with him down this wonderful and totally unexpected path!


top -- writing with a mussel shell -- not beautiful!


bottom -- writing with a pen -- not readable!

Sunday, April 25, 2010

Fiberart International -- part 2

As part of the opening weekend of Fiberart International, the sponsoring Fiberarts Guild of Pittsburgh put on a day-long forum with a refreshingly simple format – artists with work in the show would stand in front of their work for an hour, and people could walk around and talk to them. Of the 78 artists in the show, 43 were scheduled to participate in the forum. A few artists from Europe were on hand, having embarked before the volcano grounded air traffic, but several others didn’t make it.

Every artist that I talked to was happy to let you touch the work, turn it over to see the back, take pictures or otherwise poke and prod. Of course, isn’t that the very best part of hanging out with other artists? What is more exhilarating than what we high-mindedly call the studio visit? Which of course is nothing more than seeing a lot of somebody’s work, talking about it, touching it, getting to know it up close.

Some of the conversations were educational. Wendeanne Stitt told us how she prepares Hawaiian bark cloth in the traditional manner – it starts with growing the trees to the proper diameter and proceeds through soaking, scraping and other time-consuming steps.  Her title, Shark Teeth, refers both to the pattern and the tool used to scrape the bark.


Wendeanne Stitt, Niho Mano (Shark Teeth)

Some were personal. Anne Wolf told us how she started turning old jeans into 3-D, anatomically correct human hearts about the time her newborn son needed to have heart surgery.


Anne Wolf, Hearts for LM  (one of six in the display)

Some provided insights into the artist’s larger body of work. Rebecca Siemering told us how she picks up lottery tickets from the street (or these days, receives them in huge quantities from friends who pick them up from their streets) to make objects like her man’s suit in the show, or flags.  (From up close it's hard to see that the suit has stars and stripes; at the crowded opening reception I didn't see this, but the next day I was able to see the work from across the room and discern the colors.)


Rebecca Siemering, American Made

Some were helpful in figuring out just how large pieces of work had been constructed. Barbara Wisnoski described how she strip-pieces bits of fabric together into large expanses, then slices the expanses into small strips and reassembles them without any background layer.  This piece is 60 inches in diameter; I put my finger into the detail shot for scale.


Barbara Wisnoski, Folded Circle (Redeeming Vermilion)

I liked this format a lot. I’ve sat through too many panel discussions and presentations where for one reason or another – a poorly prepared speaker, a microphone hog, a problem with the slide projector, a program running late – the audience never gets its money’s worth. How refreshing to just be able to talk with the artists, see the work up close, ask questions, unmediated by technology or distance. Many of the artists brought along supporting materials such as samples of their materials, photos of their work in progress or scrapbooks of their other works. There was plenty of time to engage with one artist for a while or to make the rounds and talk to everybody. And as a participant I was very pleased with the attentive volunteers who made my every move easy and comfortable.

Congratulations and thanks to the Fiberarts Guild for putting on a most pleasant day.

Saturday, April 24, 2010

Art-A-Day


April 18 -- Zanesville, Ohio, behind the dog food factory

April 19 -- new growth


April 20 -- lichens

April 21 -- Kroger flower shop

April 22 -- woven


April 23 -- Laurie's garden


April 24 -- mistletoe

Fiberart International 2010

It’s been a week since the opening festivities for Fiberart International 2010 in Pittsburgh but I’m not sure I have yet digested the experience. As with many “survey shows,” where the jurors want to display a wide range of what’s going on in the field, the work was all over the map.

In such a show you expect quilts, tapestries, embroideries and basketweaving with excellent workmanship. You also expect some works that flaunt what I might call “non-traditional workmanship” – deliberate use of techniques that the quilt police or tapestry police or other cops would find horrifying. You expect works using fiber techniques to manipulate non-fiber materials. You expect reuse of old household textiles.  You expect found objects (aka junk) to make an appearance. And you expect some deliberately jarring juxtapositions of elements. You can imagine a large matrix of possibilities and the jurors trying earnestly to fill in all the spaces.

Which they pretty much did. One juror commented in the catalog on the very limited presence of knitting (one dress with dozens of triangular “pockets” sticking out) and crochet (nothing), and on the small number of large 3-D works; another commented that digital technology was far less prevalent this year.

Some spaces on the grid had a disproportionate number of checkmarks. There were many, many works with representative images of people – by my count, 18 out of 85! There were many, many embroideries with the knots and thread ends on the front of the work. There were many pieces with themes of destruction, pollution, and other nasty processes. Several pieces were straight-pinned to the wall.

There were a lot of pieces that explored non-traditional precincts of fiber art: A stretched embroidery with an inset video screen playing an animation of the embroidered image. A weaving with holes burned in it. Beading and felting around found objects, sticks, gourds. A man’s suit entirely covered in lottery tickets.  Pieces of X-ray film sewed together into human figures.

Then there were the shock-element pieces, those where the artist apparently said “what can I put together that nobody would expect?” Some were totally successful, as with Claire Taylor’s crushed plastic coffee-container lid, encrusted with a bazillion mold-like green french knots as nature wins out in the end. Others didn’t get far beyond the gee-whiz level; they reminded me of student work, endearing in its enthusiasm as the kid discovers that hey! you can actually sew a potato chip bag to a piece of fabric! but lacking in substance.

To my eye, there were too many pieces in this category. Coiled baskets held together with plastic cable ties instead of cord; hand-stitching through photographs; beautiful tiny bits of embroidered felt packed in little plastic bags for display; an “interactive” piece where viewers got to stick up little vinyl figures onto velcro dots on a vinyl background. They were different, yes, but the ratio of gimmick to art seemed a bit too high.

After I visit a museum or show I often ask myself, if I could take one piece home with me, free, which one would I choose? On reflection I could find several pieces in this show that I liked, a couple that I liked a lot, some that I’d be happy to take home with me, but nothing wildly excitingly wonderful that made me say YES!! THIS IS THE ONE!!

I will write more next week about the show and some specific pieces in it.

Sunday, April 18, 2010

Art-A-Day

April 11 -- fruit market


April 12 -- landscape with torii gate


April 13 -- smoke tree


April 14 -- well-balanced


April 15 -- behind the grocery store

April 16 -- seed

April 17 -- Pittsburgh Strip


Thursday, April 15, 2010

Quilt Date for April

Now that taxes are over with, it’s time for fun – the April quilt date! You will recall that I promised to introduce you every month to a new concept or technique. After one date maybe you will have had enough, or maybe you will want to see him a lot more. This month’s date is another piecing technique, this one to make very, very thin lines.

I like to piece in lines about 1/8 inch wide, and I like them to be as uniform in width as I can make them. I know that many other quilters like to use the swoopy pieced line – shaped like the Coca-Cola swash, with wides and narrows – but that’s not the look I’m after. And I like to cross one narrow pieced-in line with another one, often at odd angles. It took me a while to figure out the best technique to get the lines to look sharp and the quilt to lie flat.

I use much narrower seam allowances than you typically find in quilting – more like 1/8 inch than 1/4 inch. I cut my strips a shade under 1/2 inch wide, and always on the cross grain, so the fabric has some give. In my earliest attempt to piece very narrow strips I cut them on the lengthwise grain (that seemed the logical thing to do) but realized that they had no stretch at all and after stitching, they seemed to tighten up a bit. As a result, the larger pieces of fabric on either side of the narrow strip seemed to pucker and bulge out, and no amount of pressing could save the day. When I switched to cross grain, everything lay beautifully flat.

Here’s my routine for making a quilt like Fault Lines. Fault Lines 3 will be on display in Europe this summer. I can't show you the whole quilt yet, but I had a detail of it in a recent post.  And I will be teaching the technique in a workshop in Japan this summer, part of my wonderful Quilts Japan Prize from Quilt National last year.

In brief, I start with a large expanse of fabric and cut a slice down the middle. I piece in a very narrow strip and the fabric expanse is restored. Then I slice across the entire fabric in another direction and piece in another narrow strip. Eventually the strips criss-cross into a complex pattern.


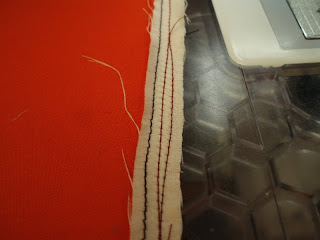
Step 1: Cut a piece of fabric larger than you want your finished piece to be. Mark two adjacent edges of the fabric – I generally put one line of stitching on one edge, and two lines of stitching on the other edge, but you could use a marker or different colors of thread. This will help you remember which side is up (this is more an issue than you might think).


Step 2: Holding the fabric with one of the marked edges up (away from you on the cutting mat), slice the fabric from top edge to bottom edge. Put the left-hand piece aside or on your design wall. Flip the right-hand piece face down, keeping the marked edge up (away from you/first through the sewing machine). Layer the narrow strip underneath it. Stitch about 1/8 inch from the edge. Do not press.


Step 3: Keep the right-hand-piece-plus-narrow-strip in the same orientation you had it before: face down. Take the left-hand piece and position it face-up UNDER the right-hand-piece-plus-narrow-strip. Align the two pieces at the top, making sure both the marked edges are still up/away from you/first through the machine. Flip the narrow strip out from under the right-hand piece and open it out so its right side is against the right side of the bottom fabric. Align the edges.

Step 4: Stitch down the narrow strip. This is not like most quilt piecing, where you watch the edges of the fabric to make sure you’re keeping a uniform seam allowance and sewing in the right place. Instead, you watch the seam line at the left of the narrow strip. You want to position your stitching so the strip maintains a uniform width. That means the seam allowance at the right may be uneven, but that’s OK, nobody will see it.

Meanwhile, your left hand will be busy gently tugging the top piece of fabric outward so it doesn’t ooze underneath and get caught in the stitching (remember, you haven't pressed that first seam, and its natural inclination is to NOT lie open).


Step 5: Inspect the narrow strip and see if you did a good job of maintaining uniform width. If not, go back and restitch. Mistakes almost always occur when the presser foot drifts too far to the right, as in this photo.

This happens because the layers of fabric are much higher on the left – especially later on in the quilt where you’re crossing previous piecing -- so the presser foot slides off to the right, making your strip too wide. You don’t have to rip out the bad stitching, just put a new line of stitching inside it at the correct place.


Sometimes you will want to correct the stitching in a too-wide place by resewing the seam you just put in. Other times you will want to turn the piece around and resew the first seam.

Step 6: Press the seam allowances all in the same direction. This is not necessarily intuitive. You might think to press each of the seam allowances away from the pieced-in strip, because the strip is so narrow that the seam allowances might overlap. But if you press that way, the strip will be only one fabric thickness tall, with three thicknesses tall on either side. The strip will noticeably sink down and recede from the viewer, an effect that I don’t want. So I press everything to one side or the other.

Which side should you press toward? Find the marked edge that was on “top” where you started this seam. Now identify the OTHER marked edge. Press your seam allowance AWAY FROM the other marked edge. You’ll see why in a minute.


Step 7: Slice the quilt in another direction so the slice crosses a previous strip. Arrange your pieces so the marked edge is at the top (this is not the same marked edge you had on top for the first seam – it’s the other marked edge). When you cross your previous stitching the seam allowances will be pointing toward you and away from the machine.


That means they’ll feed into the presser foot seam first. If they feed seam allowance first, they can easily get caught in the feed dogs and turn over, making bulges and lumps.


Step 8: As the quilt gets more complex and your lines of piecing cross previous lines, you will get to intersections where you think it’s impossible to stitch a straight seam. There are so many layers of fabric where a seam allowance has been pressed back on itself that it’s like mogul skiing – huge bumps and lumps that you need to navigate across.


The way I do it is to use my needle-nose tweezers to hold down the bumps and lumps so I can sew past them.

As the quilt gets more complex you will also find it more challenging to decide where to place your next slice. Don’t go too close to a previous intersection, because it’s very difficult to piece across so many layers of fabric. If you use a lucite ruler you can see the whole quilt and make sure your slice is going in a good place.

I like the slippage effect when the pieces get put back together – the intersecting lines don’t match up exactly on either side of the new line. In fact, the slippage is why I decided to name my series “Fault Lines.” You’ll also notice as you make more slices that the edges of the quilt can get very ragged. That’s to be expected; you’ll have to trim off a fair amount of fabric at the end of the project.

I suggest a small sample, maybe 14 x 20. It will shrink with each slice, but this way you can make several lines in each direction and it will still be big enough for a placemat, if it comes to that. I also suggest you choose a fabric for the lines that is lighter in color than the background. That’s to eliminate potential problems with show-through.

If you like this technique, here are some ideas for the second date:

• Do the same thing on a larger scale than your sample.

• Make several modules on the same scale as your sample, and join them into a larger piece.

• Experiment with different angles and densities of lines. For instance, here’s a quilt where all the cuts are at right angles – a totally different mood.


• Or anything else that strikes your fancy.

Let me know how it works out. If you want to send me a picture of what you made, I’ll post it.

Have fun!

Wednesday, April 14, 2010

Copyright -- or today, copywrong

This morning somebody posted the following story on the Quiltart list:

My grandson is in the 2nd grade. Yesterday I was drawing in my art journal and he said he wished he had one to draw in so I gave him one... he sat there staring at it so I asked him what the problem was. He didn't know what to draw. I suggested he find a photo of something and try to draw it....for practice, just to see if he could make a drawing that looked like it. His reply? "I can't do that, Grandma, it's a violation to copy it, I could get in trouble!" I asked him where he heard that. His teacher is teaching 2nd graders about copyright laws.

Now what would the ordinary grandma respond? She would say “well, dear, copyright laws have to do with people selling their work. They have nothing to do with you copying a picture into your sketchbook. Don’t worry – of course this is OK. Artists all over the world for all of history have learned to draw by copying pictures into their sketchbooks. In fact, you could probably go to the museum and see some of them doing that today.”

But no, this grandma didn’t say that. The story resumes:

This restores MY faith to some degree in public schools... I sent his teacher an email today to thank her for getting this vital part of educating the masses started at an early age.

Hmmm. What to comment on first.

How about the fact that the teacher has obviously taught the kids wrong? If the nine-year-old thinks he can’t copy a picture from a magazine into his sketchbook, either the teacher told him the wrong thing or he seriously misunderstood her.

Of course, it’s not surprising that the kid (or the teacher) got it wrong. Copyright law is so complicated that even copyright lawyers can’t tell you with any confidence how a given situation is going to play out in court. And it is so widely misunderstood that people are ready to step up and tell the world that just about anything you can name is a violation of copyright. (Not to mention the fact that at least half of those people think it’s “copywrite.”)

But I wonder about the enduring consequences of the eight-year-old getting this wrong idea. Will he next refuse to copy a problem out of the arithmetic textbook to do homework or quote a line from a poem in his book report because it’s wrong to copy from a book and he could get in trouble?

Or how about the fact that the teacher has chosen, of all the complicated grownup things in the world to oversimplify and misrepresent to second graders, copyright law? Why not explain the tax code or NAFTA or the Medicare prescription drug plan, all equally relevant to children?

Or how about the fact that grandma thinks this is a good idea? She thinks that copyright law is a vital part of educating the masses at an early age? I’d settle for reading and arithmetic, and science and democracy  – and encouraging kids to draw in their sketchbooks rather than scaring them away from it.

Saturday, April 10, 2010

Looks a lot like selvages

One of my regular readers, Elena, just put a comment on an old post where I was talking about my quilts made out of selvages.  I said I love selvages because of all the printing on them.

Elena provided a link to a cool new wallpaper, introduced this week, that incorporates recycled newspaper, with the printing still visible.  It reminded her of my selvage quilts, and of course I agree!

wallpaper -- "Newsworthy" by Weitzner


selvage quilt -- "Jaunty F" by Loomis

Elena read an article in the Los Angeles Times.  When I checked it out, I recalled that I saw an article on the same product in the New York Times.

This has my head spinning tonight!  Don't know whether I want to go make another selvage quilt, or make wallpaper out of some selvages (it would probably last a lot longer than the wallpaper made out of newsprint).

Thanks, Elena, for the link!


Art-A-Day

April 4 -- infrastructure

April 5 -- almost blooming

April 6 -- bunny on a rug

April 7 -- at the airport

April 8 -- steps

April 9 -- translucent

April 10 -- have a seat

Friday, April 9, 2010

Critique -- good or bad?

Well, enough about children for a while -- let's write about grownups.  It seems that every day on the Quiltart email list somebody posts a message inviting people to visit her blog, look at her currently stalled work in progress, and give suggestions. Or maybe to look at her new quilt and suggest a name for it. And apparently many people respond to such calls for help.

I have been known to put out calls for help, too, but only to my closest art friends. The thought of posting a work in crisis for the whole world to see strikes me as only slightly less horrifying than walking down the street in my underwear. Which brings me to the subject of critique.

Half of me loves to get comments from people on work in progress (at least from people I respect and trust). The other half feels slightly guilty, as though a Real Artist communes only with His-or-her Own Self and God, and other people’s opinions can only pollute the Holy Mystique of Making Art.

So when Van Gogh and Gauguin were hanging out together in the south of France, did they each in turn put their work out in the evening so the other could point out what looked nice and what part was awkwardly painted? Did they give one another suggestions for what to do tomorrow? If one guy despaired that his picture was crap, did the other one console him, oh, it isn’t really that bad, just fix that part in the left-hand corner and it will be quite nice, don’t be so hard on yourself?  Did they ever say, this is not your best work, put it away and start something else?  Somehow I have a hard time thinking they operated that way.

I have been in a small critique/support group for something like a dozen years and it is the most important relationship in my artistic life. We know each other so well that we don’t have to spend time explaining where each new piece came from; the others know whether it’s another in your continuing series or a dramatic new concept. When we comment, we can make analogies to the piece you did three years ago or the time you switched from stretched work to loose display. We love each other, but are willing to say when we think something doesn’t work -- and willing to listen when the others say that. Kind of like being married for a l-o-n-g time.

This week I took three pieces in fairly advanced stages of construction to our meeting for critique.  I have been sewing frantically for weeks, feeling very nervous about the impending Quilt National entry deadline. It’s not till September, but my summer calendar is already silting over with travel plans. And I want to work BIG. Since our last meeting, I have made about 50 square feet of piecing so it covered a lot of display wall, and it was all new since last month.

There’s a much better display wall at our meetings than in my studio, and I’m always surprised at how different my own work looks when I see it in the new context. Or maybe it's just seeing it in the presence of others.  One piece accounted for two weeks of work, at which point I was convinced it was ruined, took it down from the wall, folded it up and started something new. But this week when I put the pieces back up on the wall, my friends thought it was wonderful.

A second piece was about 96% finished, I thought, and I expected oohs and aahs when it went up on the wall. Instead the reaction was subdued. They were worried about how I was going to quilt it (I wasn’t worried about that at all). Instead I was worried about what additional piecing had to be done (they said don’t do any more; it’s finished). I loved the way the top half looked but was disappointed in the bottom half (they loved the bottom half but weren’t sure about the top).

I decided maybe this wasn’t as great a work as I had thought while I was making it. Still don’t know how this is going to play out, whether my doubts will evaporate or remain.

The third piece had originally been conceived as the second part of a diptych with the first piece but about the time I took the first piece down in disgust I came to the conclusion the two pieces did not play well together (my friends agreed). I liked the third piece a lot more than the first one, but after the critique I felt less positive.  But this one is in its earliest stages; it has a long way to go yet.

So I drove home feeling dubious. It will take a while to digest what everybody said, and my own second thoughts. In the past I have sometimes done what my friends suggested, sometimes ignored their comments entirely. I spent yesterday working on the third piece, fixing a construction problem that I had been ignoring until the critique made me realize it had to be dealt with, and the sooner the better.

You will notice I am not posting photos of the three pieces and inviting suggestions from my blog readers. Even if I wanted a whole lot of additional input, Quilt National won’t accept work that has been seen in public. I think the rules still allow posting on the artist’s own blog, but once it’s on your blog it’s up for grabs in cyberspace, and why would anybody take the chance that an unwitting or malicious websurfer might grab your image, post it elsewhere and tank your dreams of glory?

But I will post a couple of detail shots so you can see the type of piecing I'm doing.

the first piece (I was unhappy; my friends loved it)

the second piece (I liked the parts they didn't, and vice versa)


the third piece (not very far along)

Thursday, April 8, 2010

Zoe starts a new quilt

At the risk of sounding like an elementary school art teacher (not that there’s anything wrong with that) I’m going to write about kids again today. Seems like my blog has been full of little people lately as I’ve welcomed a new baby to the family and recalled lots of babies in my past, not to mention my project for kids at a Pittsburgh museum. But yesterday our granddaughter Zoe spent the day with us and the first thing she said was, “can we make a quilt today?”

In her last quilt, Zoe did the sewing but I cut the strips and pressed after every seam. This time I decided she could learn to do these tasks for herself. After an extended lecture on rotary cutter safety (ask me how I know) we worked out a routine. First attempts to have her both hold the ruler and cut didn’t work very well, so she positioned the ruler where she wanted it; then I held the ruler in place while she cut.


In hindsight, think my work table is a little too high for Zoe and she didn’t have enough leverage to lean on either the ruler or the blade with good force. For subsequent cutting projects we’ll either give her a stool or move to a lower table. Yesterday it was simpler to let her concentrate on wielding the blade without having to worry about the ruler slipsliding away.

Then, after a lecture on iron safety (fortunately I have no burn horror stories to relate, but didn’t let that get in the way of a good lecture) she got to iron her fabric and press her seams.

We had another milestone yesterday – we had to raise Zoe’s sewing table two inches because her knees weren’t fitting properly underneath! Not really a surprise, as she’s been using it for almost two years at its low level.

Oh, the quilt itself …. We scoured every fabric drawer in the house for hot pink, which I would always tell you is one of my favorite colors but for some reason has all but vanished from my stash. I thought I owned enough print fabric of every conceivable color and color combination to satisfy anybody’s needs, but I was mortified to find so little pink. We did eventually find enough to get us through the day, but  the next step in Zoe’s quilt education may have to be a trip to the fabric store.
She’s making blocks of random-width strips that are going to finish at 12 inches square. We’ll eventually arrange them in rail-fence fashion, with alternating blocks striping horizontally and vertically. She’s more than halfway through her initial piecing.

(We thought we had started with nine strip sets, so the finished quilt can have nine blocks, but two of them joined together in the course of chain-piecing.  We'll deal with that at the next session.)

Tuesday, April 6, 2010

Art for kids

I am going to get a double honor this month. I have a quilt in Fiberart International 2010, the prestigious triennial show that opens in Pittsburgh on April 16. And I have also been invited to be the guest artist for a “drop-in studio” that will be set up at the Society for Contemporary Craft, where my piece will be on exhibit.

The drop-in studio is a place where visitors can make a little bit of art to take home. It’s usually children 4-10, who spend between 15 and 45 minutes working. The museum likes to present projects that relate to art on display at the time.

Postage 1: Regatta -- detail
on display in Fiberart International 2010

My work on display is one of my “postage” quilts, a grid of little stitched rectangles that are suspended from threads. My project for the drop-in studio is to let the kids make patches by glueing little designs to 2-inch squares of denim. The museum is going to cut the squares from old jeans and come up with a pile of fabric scraps that can be cut into designs. Low-budget projects being a good thing in the art world these days, this one should be a real winner because the only thing they’ll have to buy will be a bottle of Elmer’s Glue.

I have made a bunch of samples that will be on display, and last week I invited my granddaughter Zoe over to make some patches and then model possibilities for what to do with them.


Note patch affixed to backpack

Unfortunately, the drop-in studio is unsupervised, and while scissors are OK, the staff is hesitant to put out needles. So if any sewing has to be done, it will have to be done at home. It will be OK, of course, to glue the patches to shoes, caps, notebooks, backpacks, etc. but not to anything that has to go through the wash. But I hope that some grown-up will step up to the plate and help the kids sew the patches on their sweatshirts or pants.